Solve differential equation with anonymous... Learn more about differential equations, ode45.
from Google Alert - anonymous http://ift.tt/2xqX2el
via IFTTT
Saturday, September 23, 2017
Anonymous Anonymous
Home · Sign up · How it works · Help · Sign in · Start a Fundraiser. Try searching for locations, campaign titles and names. Explore Category; Medical ...
from Google Alert - anonymous http://ift.tt/2xBZMru
via IFTTT
from Google Alert - anonymous http://ift.tt/2xBZMru
via IFTTT
I have a new follower on Twitter
Arsalan Mosenia
Arsalan Mosenia, Ph.D., Research Scientist @Princeton University #IoT, #Privacy, #Security, #Autonomous, #Vehicles, #AI, #Data #Analytics, and #Wearables
New Jersey, USA
https://t.co/0mW4W0aNUO
Following: 900 - Followers: 705
September 23, 2017 at 11:55AM via Twitter http://twitter.com/Shad0wWa1ker
Getting started with Deep Learning for Computer Vision with Python
This blog post is intended for readers who have purchased a copy of my new book, Deep Learning for Computer Vision with Python.
Inside this tutorial you’ll learn how to:
- Download the books, code, datasets, and any extras associated with your purchase.
- Obtain your email receipt and invoice.
- Access the companion website associated with Deep Learning for Computer Vision with Python.
- Post an issue, submit a bug, or report a typo using the companion website.
- Reactivate an expired download link.
If you have any other questions related to the book, please send me an email or use the contact form.
Getting started with Deep Learning for Computer Vision with Python
Thank you for picking up a copy of Deep Learning for Computer Vision with Python!
I appreciate your support of both myself and the PyImageSearch blog. Without you, PyImageSearch would not be possible.
My goal is to ensure you receive a huge return on both your investment of time and finances. To ensure you get off on the right foot, this guide will help you get started with your brand new copy of Deep Learning for Computer Vision with Python.
Downloading the files
After you successfully checkout and purchase your copy of Deep Learning for Computer Vision with Python you will be redirected to a page that looks similar to the one below:
Figure 1: The “Downloads Page” you can use to download the files associated with your purchase of Deep Learning for Computer Vision with Python.
This is your purchase page and where you will be able to download your files. Left click on each file and your download will start.
All files that start with the prefix
SBare part of the Starter Bundle. Files that start with
PBare part of the Practitioner Bundle. And finally, file names that start with
IBare part of the ImageNet Bundle.
File names that include
*_Book.zipcontain the PDF of the respective bundle. File names including
*_Code.zipcontain your code/datasets associated for the bundle. For example, the file name
SB_Code.zipcontains all code/datasets associated with the Starter Bundle. The file name
SB_Book.zipcontains your PDF of the Starter Bundle.
Finally, the
VirtualMachine.zipfile contains your pre-configured Ubuntu VirtualBox virtual machine.
Note: At this time only the Starter Bundle contents have been released. The contents of the Practitioner Bundle and ImageNet Bundle will be released in October.
If you close this tab in your browser and need to access it again, simply:
- Open up your inbox.
- Find the email receipt (see section below).
- Click on the “View Purchase Online” link.
From there you’ll be able to access the downloads page.
Please go ahead and download these files at your earliest convenience. The service I use to handle payments and distribution of digital downloads automatically expires URLs after four days for security reasons. If your download ever expires, no problem at all, just refer to the “Reactivating an expired download” section below.
Your email receipt and invoice
A few minutes after you purchase your copy of Deep Learning for Computer Vision with Python you’ll receive an email with the subject: “Your purchase from PyImageSearch is complete”.
Inside this email you’ll find links to view/print your invoice as well as access the downloads page:
Figure 2: After purchasing your copy of Deep Learning for Computer Vision with Python you will receive an email containing your receipt/invoice and link to re-access the downloads page.
If you did not receive this email, please ensure you are examining the inbox/email address you used when checking out. If you used PayPal you’ll want to check the email address associated with your PayPal account.
If you still cannot find the email, no worries! Please just email me or send me a message from via the contact form and include any pertinent information, such as:
- The email address the purchase should be listed under.
- Your name.
- Any other relevant information you may have (purchase number, whether the payment was made via credit card or PayPal, if a friend/colleague purchased for you etc.).
From there I can double-check the database and ensure you receive your email receipt and downloads link.
Accessing the companion website
Your purchase of Deep Learning for Computer Vision with Python includes access to the supplementary material/companion website.
To access the companion website:
- Download the PDF of the Starter Bundle.
- Open the Starter Bundle to “Chapter 6: Configuring Your Development Environment”.
- Follow the link to the companion website.
- Register your account on the companion website by creating a username and password.
From there you’ll be able to access the companion website:
Figure 3: The Deep Learning for Computer Vision with Python companion website.
Right now the companion website includes links to (1) configure your development environment and (2) report a bug. In the future this website will contain additional supplementary material.
Posting an issue, bug report, or typo
The most important reason you should create your account on the companion website is to report an issue, bug, or typo.
You can do this by clicking the “Issues” button in the header of the companion website:
Figure 4: If you encounter an error when using the book, please check the “Issues” page inside the companion website.
You’ll then see a list of all open tickets.
You can search these tickets by clicking the “Apply Filters” button.
If no ticket matches your query, click “Create New Ticket” and fill out the required fields:
Figure 5: If no (already submitted) bug report matches your error, please create a new ticket so myself and others in the PyImageSearch community can help you.
From there, myself and the rest of the PyImageSearch community can help you with the problem.
You can always email me regarding any issues as well; however, I may refer you to the companion website to post the bug so:
- I can keep track of the issue and ensure your problem is resolved in a timely manner.
- Other readers can learn from the issue if they encounter it as well.
Since Deep Learning for Computer Vision with Python is a brand new book, there are bound to be many questions. By using the issue tracker we can keep all bugs organized while ensuring the community can learn from other questions as well.
Reactivating an expired download
The service I use to handle payments and distribution of digital downloads automatically expires URLs after four days for security reasons.
If your URL ever expires, no problem at all — simply email me or send me a message and I can reactivate your purchase for you.
Summary
In this tutorial you learned how to get started with your new purchase of Deep Learning for Computer Vision with Python.
If you have a question that is not discussed in this guide, please shoot me an email or send me a message — I’ll be happy to discuss the problem with you.
Otherwise, if your question is specifically related to a chapter, a piece of code, an error message, or anything pertinent to the actual contents of the book, please refer to the “Posting an issue, bug report, or typo” section above.
Thank you again for purchasing a copy of Deep Learning for Computer Vision with Python.
I feel incredibly excited and privileged to guide you on your journey to deep learning mastery.
Without you, this blog would not be possible.
Have a wonderful day and happy reading!
P.S. If you haven’t already purchased a copy of Deep Learning for Computer Vision with Python, you can do so here.
The post Getting started with Deep Learning for Computer Vision with Python appeared first on PyImageSearch.
from PyImageSearch http://ift.tt/2xvYJc9
via IFTTT
Your deep learning + Python Ubuntu virtual machine
When it comes to working with deep learning + Python I highly recommend that you use a Linux environment.
Deep learning tools can be more easily configured and installed on Linux, allowing you to develop and run neural networks quickly.
Of course, configuring your own deep learning + Python + Linux development environment can be quite the tedious task, especially if you are new to Linux, a beginner at working the command line/terminal, or a novice when compiling and installing packages by hand.
In order to help you jump start your deep learning + Python education, I have created an Ubuntu virtual machine with all necessary deep learning libraries you need to successful (including Keras, TensorFlow, scikit-learn, scikit-image, OpenCV, and others) pre-configured and pre-installed.
This virtual machine is part of all three bundles of my book, Deep Learning for Computer Vision with Python. After you purchase your copy you’ll be able to download the virtual machine and get started with deep learning immediately.
In the remainder of this tutorial I’ll show you:
- How to download and install VirtualBox for managing, creating, and importing virtual machines.
- How to import the pre-configured Ubuntu virtual machine for deep learning.
- How to access the pre-installed deep learning libraries on the virtual machine.
Let’s go ahead and get started.
Your deep learning + Python virtual machine
Your purchase of Deep Learning for Computer Vision with Python includes a pre-configured Ubuntu virtual machine for deep learning. In the following sections I’ll show you how easy it is to import your Ubuntu deep learning virtual machine.
This tutorial is broken down into three parts to make it easy to digest and understand:
- Download and install VirtualBox.
- Download and import your pre-configured Ubuntu deep learning virtual machine.
- Access the Python development environment inside the deep learning virtual machine.
Step #1: Download and install VirtualBox
The first step is to download VirtualBox, a free open source platform for managing virtual machines.
VirtualBox will run on macOS, Linux, and Windows.
We call the physical hardware VirtualBox is running on your host machine. The virtual machine that will be imported into VirtualBox is the guest machine.
To install VirtualBox, first visit the downloads page and then select the appropriate binaries for your operating system:
Figure 1: VirtualBox downloads.
From there install the software on your system following the provided instructions — I’ll be using macOS in this example, but again, these instructions will also work on Linux and Windows as well:
Figure 2: Installing VirtualBox on macOS
Step #2: Download your deep learning virtual machine
Now that VirtualBox is installed you need to download the pre-configured Ubuntu virtual machine associated with your purchase of Deep Learning for Computer Vision with Python:
Figure 3: Downloading the pre-configured Ubuntu deep learning virtual machine.
The file is approximately 4GB so depending on your internet connection this download make take some time to complete.
Once you have downloaded the
VirtualMachine.zipfile, unarchive it and you’ll find a file named
DL4CV Ubuntu VM.ova. I have placed this file on my Desktop:
Figure 4: The DL4CV Ubuntu VM.ova file.
This is the actual file that you will be importing into the VirtualBox manager.
Step #3: Import the deep learning virtual machine into VirtualBox
Go ahead and open up the VirtualBox manager.
From there select
File => Import Appliance...:
Figure 5: Importing the pre-configured Ubuntu deep learning virtual machine.
Once the dialog opens you’ll want to navigate to where the
DL4CV Ubuntu VM.ovafile resides on disk:
Figure 6: Selecting the pre-configured Ubuntu deep learning virtual machine.
Finally, you can click “Import” and allow the virtual machine to import:
Figure 7: Importing the Ubuntu deep learning virtual machine may take 3-4 minutes depending on your system.
The entire import process should take only a few minutes.
Step #4: Boot the deep learning virtual machine
Now that the deep learning virtual machine has been imported we need to boot it.
From the VirtualBox manager select the “DL4CV Ubuntu VM” on the left pane of the window and then click “Start”:
Figure 8: Booting the pre-configured Ubuntu deep learning virtual machine.
Once the virtual machine has booted you can login using the following credentials:
- Username:
pyimagesearch
- Password:
deeplearning
Figure 9: Logging into the deep learning virtual machine.
Step #5: Access the deep learning Python virtual environment
The next step after logging into the VM is to launch a terminal:
Figure 10: Launching a terminal window.
From there, execute
workon dl4cvto access the Python + deep learning development environment:
Figure 11: Accessing the dl4cv deep learning + Python development environment.
Notice that my prompt now has the text
(dl4cv)preceding it, implying that I am inside the
dl4cvPython virtual environment.
You can run
pip freezeto see all the Python libraries installed.
I have included a screenshot below demonstrating how to import Keras, TensorFlow, and OpenCV from a Python shell:
Figure 12: Importing Keras, TensorFlow, and OpenCV into our deep learning Python virtual environment.
Step #6: (Optional) Install Guest Additions on virtual machine
An optional step you may wish to perform is installing the VirtualBox Guest Additions on your machine.
The Guest Additions package allow you to:
- Copy and paste from the virtual machine to your host (and vice versa)
- Share folders between the virtual machine and host
- Adjust screen resolution
- etc.
You can install the Guest Additions by selecting
Devices => Install Guest Additions...from the VirtualBox menu at the top of your screen.
Executing code from Deep Learning for Computer Vision with Python on your virtual machine
There are multiple methods to access the Deep Learning for Computer Vision with Python source code + datasets from your virtual machine.
By far the easiest method is to simply open Firefox and download the .zip archives from the “Your Purchase” page after buying your copy of Deep Learning for Computer Vision with Python. I would recommend forwarding the receipt email to yourself so you can login to your inbox via Firefox and then download the code + datasets.
You may also use your favorite SFTP/FTP client to transfer the code from your host machine to the virtual machine.
Of course, you can always manually write the code inside Ubuntu virtual machine using the built-in text editor as you follow along with the book.
Tips for using the deep learning virtual machine
When using the Ubuntu VirtualBox virtual machine for deep learning I recommend the following:
- Use Sublime Text as a lightweight code editor. Sublime Text is my favorite code editor for Linux. It’s simple, easy to use, and very lightweight, making it ideal for a virtual machine.
- Use PyCharm as a full blown IDE. When it comes to Python IDEs, it’s hard to beat PyCharm. I personally don’t like using PyCharm inside a virtual machine as it’s quite resource hungry. You’ll also need to configure PyCharm to use the
dl4cv
Python environment once installed.
Troubleshooting and FAQ
In this section I detail answers to frequently asked questions and problems regarding the pre-configured Ubuntu deep learning virtual machine.
How do I boot my deep learning virtual machine?
Once your VM has been imported, select the “DL4CV Ubuntu VM” on the left-hand side of the VirtualBox software, then click the “Start” button. Your VM will then boot.
What is the username and password for the Ubuntu deep learning virtual machine?
The username is
pyimagesearchand the password is
deeplearning.
How do I run Python scripts that access deep learning libraries?
The Deep Learning for Computer Vision with Python virtual machine uses Python virtual environments to help organize Python modules and keep them separate from the system install of Python.
To access the virtual environment simply execute
workon dl4cvfrom the shell. Form there you’ll have access to deep learning/computer vision libraries such as TensorFlow, Keras, OpenCV, scikit-learn, scikit-image, etc.
How can I access my GPU from the Ubuntu virtual machine?
The short answer is that you cannot access your GPU from the virtual machine.
A virtual machine abstracts your hardware and creates an artificial barrier between your host machine and your guest machine. Peripherals such as your GPU, USB ports, etc. on your physical computer cannot be accessed by the virtual machine.
If you would like to use your GPU for deep learning I would suggest configuring your native development environment.
I am receiving an error message related to “VT-x/AMD-V hardware acceleration is not available for your system”. What do I do?
If you are getting an error message similar to the following:
Figure 13: Resolving “VT-x/AMD-V hardware acceleration is not available for your system” errors.
Then you likely need to check your BIOS and ensure virtualization is enabled. If you’re on Windows you might also need to disable Hyper-V mode.
To resolve the problem:
- Disable Hyper-V mode from the Windows control panel (if using the Windows operating system). Take a look at the answers to this question, which is the same problem you are having. Disabling Hyper-V is different on different Windows versions, but following the answer to the question above you should be able to find your solution. That said, also make sure you do step 2 below as well.
- Check your BIOS. The next time you boot your system, go into the BIOS and ensure that Virtualization is enabled (normally it’s under some sort of “advanced setting”). If virtualization is not enabled, then the VM will not be able to boot.
Summary
In today’s tutorial I demonstrated:
- How to download and install VirtualBox, the software used to manage virtual machines.
- How to import and launch your Ubuntu deep learning virtual machine.
- How to access the deep learning development environment once Ubuntu has booted.
All purchases of my book, Deep Learning for Computer Vision with Python, include a copy of my pre-configured virtual machine.
This virtual machine is by far the fastest way to get up and running with deep learning and computer vision using the Python programming language.
If you would like to learn more about my new book (and pick up a copy yourself), just click here.
The post Your deep learning + Python Ubuntu virtual machine appeared first on PyImageSearch.
from PyImageSearch http://ift.tt/2wcKwxv
via IFTTT
Pre-configured Amazon AWS deep learning AMI with Python
The Ubuntu VirtualBox virtual machine that comes with my book, Deep Learning for Computer Vision with Python, includes all the necessary deep learning and computer vision libraries you need (such as Keras, TensorFlow, scikit-learn, scikit-image, OpenCV, etc.) pre-installed.
However, while the deep learning virtual machine is easy to use, it also has a number of drawbacks, including:
- Being significantly slower than executing instructions on your native machine.
- Unable to access your GPU (and other peripherals attached to your host).
What the virtual machine has in convenience you end up paying for in performance — this makes it a great for readers who are getting their feet wet, but if you want to be able to dramatically boost speed while still maintaining the pre-configured environment, you should consider using Amazon Web Services (AWS) and my pre-built deep learning Amazon Machine Image (AMI).
Using the steps outlined in this tutorial you’ll learn how to login (or create) your AWS account, spin up a new instance (with or without a GPU), and install my pre-configured deep learning image. This will enable you to enjoy the pre-built deep learning environment without sacrificing speed.
To learn how to use my deep learning AMI, just keep reading.
Pre-configured Amazon AWS deep learning AMI with Python
In this tutorial I will show you how to:
- Login/create your AWS account.
- Launch my pre-configured deep learning AMI.
- Login to the server and execute your code.
- Stop the machine when you are done.
However, before we get too far I want to mention that:
- The deep learning AMI is Linux-based so I would recommend having some basic knowledge of Unix environments, especially the command line.
- AWS is not free and costs an hourly rate. Exactly how much the hourly rate depends is on which machine you choose to spin up (no GPU, one GPU, eight GPUs, etc.). For less than $1/hour you can use a machine with a GPU which will dramatically speedup the training of deep neural networks. You pay for only the time the machine is running. You can then shut down your machine when you are done.
Step #1: Setup Amazon Web Services (AWS) account
In order to launch my pre-configured deep learning you first need an Amazon Web Services account.
To start, head to the Amazon Web Services homepage and click the “Sign In to the Console” link:
Figure 1: The Amazon Web Services homepage.
If you already have an account you can login using your email address and password. Otherwise you will need to click the “Create a new AWS account” button and create your account:
Figure 2: Logging in to your Amazon Web services account.
I would encourage you to use an existing Amazon.com login as this will expedite the process.
Step #2: Select and launch your deep learning AWS instance
You are now ready to launch your pre-configured deep learning AWS instance.
First, you should set your region/zone to “US West (Oregon)”. I created the deep learning AMI in the Oregon region so you’ll need to be in this region to find it, launch it, and access it:
Figure 3: Setting your AWS region to “US West (Oregon)”.
After you have set your region to Oregon, click the “Services” tab and then select “EC2” (Elastic Cloud Compute):
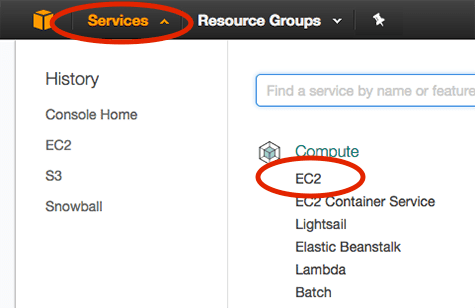
Figure 4: Accessing the Amazon EC2 dashboard.
From there you should click the “Launch Instance” button:
Figure 5: Launching an Amazon AWS instance for deep learning.
Then select the “Community AMIs” and search for either “deep-learning-for-computer-vision-with-python” or “ami-ccba4ab4”:
Figure 6: Searching for the Deep Learning for Computer Vision with Python AMI.
Click “Select” next to the AMI.
You are now ready to select your instance type. Amazon provides a huge number of virtual servers that are designed to run a wide array of applications. These instances have varying amount of CPU power, storage, network capacity, or GPUs, so you should consider:
- What type of machine you would like to launch.
- Your particular budget.
GPU instances tend to cost much more than standard CPU instances. However, they can train deep neural networks in a fraction of the time. When you average out the amount of time it takes to train a network on a CPU versus on a GPU you may realize that using the GPU instance will save you money.
For CPU instances I recommend you use the “Compute optimized” c4.* instances. In particular, the c4.xlarge instance is a good option to get your feet wet.
If you would like to use a GPU, I would highly recommend the “GPU compute” instances. The p2.xlarge instance has a single NVIDIA K80 (12GB of memory).
The p2.8xlarge sports 8 GPUs. While the p2.16xlarge has 16 GPUs.
I have included the pricing (at the time of this writing) for each of the instances below:
- c4.xlarge: $0.199/hour
- p2.xlarge: $0.90/hour
- p2.8xlarge: $7.20/hour
- p2.16xlarge: $14.40/hour
As you can see, the GPU instances are much more expensive; however, you are able to train networks in a fraction of the cost, making them a more economically viable option. Because of this I recommend using the p2.xlarge instance if this is your first time using a GPU for deep learning.
In the example screenshot below you can see that I have chosen the p2.xlarge instance:
Figure 7: Selecting the p2.xlarge instance for deep learning using the GPU.
Next, I can click “Review and Launch” followed by “Launch” to boot my instance.
After clicking “Launch” you’ll be prompted to select your key pair or create a new key pair:
Figure 8: Selecting a key pair for our Elastic Cloud Compute instance.
If you have an existing key pair you can select “Choose an existing key pair” from the drop down. Otherwise you’ll need to select the “Create a new key pair” and then download the pair. The key pair is used to login to your AWS instance.
After acknowledging and accepting login note from Amazon your instance will start to boot. Scroll down to the bottom of the page and click “View Instances”. It will take a minute or so for your instance to boot.
Once the instance is online you’ll see the “Instance State” column be changed to “running” for the instance.
Select it and you’ll be able to view information on the instance, including the IP address:
Figure 9: Examining the IP address of my deep learning AWS instance.
Here you can see that my IP address is
52.88.146.157. Your IP address will be different.
Fire up a terminal and you can SSH into your AWS instance:
$ ssh -i EC2KeyPair.pem ubuntu@52.88.146.157
You’ll want to update the command above to:
- Use the filename you created for the key pair.
- Use the IP address of your instance.
Step #3: (GPU only) Re-install NVIDIA deep learning driver
If you selected a GPU instance you’ll need to re-install the NVIDIA deep learning driver. I’m not entirely sure why this step is required, but each time I’ve rebooted my system the driver needed to be re-installed.
Luckily this is easy as I have included the driver file in the home directory of the instance.
If you list the contents of the
installersdirectory you’ll see three files:
$ ls -l installers/
total 1435300
-rwxr-xr-x 1 root root 1292835953 Sep  6 14:03 cuda-linux64-rel-8.0.61-21551265.run
-rwxr-xr-x 1 root root  101033340 Sep  6 14:03 cuda-samples-linux-8.0.61-21551265.run
-rwxr-xr-x 1 root root   75869960 Sep  6 14:03 NVIDIA-Linux-x86_64-375.26.run
Change directory into
installersand then execute the following command:
$ cd installers
$ sudo ./NVIDIA-Linux-x86_64-375.26.run
Follow the prompts on screen (including overwriting any existing NVIDIA driver files) and your NVIDIA deep learning driver will be installed.
You can validate the NVIDIA driver installed successfully by running the
nvidia-smicommand:
$ nvidia-smi
Wed Sep 13 12:51:43 2017
+-----------------------------------------------------------------------------+
| NVIDIA-SMI 375.26                 Driver Version: 375.26                    |
|-------------------------------+----------------------+----------------------+
| GPU  Name        Persistence-M| Bus-Id        Disp.A | Volatile Uncorr. ECC |
| Fan  Temp  Perf  Pwr:Usage/Cap|         Memory-Usage | GPU-Util  Compute M. |
|===============================+======================+======================|
|   0  Tesla K80           Off  | 0000:00:1E.0     Off |                    0 |
| N/A   43C    P0    59W / 149W |      0MiB / 11439MiB |     97%      Default |
+-------------------------------+----------------------+----------------------+

+-----------------------------------------------------------------------------+
| Processes:                                                       GPU Memory |
|  GPU       PID  Type  Process name                               Usage      |
|=============================================================================|
|  No running processes found                                                 |
+-----------------------------------------------------------------------------+
Step #4: Access deep learning Python virtual environment on AWS
You can access our deep learning and computer vision libraries by using the
workon dl4cvcommand to access the Python virtual virtual environment:
Figure 10: Accessing the dl4cv Python virtual environment for deep learning.
Notice that my prompt now has the text
(dl4cv)preceding it, implying that I am inside the
dl4cvPython virtual environment.
You can run
pip freezeto see all the Python libraries installed.
I have included a screenshot below demonstrating how to import Keras, TensorFlow, mxnet, and OpenCV from a Python shell:
Figure 11: Importing Keras, TensorFlow, mxnet, and OpenCV into our deep learning Python virtual environment.
The code + datasets to Deep Learning for Computer Vision with Python are not included on the pre-configured AMI by default (as the AMI is publicly available and can be used for tasks other than reading through Deep Learning for Computer Vision with Python).
To upload the code from the book on your local system to the AMI I would recommend using the
scpcommand:
$ scp -i EC2KeyPair.pem ~/Desktop/sb_code.zip ubuntu@52.88.146.157:~
Here I am specifying:
- The path to the
.zip
file of the Deep Learning for Computer Vision with Python code + datasets. - The IP address of my Amazon instance.
From there the
.zipfile is uploaded to my home directory.
You can then unzip the archive and execute the code:
$ unzip sb_code.zip
$ cd sb_code/chapter12-first_cnn/
$ workon dl4cv
$ python shallownet_animals.py --dataset ../datasets/animals
Using TensorFlow backend.
[INFO] loading images...
...
Epoch 100/100
2250/2250 [==============================] - 0s - loss: 0.3429 - acc: 0.8800 - val_loss: 0.7278 - val_acc: 0.6720
[INFO] evaluating network...
             precision    recall  f1-score   support

        cat       0.67      0.52      0.58       262
        dog       0.59      0.64      0.62       249
      panda       0.75      0.87      0.81       239

avg / total       0.67      0.67      0.67       750
Step #5: Stop your deep learning AWS instance
Once you are finished working with your AMI head back to the “Instances” menu item on your EC2 dashboard and select your instance.
With your instance selected click “Actions => Instance State => Stop”:
Figure 12: Stopping my deep learning AWS instance.
This process will shutdown your deep learning instance (and you will no longer be billed hourly for it).
If you wanted to instead delete the instance you would select “Terminate”.
Troubleshooting and FAQ
In this section I detail answers to frequently asked questions and problems regarding the pre-configured deep learning AMI.
How do I execute code from Deep Learning for Computer Vision with Python from the deep learning AMI?
Please see the “Access deep learning Python virtual environment on AWS” section above. The gist is that you will upload a
.zipof the code to your AMI via the
scpcommand. An example command can be seen below:
$ scp -i EC2KeyPair.pem path/to/code.zip ubuntu@your_aws_ip_address:~
Can I use a GUI/window manager with my deep learning AMI?
No, the AMI is terminal only. I would suggest using the deep learning AMI if you are:
- Comfortable with Unix environments.
- Have experience using the terminal.
Otherwise I would recommend the deep learning virtual machine part of Deep Learning for Computer Vision with Python instead.
How can I use a GPU instance for deep learning?
Please see the “Step #2: Select and launch your deep learning AWS instance” section above. When selecting your Amazon EC2 instance choose a p2.* (i.e., “GPU compute”) instance. These instances have one, eight, and sixteen GPUs, respectively.
Summary
In today’s blog post you learned how to use my pre-configured AMI for deep learning in the Amazon Web Services ecosystem.
The benefit of using my AMI over the pre-configured virtual machine is that:
- Amazon Web Services and the Elastic Cloud Compute ecosystem give you a huge range of systems to choose from, including CPU-only, single GPU, and multi-GPU.
- You can scale your deep learning environment to multiple machines.
- You retain the ability to use pre-configured deep learning environments but still get the benefit of added speed via dedicated hardware.
The downside is that AWS:
- Costs money (typically an hourly rate).
- Can be daunting for those who are new to Unix environments.
After you have gotten your feet wet with deep learning using my virtual machine I would highly recommend that you try AWS out as well — you’ll find that the added speed improvements are worth the extra cost.
To learn more, take a look at my new book, Deep Learning for Computer Vision with Python.
The post Pre-configured Amazon AWS deep learning AMI with Python appeared first on PyImageSearch.
from PyImageSearch http://ift.tt/2fhmz1e
via IFTTT
Real-time object detection with deep learning and OpenCV
Today’s blog post was inspired by PyImageSearch reader, Emmanuel. Emmanuel emailed me after last week’s tutorial on object detection with deep learning + OpenCV and asked:
“Hi Adrian,
I really enjoyed last week’s blog post on object detection with deep learning and OpenCV, thanks for putting it together and for making deep learning with OpenCV so accessible.
I want to apply the same technique to real-time video.
What is the best way to do this?
How can I achieve the most efficiency?
If you could do a tutorial on real-time object detection with deep learning and OpenCV I would really appreciate it.”
Great question, thanks for asking Emmanuel.
Luckily, extending our previous tutorial on object detection with deep learning and OpenCV to real-time video streams is fairly straightforward — we simply need to combine some efficient, boilerplate code for real-time video access and then add in our object detection.
By the end of this tutorial you’ll be able to apply deep learning-based object detection to real-time video streams using OpenCV and Python — to learn how, just keep reading.
Looking for the source code to this post?
Jump right to the downloads section.
Real-time object detection with deep learning and OpenCV
Today’s blog post is broken into two parts.
In the first part we’ll learn how to extend last week’s tutorial to apply real-time object detection using deep learning and OpenCV to work with video streams and video files. This will be accomplished using the highly efficient
VideoStreamclass discussed in this tutorial.
From there, we’ll apply our deep learning + object detection code to actual video streams and measure the FPS processing rate.
Object detection in video with deep learning and OpenCV
To build our deep learning-based real-time object detector with OpenCV we’ll need to (1) access our webcam/video stream in an efficient manner and (2) apply object detection to each frame.
To see how this is done, open up a new file, name it
real_time_object_detection.pyand insert the following code:
# import the necessary packages
from imutils.video import VideoStream
from imutils.video import FPS
import numpy as np
import argparse
import imutils
import time
import cv2
We begin by importing packages on Lines 2-8. For this tutorial, you will need imutils and OpenCV 3.3.
To get your system set up, simply install OpenCV using the relevant instructions for your system (while ensuring you’re following any Python virtualenv commands).
Note: Make sure to download and install opencv and and opencv-contrib releases for OpenCV 3.3. This will ensure that the deep neural network (
dnn) module is installed. You must have OpenCV 3.3 (or newer) to run the code in this tutorial.
Next, we’ll parse our command line arguments:
# construct the argument parse and parse the arguments
ap = argparse.ArgumentParser()
ap.add_argument("-p", "--prototxt", required=True,
        help="path to Caffe 'deploy' prototxt file")
ap.add_argument("-m", "--model", required=True,
        help="path to Caffe pre-trained model")
ap.add_argument("-c", "--confidence", type=float, default=0.2,
        help="minimum probability to filter weak detections")
args = vars(ap.parse_args())
Compared to last week, we don’t need the image argument since we’re working with streams and videos — other than that the following arguments remain the same:
-
--prototxt
: The path to the Caffe prototxt file. -
--model
: The path to the pre-trained model. -
--confidence
: The minimum probability threshold to filter weak detections. The default is 20%.
We then initialize a class list and a color set:
# initialize the list of class labels MobileNet SSD was trained to
# detect, then generate a set of bounding box colors for each class
CLASSES = ["background", "aeroplane", "bicycle", "bird", "boat",
        "bottle", "bus", "car", "cat", "chair", "cow", "diningtable",
        "dog", "horse", "motorbike", "person", "pottedplant", "sheep",
        "sofa", "train", "tvmonitor"]
COLORS = np.random.uniform(0, 255, size=(len(CLASSES), 3))
On Lines 22-26 we initialize
CLASSlabels and corresponding random
COLORS. For more information on these classes (and how the network was trained), please refer to last week’s blog post.
Now, let’s load our model and set up our video stream:
# load our serialized model from disk
print("[INFO] loading model...")
net = cv2.dnn.readNetFromCaffe(args["prototxt"], args["model"])

# initialize the video stream, allow the cammera sensor to warmup,
# and initialize the FPS counter
print("[INFO] starting video stream...")
vs = VideoStream(src=1).start()
time.sleep(2.0)
fps = FPS().start()
We load our serialized model, providing the references to our prototxt and model files on Line 30 — notice how easy this is in OpenCV 3.3.
Next let’s initialize our video stream (this can be from a video file or a camera). First we start the
VideoStream(Line 35), then we wait for the camera to warm up (Line 36), and finally we start the frames per second counter (Line 37). The
VideoStreamand
FPSclasses are part of my
imutilspackage.
Now, let’s loop over each and every frame (for speed purposes, you could skip frames):
# loop over the frames from the video stream
while True:
        # grab the frame from the threaded video stream and resize it
        # to have a maximum width of 400 pixels
        frame = vs.read()
        frame = imutils.resize(frame, width=400)

        # grab the frame dimensions and convert it to a blob
        (h, w) = frame.shape[:2]
        blob = cv2.dnn.blobFromImage(frame, 0.007843, (300, 300), 127.5)

        # pass the blob through the network and obtain the detections and
        # predictions
        net.setInput(blob)
        detections = net.forward()
First, we read a
frame(Line 43) from the stream, followed by resizing it (Line 44).
Since we will need the width and height later, we grab these now on Line 47. This is followed by converting the
frameto a
blobwith the
dnnmodule (Line 48).
Now for the heavy lifting: we set the
blobas the input to our neural network (Line 52) and feed the input through the
net(Line 53) which gives us our
detections.
At this point, we have detected objects in the input frame. It is now time to look at confidence values and determine if we should draw a box + label surrounding the object– you’ll recognize this code block from last week:
# loop over the detections
        for i in np.arange(0, detections.shape[2]):
                # extract the confidence (i.e., probability) associated with
                # the prediction
                confidence = detections[0, 0, i, 2]

                # filter out weak detections by ensuring the `confidence` is
                # greater than the minimum confidence
                if confidence > args["confidence"]:
                        # extract the index of the class label from the
                        # `detections`, then compute the (x, y)-coordinates of
                        # the bounding box for the object
                        idx = int(detections[0, 0, i, 1])
                        box = detections[0, 0, i, 3:7] * np.array([w, h, w, h])
                        (startX, startY, endX, endY) = box.astype("int")

                        # draw the prediction on the frame
                        label = "{}: {:.2f}%".format(CLASSES[idx],
                                confidence * 100)
                        cv2.rectangle(frame, (startX, startY), (endX, endY),
                                COLORS[idx], 2)
                        y = startY - 15 if startY - 15 > 15 else startY + 15
                        cv2.putText(frame, label, (startX, y),
                                cv2.FONT_HERSHEY_SIMPLEX, 0.5, COLORS[idx], 2)
We start by looping over our
detections, keeping in mind that multiple objects can be detected in a single image. We also apply a check to the confidence (i.e., probability) associated with each detection. If the confidence is high enough (i.e. above the threshold), then we’ll display the prediction in the terminal as well as draw the prediction on the image with text and a colored bounding box. Let’s break it down line-by-line:
Looping through our
detections, first we extract the
confidencevalue (Line 59).
If the
confidenceis above our minimum threshold (Line 63), we extract the class label index (Line 67) and compute the bounding box coordinates around the detected object (Line 68).
Then, we extract the (x, y)-coordinates of the box (Line 69) which we will will use shortly for drawing a rectangle and displaying text.
We build a text
labelcontaining the
CLASSname and the
confidence(Lines 72 and 73).
Let’s also draw a colored rectangle around the object using our class color and previously extracted (x, y)-coordinates (Lines 74 and 75).
In general, we want the label to be displayed above the rectangle, but if there isn’t room, we’ll display it just below the top of the rectangle (Line 76).
Finally, we overlay the colored text onto the
frameusing the y-value that we just calculated (Lines 77 and 78).
The remaining steps in the frame capture loop involve (1) displaying the frame, (2) checking for a quit key, and (3) updating our frames per second counter:
# show the output frame
        cv2.imshow("Frame", frame)
        key = cv2.waitKey(1) & 0xFF

        # if the `q` key was pressed, break from the loop
        if key == ord("q"):
                break

        # update the FPS counter
        fps.update()
The above code block is pretty self-explanatory — first we display the frame (Line 81). Then we capture a key press (Line 82) while checking if the ‘q’ key (for “quit”) is pressed, at which point we break out of the frame capture loop (Lines 85 and 86).
Finally we update our fps counter (Line 89).
If we break out of the loop (‘q’ key press or end of the video stream), we have some housekeeping to take care of:
# stop the timer and display FPS information
fps.stop()
print("[INFO] elapsed time: {:.2f}".format(fps.elapsed()))
print("[INFO] approx. FPS: {:.2f}".format(fps.fps()))

# do a bit of cleanup
cv2.destroyAllWindows()
vs.stop()
When we’ve exited the loop, we stop the
fpscounter (Line 92) and print information about the frames per second to our terminal (Lines 93 and 94).
We close the open window (Line 97) followed by stopping the video stream (Line 98).
If you’ve made it this far, you’re probably ready to give it a try with your webcam — to see how it’s done, let’s move on to the next section.
Real-time deep learning object detection results
To see our real-time deep-learning based object detector in action, make sure you use the “Downloads” section of this guide to download the example code + pre-trained Convolutional Neural Network.
From there, open up a terminal and execute the following command:
$ python real_time_object_detection.py \
        --prototxt MobileNetSSD_deploy.prototxt.txt \
        --model MobileNetSSD_deploy.caffemodel
[INFO] loading model...
[INFO] starting video stream...
[INFO] elapsed time: 55.07
[INFO] approx. FPS: 6.54
Provided that OpenCV can access your webcam you should see the output video frame with any detected objects. I have included sample results of applying deep learning object detection to an example video below:
Figure 1: A short clip of real-time object detection with deep learning and OpenCV + Python.
Notice how our deep learning object detector can detect not only myself (a person), but also the sofa I am sitting on and the chair next to me — all in real-time!
The full video can be found below:
Summary
In today’s blog post we learned how to perform real-time object detection using deep learning + OpenCV + video streams.
We accomplished this by combing two separate tutorials:
The end result is a deep learning-based object detector that can process approximately 6-8 FPS (depending on the speed of your system, of course).
Further speed improvements can be obtained by:
- Applying skip frames.
- Swapping different variations of MobileNet (that are faster, but less accurate).
- Potentially using the quantized variation of SqueezeNet (I haven’t tested this, but imagine it would be faster due to smaller network footprint).
In future blog posts we’ll be discussing deep learning object detection methods in more detail.
In the meantime, be sure to take a look at my book, Deep Learning for Computer Vision with Python, where I’ll be reviewing object detection frameworks such as Faster R-CNNs and Single Shot Detectors!
If you’re interested in studying deep learning for computer vision and image classification tasks, you just can’t beat this book — click here to learn more.
Downloads:
The post Real-time object detection with deep learning and OpenCV appeared first on PyImageSearch.
from PyImageSearch http://ift.tt/2wccmtN
via IFTTT
8th Street, Ocean City, MD's surf is at least 5.04ft high
Maryland-Delaware, September 29, 2017 at 04:00AM
8th Street, Ocean City, MD Summary
At 4:00 AM, surf min of 5.04ft. At 10:00 AM, surf min of 2.28ft. At 4:00 PM, surf min of 0.65ft. At 10:00 PM, surf min of 0.07ft.
Surf maximum: 6.04ft (1.84m)
Surf minimum: 5.04ft (1.54m)
Tide height: 2.65ft (0.81m)
Wind direction: NW
Wind speed: 18.27 KTS
from Surfline http://ift.tt/1kVmigH
via IFTTT
A Conjunction of Comets
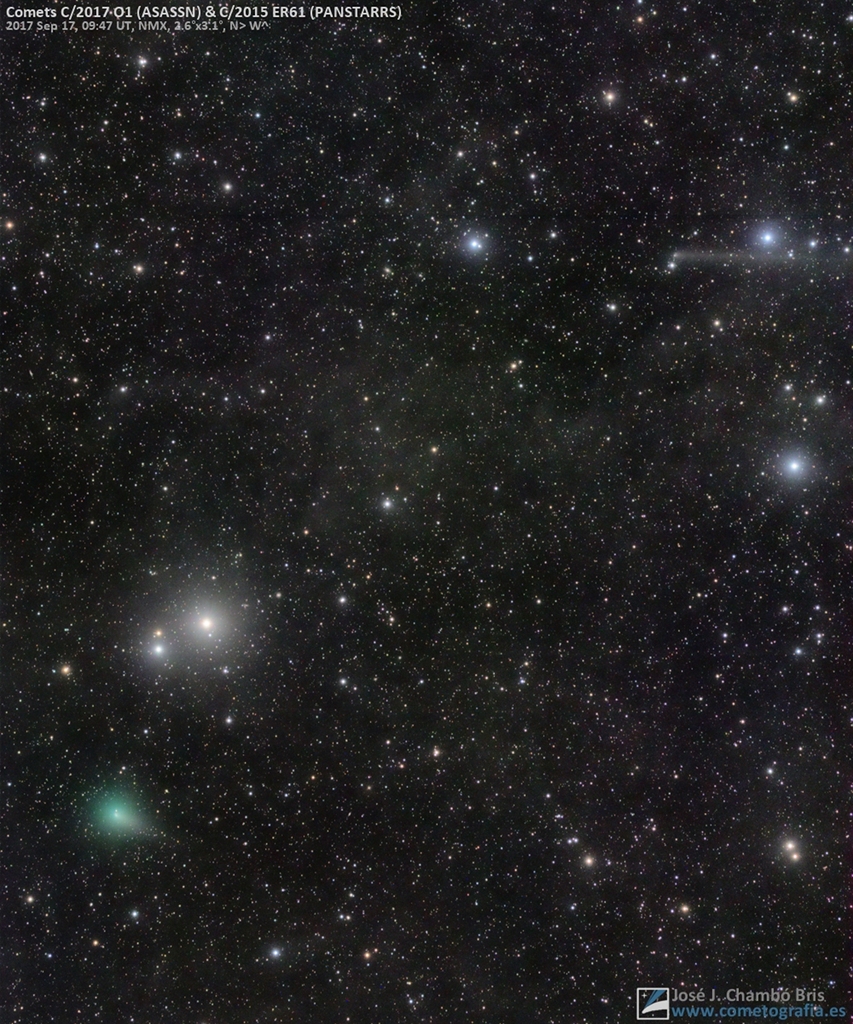
A conjunction of comets is captured in this pretty star field from the morning of September 17. Discovered in July by a robotic sky survey searching for supernovae, comet C/2017 O1 ASASSN is at the lower left. The visible greenish glow of its coma is produced by the fluorescence of diatomic carbon molecules in sunlight. Nearing its closest approach to the Sun, the binocular comet was only about 7.2 light-minutes from Earth. In the same telescopic field of view is the long-tailed, outbound comet C/2015 ER61 PanSTARRS at the upper right, almost 14 light-minutes away. Many light-years distant, the starry background includes faint, dusty nebulae of the Milky Way. The well-known Pleiades star cluster lies just off the top right of the frame. via NASA http://ift.tt/2hkU6fa
Friday, September 22, 2017
Panama Min. Says Anonymous Corporations Are in the Past
Sep.22 -- Panama Finance Minister Dulcidio de la Guardia discusses the supervision of the country's financial industry with Bloomberg's Erik ...
from Google Alert - anonymous http://ift.tt/2yjAI5l
via IFTTT
from Google Alert - anonymous http://ift.tt/2yjAI5l
via IFTTT
I have a new follower on Twitter
Ben Isenburg
An addiction treatment and rehab facility located in Prescott, Arizona. We specialize in heroin dependency but help people from all walks of life.
Prescott, AZ
https://t.co/rpxzGjG1Je
Following: 3634 - Followers: 3427
September 22, 2017 at 03:44PM via Twitter http://twitter.com/TrueAccountable
Neurotics Not Anonymous.
Ment Health (Lond). 1968 Fall;27(Autumn):25-27. Neurotics Not Anonymous. Quine M(1). Author information: (1)lecturer in sociology, Southampton ...
from Google Alert - anonymous http://ift.tt/2hmapIM
via IFTTT
from Google Alert - anonymous http://ift.tt/2hmapIM
via IFTTT
Alcoholics Anonymous Meeting
Alcoholics Anonymous Meeting. Saturday, September 23, 2017 - 7:00pm. AA meetings are held each Saturday at 7 p.m. For more information, please ...
from Google Alert - anonymous http://ift.tt/2xnHWWL
via IFTTT
from Google Alert - anonymous http://ift.tt/2xnHWWL
via IFTTT
Strut for Success
18 hours ago. Peter Ziblatt. DONATION: $100. 20 hours ago. ANONYMOUS. DONATION: $25. 22 hours ago. Vivienne Bernard. DONATION: $100.
from Google Alert - anonymous http://ift.tt/2xuAzi9
via IFTTT
from Google Alert - anonymous http://ift.tt/2xuAzi9
via IFTTT
Episode 61: Gamblers Anonymous with Dom Luszczyszyn
Dom Luszczyszyn from The Athletic joins us this week to break down some of our favourite bets heading into the season. We looked primarily at the ...
from Google Alert - anonymous http://ift.tt/2xnQixM
via IFTTT
from Google Alert - anonymous http://ift.tt/2xnQixM
via IFTTT
Rumor Central: Orioles have no plans to shop Manny Machado this offseason - FanRag Sports (ESPN)
from ESPN http://ift.tt/1eW1vUH
via IFTTT
via IFTTT
Passwords For 540,000 Car Tracking Devices Leaked Online
Another day, another news about a data breach, though this is something disconcerting. Login credentials of more than half a million records belonging to vehicle tracking device company SVR Tracking have leaked online, potentially exposing the personal data and vehicle details of drivers and businesses using its service. Just two days ago, Viacom was found exposing the keys to its kingdom on


from The Hacker News http://ift.tt/2yiVxxX
via IFTTT
from The Hacker News http://ift.tt/2yiVxxX
via IFTTT
Linux Trojan Using Hacked IoT Devices to Send Spam Emails
Botnets, like Mirai, that are capable of infecting Linux-based internet-of-things (IoT) devices are constantly increasing and are mainly designed to conduct Distributed Denial of Service (DDoS) attacks, but researchers have discovered that cybercriminals are using botnets for mass spam mailings. New research conducted by Russian security firm Doctor Web has revealed that a Linux Trojan,

from The Hacker News http://ift.tt/2yvgiYd
via IFTTT
from The Hacker News http://ift.tt/2yvgiYd
via IFTTT
Subscribe to:
Posts (Atom)