--------------------------------------------------------------------
Source: Gmail -> IFTTT-> Blogger
Saturday, March 24, 2018
I have a new follower on Twitter

Panoply
We're the world's first Smart Data Warehouse.
San Francisco, CA
http://t.co/2j9Z48we3s
Following: 5381 - Followers: 4894
March 24, 2018 at 04:33AM via Twitter http://twitter.com/panoplyio
NGC 602 and Beyond
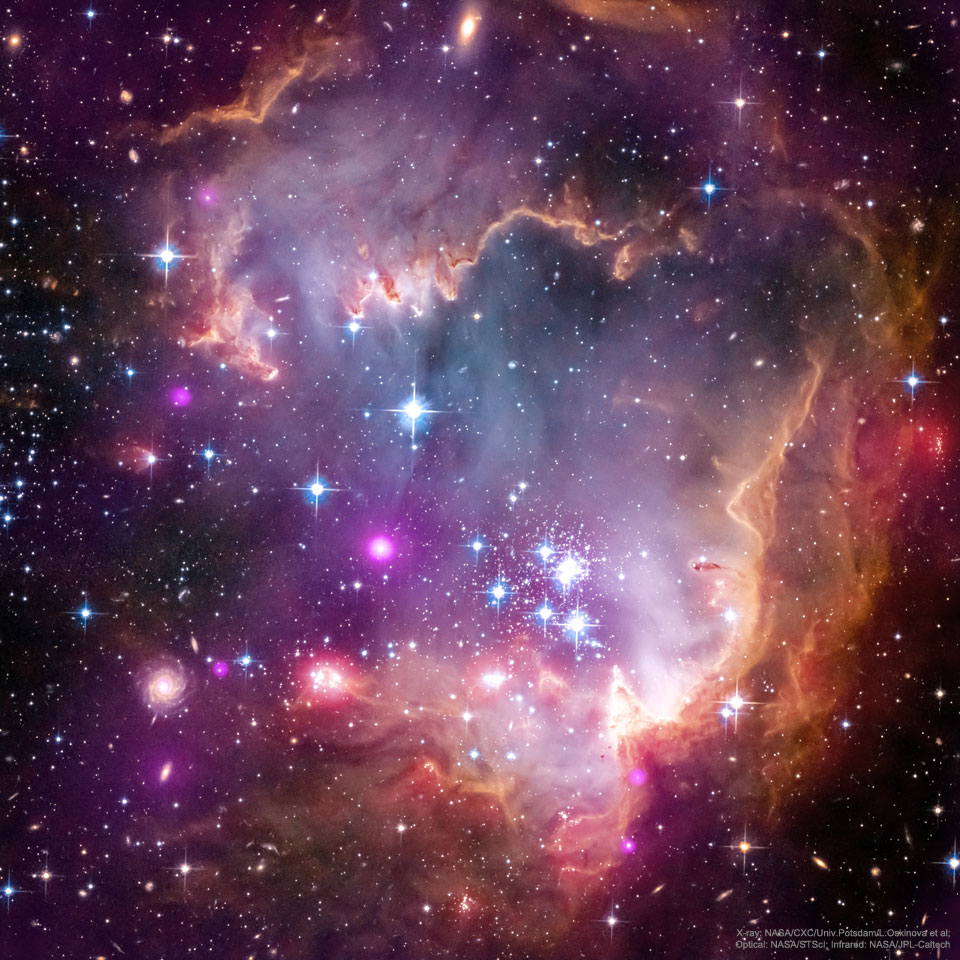
Near the outskirts of the Small Magellanic Cloud, a satellite galaxy some 200 thousand light-years distant, lies 5 million year young star cluster NGC 602. Surrounded by natal gas and dust, NGC 602 is featured in this stunning Hubble image of the region, augmented by images in the X-ray by Chandra, and in the infrared by Spitzer. Fantastic ridges and swept back shapes strongly suggest that energetic radiation and shock waves from NGC 602's massive young stars have eroded the dusty material and triggered a progression of star formation moving away from the cluster's center. At the estimated distance of the Small Magellanic Cloud, the Picture spans about 200 light-years, but a tantalizing assortment of background galaxies are also visible in this sharp multi-colored view. The background galaxies are hundreds of millions of light-years or more beyond NGC 602. via NASA https://ift.tt/2G66Qhr
Friday, March 23, 2018
Piety
Title: Piety; Creator: Anonymous; Date: 1700/1800; Technique: Carved on wood; Physical Dimensions: w42,40 x h48,50 x d22,00 cm; Adquisition: Lima, Peru; Provenance: Pedro y Angélica de Osma Foundation; Type: Sculpture and carving ...
from Google Alert - anonymous https://ift.tt/2pzffDP
via IFTTT
from Google Alert - anonymous https://ift.tt/2pzffDP
via IFTTT
[FD] BSidesMilano Event and CFP
Good morning everyone, I would like to invite everyone is interested @BSidesMilano 9th June, we will open the registration process on eventbrite the 12th of April. We are still looking for speakers, the cfp will end the 30th of April and we are looking for cutting edge and innovative presentation, if you want to share you research and have some good beers and exceptional food ( as usual in Italy;) ) take a look on the website milano.securitybsides.eu And the cfp link http://bit.ly/BSML_CFP Cheers guys I hope to see you there Van1sh BSides Roma and Milano organizer Follow us on Twitter @BSidesRoma @BSidesMilano
Source: Gmail -> IFTTT-> Blogger
Source: Gmail -> IFTTT-> Blogger
ISS Daily Summary Report – 3/21/2018
54S Launch: 54S, carrying Ricky Arnold, Drew Feustel, and Oleg Artimyev to the International Space Station, launched today from the Baikonur Cosmodrome in Kazakhstan at 17:44:23.396 GMT (12:44:23 CDT). 54S is scheduled for a 34-orbit rendezvous with ISS and docking is planned for Friday, March 23 at 19:43 GMT (14:43 CDT). Lab Mass Constituent Analyzer … Continue reading "ISS Daily Summary Report – 3/21/2018"
from ISS On-Orbit Status Report http://ift.tt/2Gfv63N
via IFTTT
from ISS On-Orbit Status Report http://ift.tt/2Gfv63N
via IFTTT
ISS Daily Summary Report – 3/22/2018
54S Rendezvous: 54S, carrying Ricky Arnold, Drew Feustel, and Oleg Artimyev to the International Space Station, is currently conducting a 34-orbit rendezvous profile with a planned docking Friday, March 23 at 19:43 GMT (14:43 CDT). All Soyuz systems are performing nominally. Veg-03: The crew watered the Veg-03 plants and continued with the photo-documentation of plant … Continue reading "ISS Daily Summary Report – 3/22/2018"
from ISS On-Orbit Status Report http://ift.tt/2HZguTu
via IFTTT
from ISS On-Orbit Status Report http://ift.tt/2HZguTu
via IFTTT
Lone Star Regional Service Office of NA
Welcome to the Lone Star Regional Service Office ONLINE STORE… We carry all fellowship approved Narcotics Anonymous literature including: Narcotics Anonymous Basic Text, It Works: How and Why, Living Clean: The Journey Continues, NA Gift Edition Books, and NA Commemorative Books.
from Google Alert - anonymous http://ift.tt/2IIsgTv
via IFTTT
from Google Alert - anonymous http://ift.tt/2IIsgTv
via IFTTT
Facebook and Cambridge Analytica – What's Happened So Far
Top Story— Facebook has just lost over $60 billion in market value over the past two days—that's more than Tesla's entire market capitalisation and almost three times that of Snapchat. Facebook shares plunge over revelations that personal data of 50 million users was obtained and misused by British data analytics firm 'Cambridge Analytica,' who reportedly helped Donald Trump win the US


from The Hacker News http://ift.tt/2IJPiJw
via IFTTT
from The Hacker News http://ift.tt/2IJPiJw
via IFTTT
8th St.'s surf is at least 5.24ft high
Maryland-Delaware, March 29, 2018 at 04:00AM
8th St. Summary
At 4:00 AM, surf min of 5.24ft. At 10:00 AM, surf min of 4.11ft. At 4:00 PM, surf min of 3.12ft. At 10:00 PM, surf min of 2.49ft.
Surf maximum: 5.87ft (1.79m)
Surf minimum: 5.24ft (1.6m)
Tide height: 2.23ft (0.68m)
Wind direction: NW
Wind speed: 10.38 KTS
from Surfline http://ift.tt/1kVmigH
via IFTTT
I have a new follower on Twitter

Pedro Alves
After doing AI in a dozen different industries I decided to found @Ople_AI as the CEO, to advance the field of AI and help deliver. #AIbuildingAI #ai4ai
San Francisco, CA
https://t.co/mzA54N4pme
Following: 4103 - Followers: 4639
March 23, 2018 at 04:52AM via Twitter http://twitter.com/Pedro_Data_Sci
Thursday, March 22, 2018
[FD] DSA-2018-018: Dell EMC Isilon OneFS Multiple Vulnerabilities
-----BEGIN PGP SIGNED MESSAGE-
Source: Gmail -> IFTTT-> Blogger
Source: Gmail -> IFTTT-> Blogger
Adam
Title: Adam; Creator: Anonymous; Date: 1700/1800; Technique: Modeled in plaster on Maguey (cactus); Physical Dimensions: w27,00 x h62,00 cm; Adquisition: Cusco, Peru; Provenance: Pedro y Angélica de Osma Foundation; Type: Sculpture and carving ...
from Google Alert - anonymous http://ift.tt/2IKO2WL
via IFTTT
from Google Alert - anonymous http://ift.tt/2IKO2WL
via IFTTT
Orioles: P Dylan Bundy beats out Kevin Gausman for Opening Day assignment vs. Twins on March 29 (ESPN)
from ESPN http://ift.tt/1eW1vUH
via IFTTT
via IFTTT
[FD] ModSecurity WAF 3.0 for Nginx - Denial of Service
Hey, TL;DR: UAF in a "non-release" version of ModSecurity for Nginx. !RCE|DoS, no need to panic. Plus some old and even older exploitation vector(s). /* * 1. Use-After-Free (UAF) */ During one of the engagements my team tested a WAF running in production Nginx + ModSecurity + OWASP Core Rule Set [1][2][3]. In the system logs I found information about the Nginx worker processes being terminated due to memory corruption errors. Through fuzzing and stress testing it was possible to obtain a minimised payload triggering the memory corruption. Further analysis revealed the v3 branch of ModSecurity suffered from an UAF vulnerability. Unfortunately, all I managed to do with it was to cause a poor-man's remote DoS, perhaps others will have more luck exploiting it. Looking forward to read about it. The jaw dropping PoC:
Source: Gmail -> IFTTT-> Blogger
Source: Gmail -> IFTTT-> Blogger
[FD] Bomgar Remote Support Portal JavaStart Applet <= 52970 - Path Traversal
Hey, The Path Traversal vulnerability was found in the component of the Bomgar Remote Support Portal (RSP) [1]. The affected component is a JavaStart.jar applet that is hosted at https://TARGET/api/content/JavaStart.jar on the vulnerable RSP deployments. The JavaStart version 52970 and prior were confirmed to be vulnerable. Analysis of the applet revealed that App.class suffers from a Path Traversal vulnerability. The vulnerable class makes a call to a File() constructor and uses the value specified in the "url" parameter as an argument. The "url" parameter is specified in the HTML tag which passes arguments to applets embedded on web sites using an
[FD] Kaseya AgentMon.exe <= 9.3.0.11 - Local Privilege Escalation
Hey, The Local Privilege Escalation vulnerability was found in the Kaseya Virtual System Administrator (VSA) [1] agent "AgentMon.exe". The agent is a Windows service that periodically executes various programs with “NT AUTHORITY\SYSTEM” privileges. In the Kaseya's default configuration, Windows users who belong to the “Authenticated Users” group can modify files residing in the working and temporary directories e.g.: - "HKLM\SOFTWARE\Kaseya\Agent\...\TempPath" - "C:\Temp" - "C:\kworking" The list of executables that are stored in these directories and are run by the agent includes, but is not limited to: - "C:\kworking\NetUserStateAudit.exe" - "C:\kworking\KLicense.exe" - "C:\Temp\kwami.dll" The VSA agent before running the executables performs verification if the files were modified. If it detects that was the case, then it restores them to their known-good originals. However, this process was found to suffer from a Time of Check & Time of Use (TOCTOU) issue and that it is possible to win a race condition which makes it possible to run arbitrary executables with "NT AUTHORITY\SYSTEM" privileges. The PoC exploiting this vulnerability is included below. The PoC is an Empire module (http://ift.tt/2oJReqM) and it currently supports exploitation by replacing one of the following files: - "C:\kworking\NetUserStateAudit.exe" ($exe in PoC) - "C:\Temp\kwami.dll" ($dll in PoC)
Source: Gmail -> IFTTT-> Blogger
Source: Gmail -> IFTTT-> Blogger
[FD] New release: UFONet v1.0 "TachY0n!"
Hi FD, I am glad to present a new release of this tool: - https://ufonet.03c8.net "UFONet - is a tool designed to launch Layer 7 (HTTP/Web Abuse) DDoS & DoS attacks." See these links for more info: - CWE-601:Open Redirect [1] - OWASP:URL Redirector Abuse [2]
Source: Gmail -> IFTTT-> Blogger
Source: Gmail -> IFTTT-> Blogger
8th St.'s surf is Good
March 21, 2018 at 08:00PM, the surf is Good!
8th St. Summary
Surf: head high to 2 ft overhead
Maximum: 2.142m (7.03ft)
Minimum: 1.53m (5.02ft)
Maryland-Delaware Summary
from Surfline http://ift.tt/1kVmigH
via IFTTT
8th St. Summary
Surf: head high to 2 ft overhead
Maximum: 2.142m (7.03ft)
Minimum: 1.53m (5.02ft)
Maryland-Delaware Summary
from Surfline http://ift.tt/1kVmigH
via IFTTT
I have a new follower on Twitter

TheMontaukBeachHouse
Boutique hotel in Montauk where music, art & fashion converge. Summer 2018 Bookings Available NOW. https://t.co/I0zXd3cHXX
Montauk, NY
https://t.co/WlvqDtQU1K
Following: 7787 - Followers: 9724
March 22, 2018 at 06:52AM via Twitter http://twitter.com/TheMBH
Half model of a pilot cutter Visually similar work
Title: Half model of a pilot cutter; Creator: Anonymous; Date Created: c. 1860 - c. 1880; Physical Dimensions: h 32.1cm - l 130.2cm - w 13.7cm; External Link: See more details about this work on the Rijksmuseum Website; Medium: wood (plant material) ...
from Google Alert - anonymous http://ift.tt/2FUcaZ5
via IFTTT
from Google Alert - anonymous http://ift.tt/2FUcaZ5
via IFTTT
8th St.'s surf is at least 5.93ft high
Maryland-Delaware, March 28, 2018 at 04:00AM
8th St. Summary
At 4:00 AM, surf min of 5.93ft. At 10:00 AM, surf min of 6.32ft. At 4:00 PM, surf min of 5.49ft. At 10:00 PM, surf min of 4.46ft.
Surf maximum: 7.1ft (2.16m)
Surf minimum: 5.93ft (1.81m)
Tide height: 3.17ft (0.97m)
Wind direction: NW
Wind speed: 4.76 KTS
from Surfline http://ift.tt/1kVmigH
via IFTTT
NGC 253: Dusty Island Universe
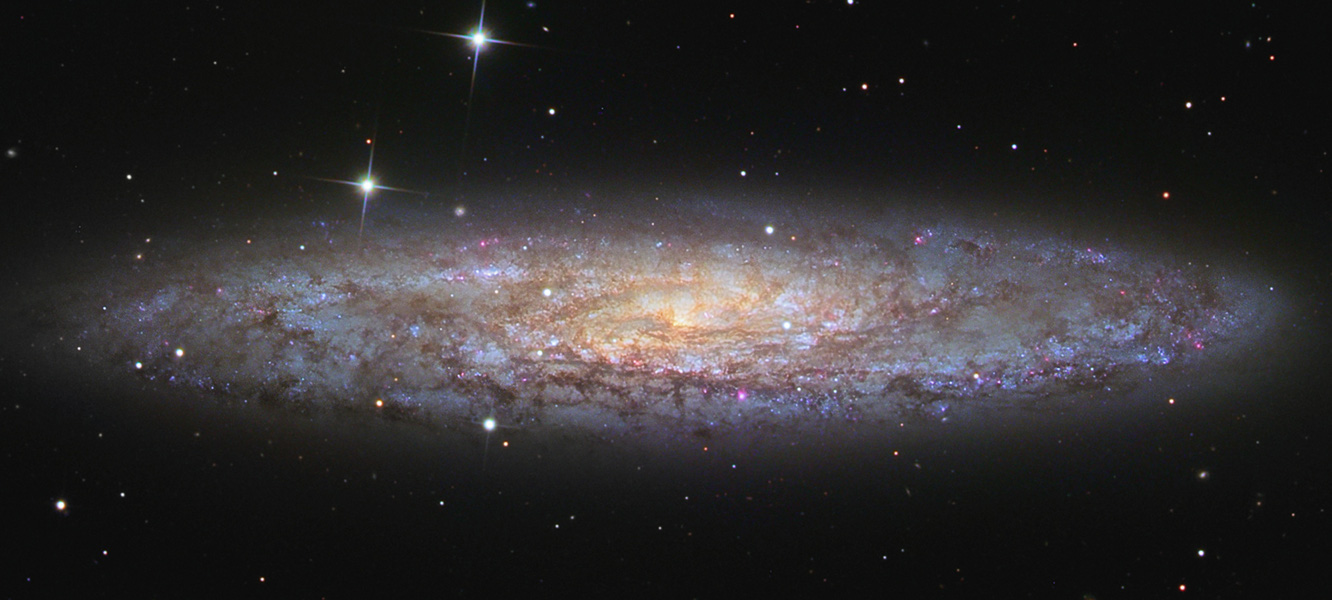
Shiny NGC 253 is one of the brightest spiral galaxies visible, and also one of the dustiest. Some call it the Silver Dollar Galaxy for its appearance in small telescopes, or just the Sculptor Galaxy for its location within the boundaries of the southern constellation Sculptor. Discovered in 1783 by mathematician and astronomer Caroline Herschel, the dusty island universe lies a mere 10 million light-years away. About 70 thousand light-years across, NGC 253 is the largest member of the Sculptor Group of Galaxies, the nearest to our own Local Group of Galaxies. In addition to its spiral dust lanes, tendrils of dust seem to be rising from a galactic disk laced with young star clusters and star forming regions in this sharp color image. The high dust content accompanies frantic star formation, earning NGC 253 the designation of a starburst galaxy. NGC 253 is also known to be a strong source of high-energy x-rays and gamma rays, likely due to massive black holes near the galaxy's center. Take a trip through extragalactic space in this short video flyby of NGC 253. via NASA http://ift.tt/2pvMXch
Wednesday, March 21, 2018
Séminaire SoSySec - Anonymous Server-Aided Verification
Séminaire SoSySec - Anonymous Server-Aided Verification. Submitted by Nadia DEROUAULT on mer 21 mar 2018 - 14h09. Date: Vendredi, 30. mars 2018 - 11:00 - 12:00. Département: D1 - SYSTÈMES LARGE ÉCHELLE. Orateur: Elena PAGNIN (Chalmers University of Technology, Sweden). Lieu:.
from Google Alert - anonymous http://ift.tt/2GQWCCI
via IFTTT
from Google Alert - anonymous http://ift.tt/2GQWCCI
via IFTTT
Nadia Lee Cohen
Anonymous Content. Nadia Lee Cohen. GCDS. Kali Uchis “After The Storm”. 1GCDS; 2Kali Uchis “After The Storm”
from Google Alert - anonymous http://ift.tt/2HSnAsO
via IFTTT
from Google Alert - anonymous http://ift.tt/2HSnAsO
via IFTTT
My review of Microsoft’s data science virtual machine (DSVM) for deep learning
Image credit: OnMSFT
Over the past few months, I’ve been using Microsoft’s Ubuntu deep learning and data science virtual machine (DSVM) for a few projects I’m working on here at PyImageSearch.
At first, I was a bit hesitant (and perhaps even a bit resistant) to giving it a try — I already have a pre-configured Amazon AWS deep learning AMI that (1) I use often and (2) is publicly available to any PyImageSearch reader who wants to utilize it in their own projects.
And while I’m not a fan of Amazon’s AWS user interface, I’ve gotten used to it over the years. I suppose there is a sort of “familiarity” in its clunky complexity.
But I had heard such good things about the Ubuntu DSVM that I decided to test it out.
I was incredibly impressed.
The interface was easier to use. The performance was great. The price was on point.
…and it didn’t hurt that all code from Deep Learning for Computer Vision with Python ran on it without a single change.
Microsoft even graciously allowed me to author a series of guest posts on their Machine Learning Blog and share my experiences while I was using it, testing it, and evaluating it:
- Deep Learning & Computer Vision in the Microsoft Azure Cloud
- 22 Minutes to 2nd Place in a Kaggle Competition, with Deep Learning & Azure
- Training state-of-the-art neural networks in the Microsoft Azure cloud
Microsoft is serious about establishing themselves as the “go to” cloud environment for deep learning, machine learning, and data science. The quality of their DSVM product shows that.
In the remainder of today’s special edition blog post I’ll be sharing my thoughts on the DSVM and even demonstrating how to start your first instance and run your first deep learning example on it.
To learn more about Microsoft’s deep learning virtual machine (and whether it’s right for you), keep reading!
A review of Microsoft’s deep learning virtual machine
When I first evaluated Microsoft’s data science and deep learning virtual machine (DSVM) I took all code examples from Deep Learning for Computer Vision with Python and ran each and every example on the DSVM.
The process of manually running each example and inspecting the output was a bit tedious but it was also a great way to put the DSVM for the ringer and assess it for:
- Beginner usage (i.e., just getting started with deep learning)
- Practitioner usage, where you’re building deep learning models and need to quickly evaluate performance
- Research usage, where you’re training deep neural networks on large image datasets.
The codebase to Deep Learning for Computer Vision with Python compliments this test perfectly.
The code inside the Starter Bundle is meant to help you take your first step with image classification, deep learning, and Convolutional Neural Networks (CNNs).
If the code ran without a hitch on the DSVM then I could certainly recommend it to beginners looking for a pre-configured deep learning environment.
The chapters + accompanying code in the Practitioner Bundle cover significantly more advanced techniques (transfer learning, fine-tuning GANs, etc). These are the techniques a deep learning practitioner or engineer would be applying in their day to day work.
If the DSVM handled these examples, then I knew I could recommend it to deep learning practitioners.
Finally, the code inside the ImageNet Bundle requires GPU horsepower (the more the better) and I/O performance. Inside this bundle I demonstrate how to replicate the results of state-of-the-art publications (ex. ResNet, SqueezeNet, etc.) on the massive image datasets, such as the 1.2 million image ImageNet dataset.
If the DSVM could handle reproducing the results of state-of-the-art papers, then I knew I could recommend the DSVM to researchers.
In the first half of this blog post I’ll summarize my experience with each of these tests.
From there I’ll show you how to launch your first deep learning instance in the Microsoft cloud and then run your first deep learning code example in the DSVM.
Comprehensive deep learning libraries
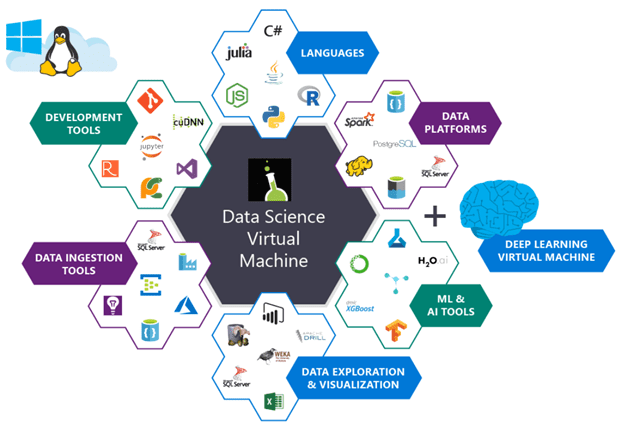
Figure 1: The Microsoft Azure Data Science Virtual Machine comes with all packages shown pre-installed and pre-configured for your immediate use.
Microsoft’s deep learning virtual machine runs in their Azure cloud.
It can technically run either Windows or Linux, but for nearly all deep learning projects, I would recommend you use their Ubuntu DSVM instance (unless you have a specific reason to use Windows).
The list of packages installed on the DSVM is is quite comprehensive — you can find the full list here. I have included the most notable deep learning and computer vision packages (particularly to PyImageSearch readers) below to give you an idea on how comprehensive this list is:
- TensorFlow
- Keras
- mxnet
- Caffe/Caffe2
- Torch/PyTorch
- OpenCV
- Jupyter
- CUDA and cuDNN
- Python 3
The DSVM team releases a new, updated DSVM every few months with the most up to date packages pre-configured and pre-installed. This is a huge testament to not only the DSVM team for keeping this instance running seamlessly (keeping the DSVM free of package conflicts must be a painful process, but it’s totally transparent to the end user), but also Microsoft’s desire to have users enjoying the experience as well.
What about GPUs?
The DSVM can run in both CPU-only and GPU instances.
For the majority of all experiments and tests I ran below, I utilized an Ubuntu GPU instance with the standard NVIDIA K80 GPU.
Additionally, Microsoft granted me to access to their just released NVIDIA V100 behemoth which I ran a few additional quick spot checks with (see results below — it’s fast!)
For all Starter Bundle and Practitioner Bundle experiments I opted to test out Microsoft’s Jupyter Notebook.
The process was incredibly easy.
I copied and pasted the Jupyter Notebook server URL in my browser, launched a new notebook, and within a few minutes I was running examples from the book.
For the ImageNet Bundle experiments I used SSH as replicating the results of state-of-the-art papers required days of training time and I personally do not think that is a proper usage of Jupyter Notebooks.
Easy for deep learning beginners to use
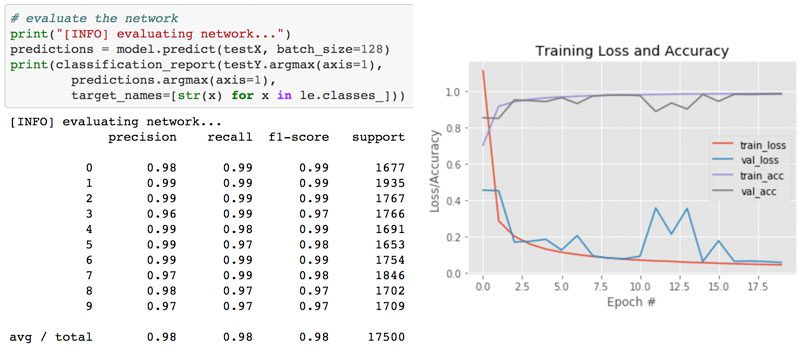
Figure 2: Training the LeNet architecture on the MNIST dataset. This combination is often referred to as the “hello world” example of Deep Learning.
In my first guest post on the Microsoft blog, I trained a simple Convolutional Neural Network (LeNet) on the MNIST handwritten digit dataset. Training LeNet on MNIST is likely the first “real” experiment for a beginner studying deep learning.
Both the model and dataset are straightforward and training can be performed on a CPU or GPU as well.
I took the code from Chapter 14 of Deep Learning for Computer Vision with Python (Starter Bundle) and executed it in a Jupyter Notebook (which you can find here) on the Microsoft DSVM.
The results of which can be seen in Figure 2 above.
I was was able to obtain 98% classification accuracy after 20 epochs of training.
All other code examples from the Starter Bundle of Deep Learning for Computer Vision with Python ran without a hitch as well.
Being able to run the code in browser via a Jupyter Notebook on the Azure DSVM (with no additional configurations) was a great experience and one that I believe users new to deep learning would enjoy and appreciate.
Practical and useful for deep learning practitioners
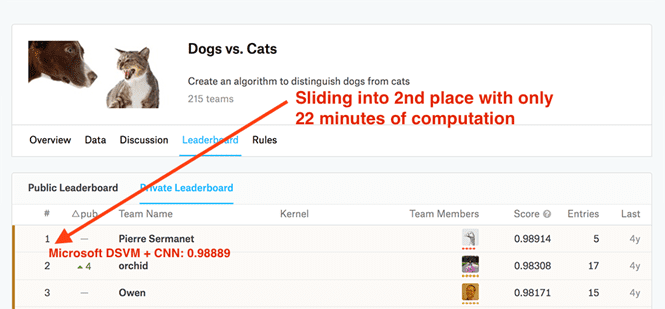
Figure 3: Taking 2nd place on the Kaggle Leaderboard for the dogs vs. cats challenge is a breeze with the Microsoft Azure DSVM (pre-configured) using code from Deep Learning for Computer Vision with Python.
My second post on the Microsoft blog was geared towards practitioners.
A common technique used by deep learning practitioners is to apply transfer learning and in particular, feature extraction, to quickly train a model and obtain high accuracy.
To demonstrate how the DSVM can be used for practitioners looking to quickly train a model and evaluate different hyperparameters, I:
- Utilized feature extraction using a pre-trained ResNet model on the Kaggle Dogs vs. Cats dataset.
- Applied a Logistic Regression classifier with grid searched hyperparameters on the extracted features.
- Obtained a final model capable of capturing 2nd place in the competition.
I also wanted to accomplish all of this in under 25 minutes.
The end result was a model capable of sliding into 2nd place with only 22 minutes of computation (as Figure 3 demonstrates).
You can find a full writeup on how I accomplished this task, including the Jupyter Notebook + code, in this post.
But could it be done faster?
After I had ran the Kaggle Dogs vs. Cats experiment on the NVIDIA K80, Microsoft allowed me access to their just released NVIDIA V100 GPUs.
I had never used an NVIDIA V100 before so I was really excited to see the results.
I was blown away.
While it took 22 minutes for the NVIDIA K80 to complete the pipeline, the NVIDIA V100 completed the task in only 5 minutes — that’s a massive improvement of over 340%!
I believe deep learning practitioners will get a lot of value out of running their experiments on a V100 vs. a K80, but you’ll also need to justify the price as well (covered below).
Powerful enough for state-of-the-art deep learning research
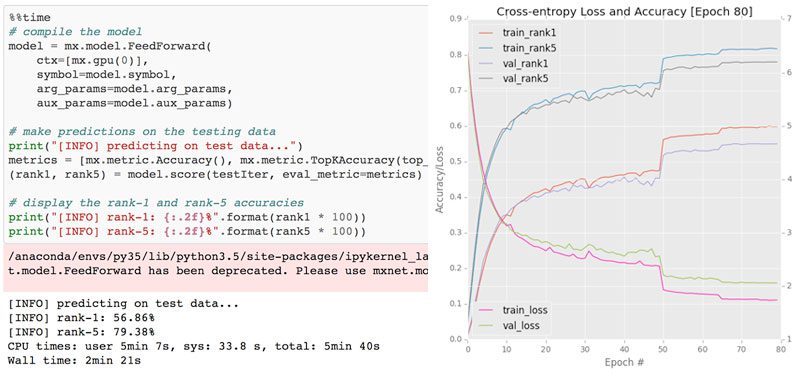
Figure 4: The Microsoft Azure DSVM handles training SqueezeNet on the ImageNet dataset easily.
The DSVM is perfectly suitable for deep learning beginners and practitioners — but what about researchers doing state-of-the-art work? Is the DSVM still useful for them?
To evaluate this question, I:
- Downloaded the entire ImageNet dataset to the VM
- Took the code from Chapter 9 of the ImageNet Bundle of Deep Learning for Computer Vision with Python where I demonstrate how to train SqueezeNet on ImageNet
I chose SqueezeNet for a few reasons:
- I had a local machine already training SqueezeNet on ImageNet for a separate project, enabling me to easily compare results.
- SqueezeNet is one of my personal favorite architectures.
- The resulting model size (< 5MB without quantization) is more readily used in production environments where models need to be deployed over resource constrained networks or devices.
I trained SqueezeNet for a total of 80 epochs on the NVIDIA K80. SGD was used to train the network with an initial learning rate of 1e-2 (I found the Iandola et al. recommendation of 4e-2 to be far too large for stable training). Learning rates were lowered by an order of magnitude at epochs 50, 65, and 75, respectively.
Each epoch took approximately 140 minutes on the K80 so the entire training time was ~1 week.
Using multiple GPUs could have easily reduced training time to 1-3 days, depending on the number of GPUs utilized.
After training is complete, I evaluated on a 50,000 image testing set (which I sampled from the training set so I did not have to submit the results to the ImageNet evaluation server).
Overall, I obtained 58.86% rank-1 and 79.38% rank-5 accuracy. These results are consistent with the results reported by Iandola et al.
Incredibly fast training with the NVIDIA V100
After I trained the SqueezeNet on ImageNet using the NVIDIA K80, I repeated the experiment with a single V100 GPU.
The speedup in training was incredible.
Compared to the K80 (~140 minutes per epoch), the V100 was completing a single epoch in 28 minutes, a huge speedup over over 400%!
I was able to train SqueezeNet and replicate the results in my previous experiment in just over 36 hours.
Deep learning researchers should give the DSVM serious consideration, especially if you do not want to own and maintain the actual hardware.
But what about price?
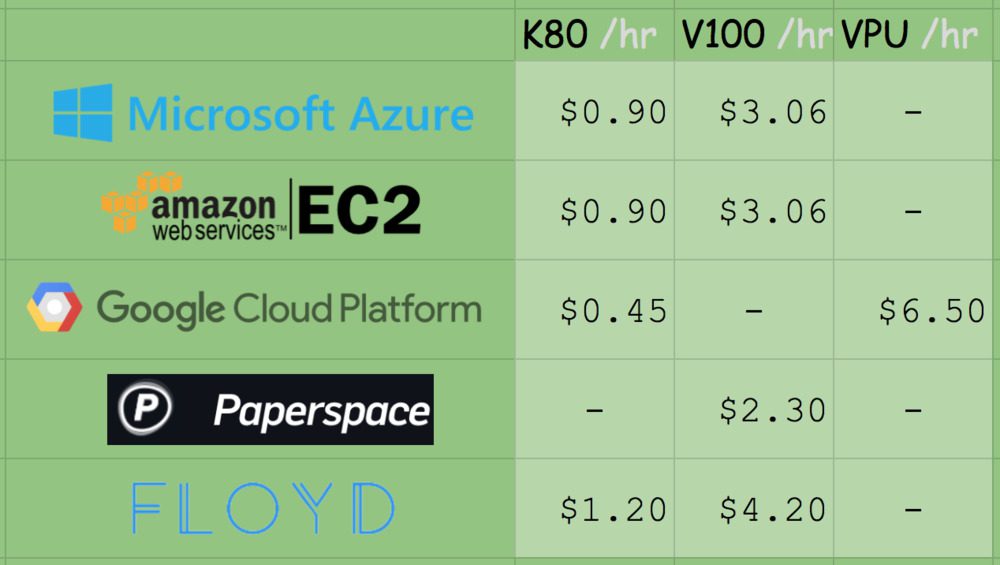
Figure 5: GPU compute pricing comparison for various deep learning + GPU providers.
On Amazon’s EC2, for a p2.xlarge instance, you’ll pay $0.90/hr (1x K80), $7.20/hr (8x K80), or $14.40/hr (16x K80). That is $0.90/hr per K80.
On Microsoft Azure, prices are the exact same $0.90/hr (1x K80), $1.80/hr (2x K80), and $3.60/hr (4x K80). This also comes out to $0.90/hr per K80.
Amazon has V100 machines ready and priced at $3.06/hr (1x V100), $12.24/hr (4x V100), $24.48/hr (8x V100). Be prepared to spend $3.06/hr per V100 on Amazon EC2.
The recently released V100 instances on Azure are priced competitively at $3.06/hr (1x V100), $6.12/hr (2x V100), $12.24/hr (4x V100).This also comes out to $3.06/hr per V100.
Microsoft offers Azure Batch AI pricing, similar to Amazon’s spot pricing, enabling you to potentially get a better deal on instances.
It wouldn’t be a complete (and fair) price comparison unless we look at Google, Paperspace, and Floydhub as well.
Google charges $0.45/hr (1x K80), $0.90 (2x K80), $1.80/hr (4x K80), $3.60/hr (8x K80). This is clearly the best pricing model for the K80 at half the cost of MS/EC2. Google does not have V100 machines available from what I can tell. Instead they offer their own breed, the TPU which is priced at $6.50/hr per TPU.
Paperspace charges $2.30/hr (1x V100) and they’ve got API endpoints.
Floydhub pricing is $4.20/hr (1x V100) but they offer some great team collaboration solutions.
When it comes to reliability, EC2 and Azure stick out. And when you factor in how easy it is to use Azure (compared to EC2) it becomes harder and harder to justify sticking with Amazon for the long run.
If you’re interested in giving the Azure cloud a try, Microsoft offers free trial credits as well; however, the trial cannot be used for GPU machines (I know, this is a bummer, but GPU instances are at a premium).
Starting your first deep learning instance in the Microsoft cloud
Starting a DSVM instance is dead simple — this section will be your quick-start guide to launching one.
For advanced configurations you’ll want to refer to the documentation (as I’ll mainly be selecting the default options).
Additionally, you may want to consider signing up for Microsoft’s free Azure trial so you can test out their Azure cloud without committing to spending your funds
Note: Microsoft’s trial cannot be used for GPU machines. I know, this is a bummer, but GPU instances are at a huge premium.
Let’s begin!
Step 1: Create a user account or login at portal.azure.com.
Step 2: Click “Create Resource” in the top-left.
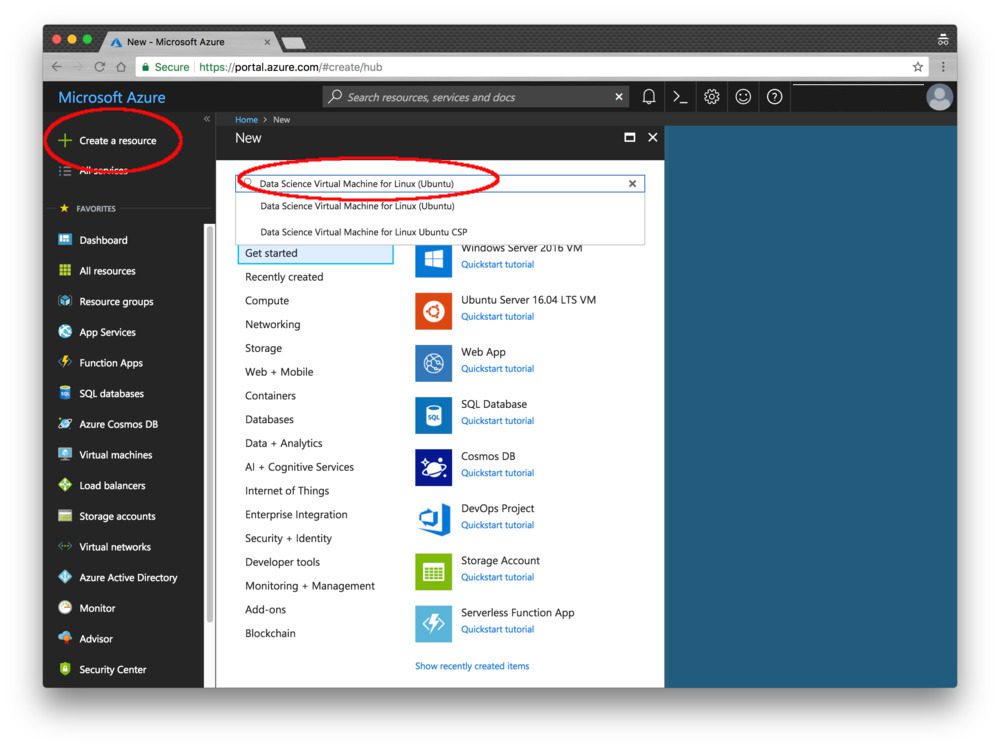
Figure 6: Microsoft Azure “Create Resource” screen.
Step 3: Enter “Data Science Virtual Machine for Linux” in the search box and it will auto-complete as you type. Select the first Ubuntu option.
Step 4: Configure the basic settings: Create a Name (no spaces or special chars). Select HDD (do not select SSD). I elected to use a simple password rather than a key file but this is up to you. Under “Subscription” check to see if you have any free credits you can use. You’ll need to create a “Resource Group” — I used my existing “rg1”.
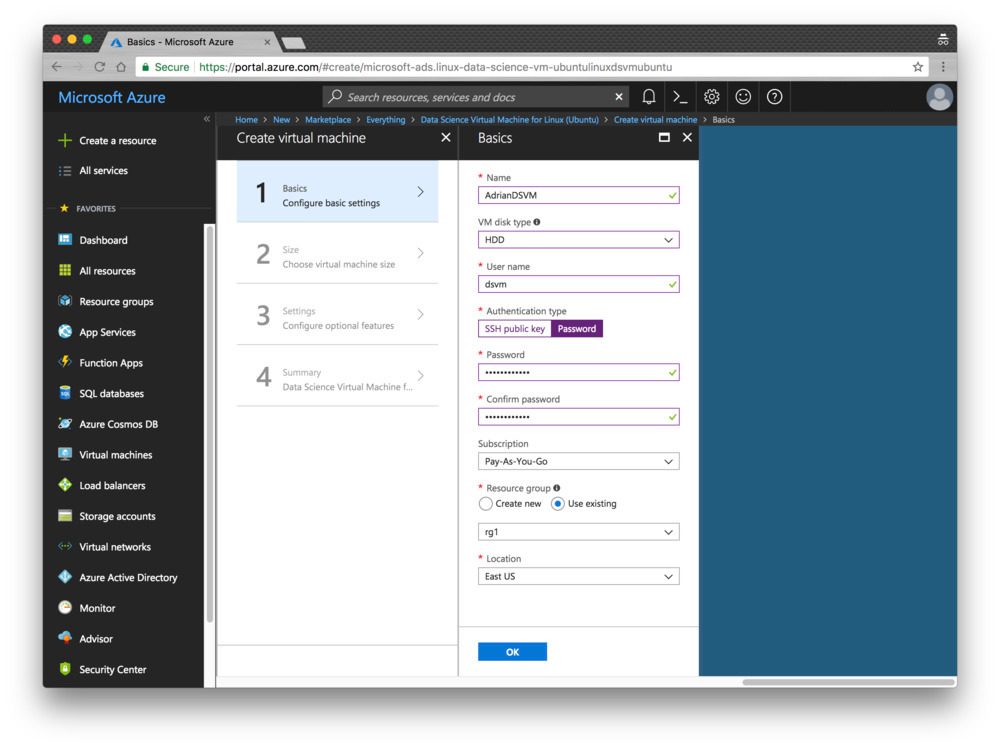
Figure 7: Microsoft Azure resource “Basic Settings”.
Step 5: Choose a Region and then choose your VM. I selected the available K80 instance (NC65_V3). The V100 instance is also available if you scroll down (NC6S_V3). One of my complaints is I don’t understand the naming conventions. I was hoping they were named like sports cars or at least something like “K80-2” for a 2x K80 machine, instead they’re named after the number of vCPUs which is a bit confusing when we’re instead interested in the GPUs.
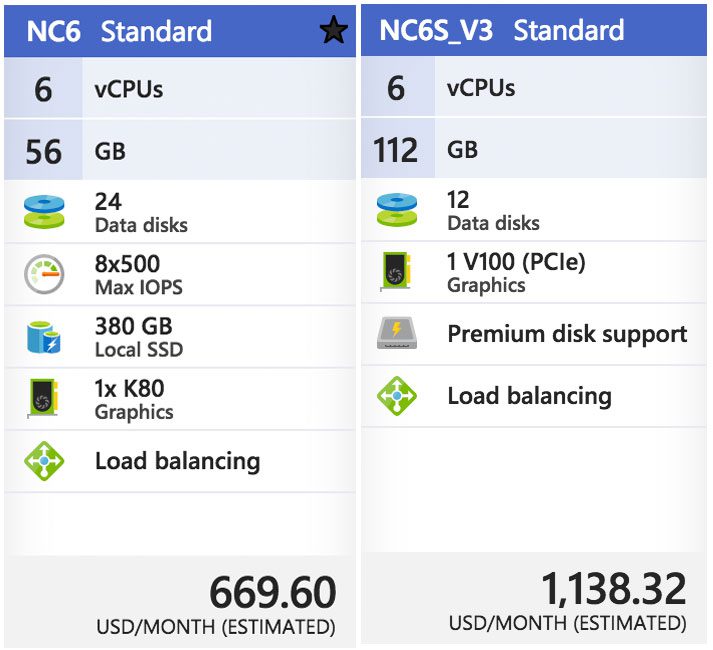
Figure 8: The Microsoft Azure DSVM will run on a K80 GPU and V100 GPU.
Step 6: Review the Summary page and agree to the contract:
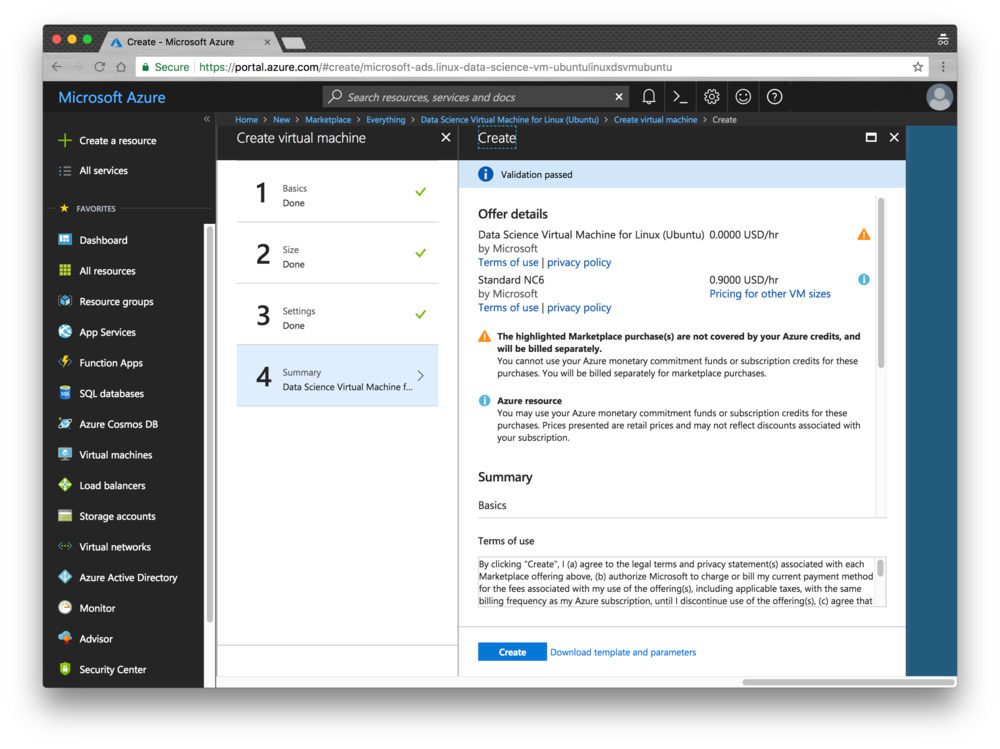
Figure 9: The summary page allows you to review and agree to the contract.
Step 7: Wait while the system deploys — you’ll see a convenient notification when your system is ready.
Step 8: Click “All resources”. You’ll see everything you’re paying for here:
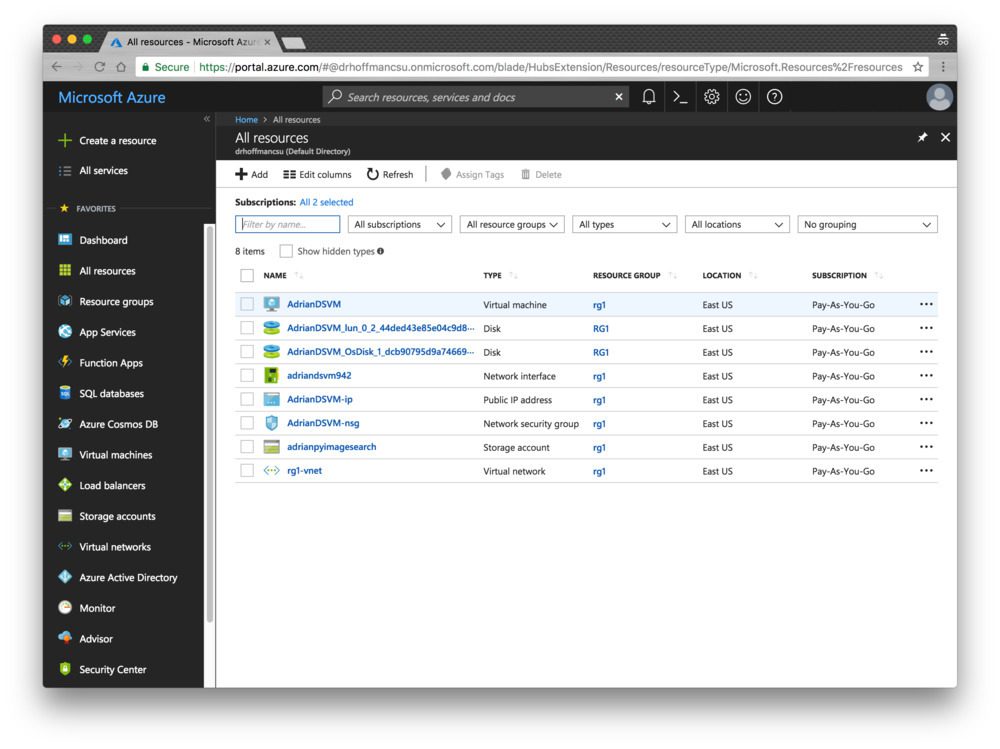
Figure 10: The Azure “All Resources” page shows my DSVM and associated services.
If you select the virtual machine, then you’ll see information about your machine (open the screenshot below in a new tab so you can see a higher resolution version of the image which includes the IP address, etc.):
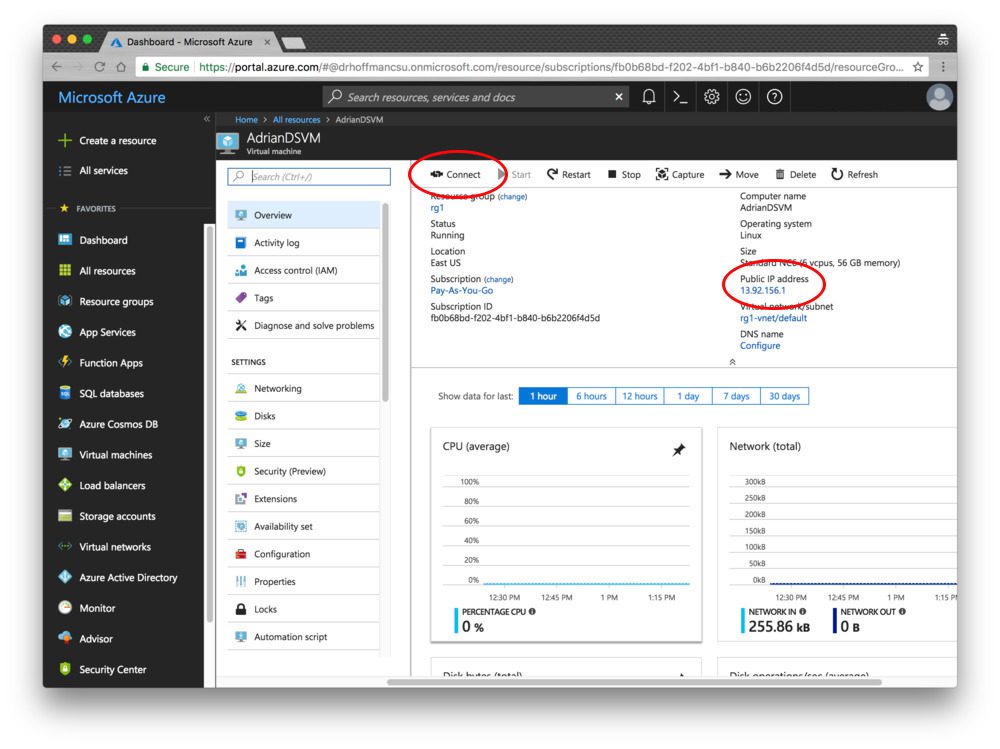
Figure 11: The “Resource Overview” page allows for you to see your instance’s
Step 9: Connect via SSH and/or Jupyter.
Clicking the connect option will provide you with connectivity details for SSH whether you’re using a key file or password:
Unfortunately, a convenient link to Jupyter isn’t shown. To access Jupyter, you’ll need to:
- Open a new tab in your browser
- Navigate to
https://yourAzureDsvmPublicIP:8000
(the “s” after “http” is important). Make sure you fill in the URL with your public IP.
Running code on the deep learning virtual machine
Now, let’s run the LeNet + MNIST example from my first Microsoft post in Jupyter.
This is a two step process:
Step 1: SSH into the machine (see Step 9 in the previous section).
Change directory into the
~/notebooksdirectory.
Clone the repo:
$ git clone https://github.com/jrosebr1/microsoft-dsvm.git
Step 2: Fire up Jupyter in your browser (see Step 9 in the previous section).
Click the
microsoft-dsvmdirectory.
Open the appropriate
.ipynbfile (
pyimagesearch-training-your-first-cnn.ipynb).
But before running the notebook, I’d like to introduce you to a little trick.
It isn’t mandatory, but it can save some headache if you’re working with multiple notebooks in your DSVM.
The motivation for this trick is this: if you execute a notebook but leave it “running”, the kernel still has a lock on the GPU. Whenever you run a different notebook, you’ll see errors such as “resource exhausted”.
The quick fix is to place the following two lines in their very own cell at the very bottom of the notebook:
%%javascript
Jupyter.notebook.session.delete();
Now, when you execute all the cells in the notebook, the notebook will gracefully shut down its own kernel. This way you won’t have to remember to manually shut it down.
From there, you can click somewhere inside the first cell and then click “Cell > Run all”. This will run all cells in the notebook and train LeNet on MNIST. From there you can watch the output in the browser and obtain a result similar to mine below:
Figure 12: Training LeNet on MNIST in the Microsoft Azure cloud and the Data Science Virtual Machine (DSVM).
I like to clear all output when I’m finished or before starting new runs after modifications. You can do this from the “Kernel > Restart & Clear Output” menu selection.
Summary
In today’s blog post, I reviewed and discussed my personal experience with Microsoft’s data science and deep learning virtual machine (DSVM).
I also demonstrated how to launch your first DSVM instance and run your first deep learning example on it.
I’ll be the first to admit that I was a bit hesitant when trying out the DSVM — but I’m glad I did.
Each and every test I threw at the DSVM, ranging from beginner usage to replicating the results of state-of-the-art papers, it handled it with ease.
And when I was able to use Microsoft’s new NVIDIA V100 GPU instances, my experiments flew, seeing a whopping 400% speedup over the NVIDIA K80 instances.
If you’re in the market for a deep learning cloud-based GPU instance, I would encourage you to try out Microsoft’s DSVM — the experience was great, Microsoft’s support was excellent, and the DSVM itself was powerful yet easy to use.
Additionally, Microsoft and the DSVM team will be sponsoring PyImageConf 2018, PyImageSearch’s very own computer vision and deep learning conference.
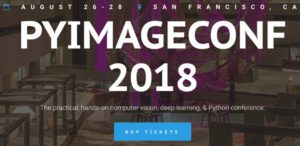
PyImageConf attendees will have free access to DSVM GPU instances while at the conference, allowing you to:
- Follow along with talks and workshops
- Train their own models
- Better learn from speakers
To learn more about PyImageConf 2018, just click here.
I hope to see you there!
The post My review of Microsoft’s data science virtual machine (DSVM) for deep learning appeared first on PyImageSearch.
from PyImageSearch http://ift.tt/2FSKML9
via IFTTT
ISS Daily Summary Report – 3/20/2018
Mouse Stress Defense: Today the crew continued preparations for the Mouse Stress Defense investigation which will start after the arrival of mice on the SpaceX-14 Dragon vehicle. The crew reconfigured laptop cables and connected the Cell Biology Experiment Facility (CBEF) to a backup power source. Space flight brings an extreme environment with unique stressors. Microgravity … Continue reading "ISS Daily Summary Report – 3/20/2018"
from ISS On-Orbit Status Report http://ift.tt/2psJc7J
via IFTTT
from ISS On-Orbit Status Report http://ift.tt/2psJc7J
via IFTTT
8th St.'s surf is at least 6.11ft high
Maryland-Delaware, March 27, 2018 at 04:00AM
8th St. Summary
At 4:00 AM, surf min of 6.11ft. At 10:00 AM, surf min of 6.24ft. At 4:00 PM, surf min of 6.29ft. At 10:00 PM, surf min of 6.29ft.
Surf maximum: 7.31ft (2.23m)
Surf minimum: 6.11ft (1.86m)
Tide height: 3.72ft (1.14m)
Wind direction: ESE
Wind speed: 7.41 KTS
from Surfline http://ift.tt/1kVmigH
via IFTTT
AMD Acknowledges Newly Disclosed Flaws In Its Processors — Patches Coming Soon
AMD has finally acknowledged 13 critical vulnerabilities, and exploitable backdoors in its Ryzen and EPYC processors disclosed earlier this month by Israel-based CTS Labs and promised to roll out firmware patches for millions of affected devices ‘in the coming weeks.’ According to CTS-Labs researchers, critical vulnerabilities (RyzenFall, MasterKey, Fallout, and Chimera) that affect AMD's

from The Hacker News http://ift.tt/2DIR8Xy
via IFTTT
from The Hacker News http://ift.tt/2DIR8Xy
via IFTTT
Camera Orion
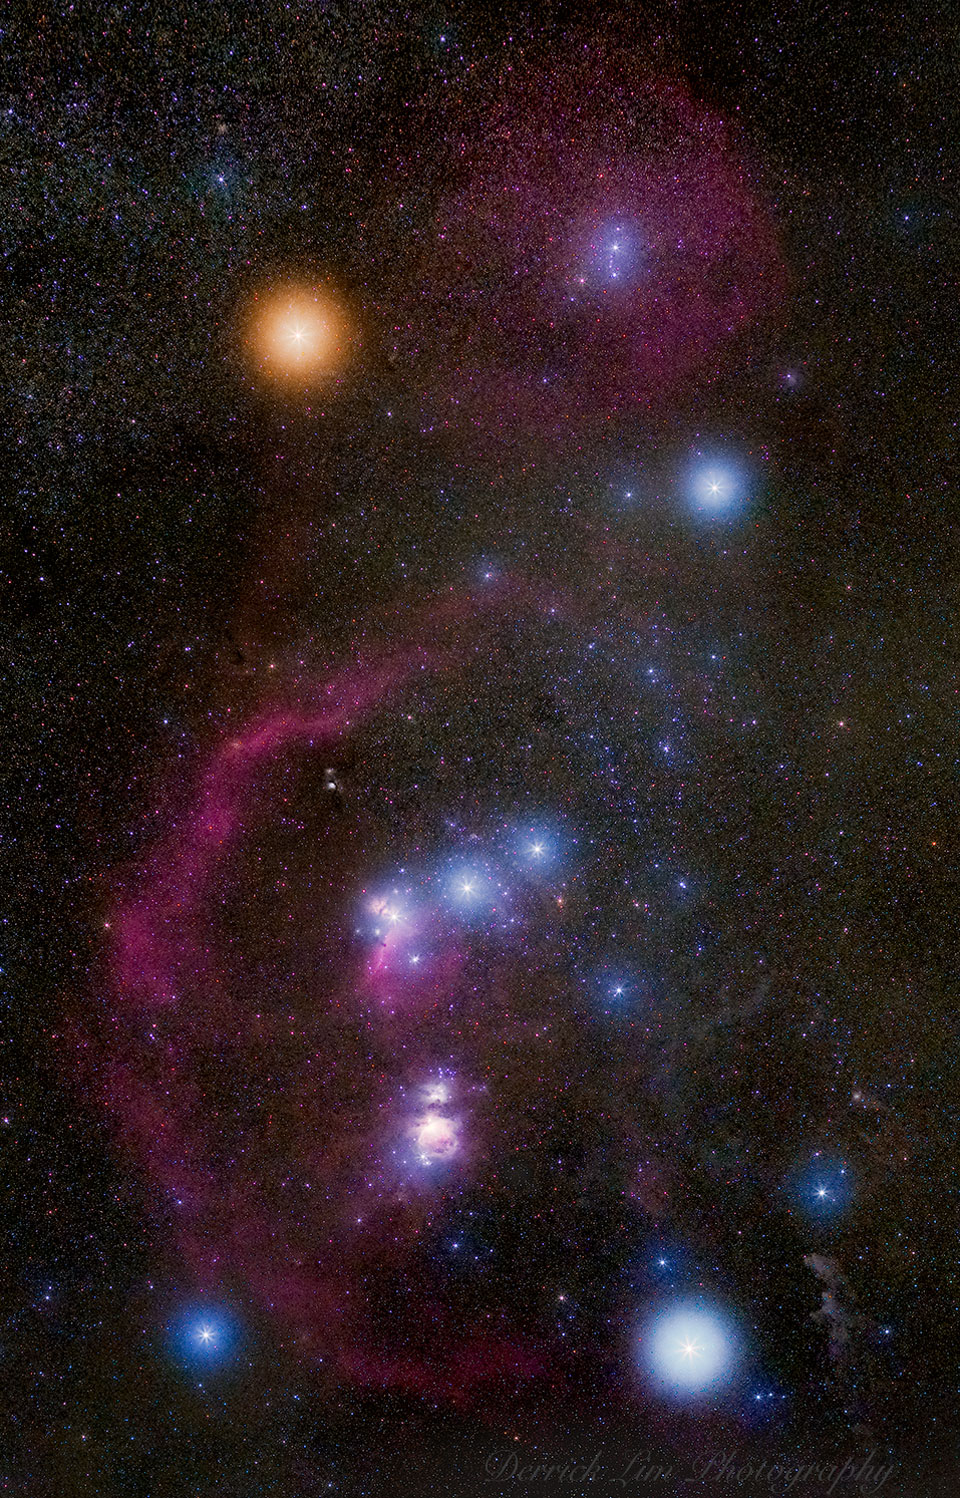
Do you recognize this constellation? Although it is one of the most recognizable star groupings on the sky, Orion's icons don't look quite as colorful to the eye as they do to a camera. In this 20-image digitally-composed mosaic, cool red giant Betelgeuse takes on a strong orange tint as the brightest star at the upper left. Orion's hot blue stars are numerous, with supergiant Rigel balancing Betelgeuse at the lower right, and Bellatrix at the upper right Lined up in Orion's belt are three stars all about 1,500 light-years away, born from the constellation's well-studied interstellar clouds. Below Orion's belt a reddish and fuzzy patch that might also look familiar -- the stellar nursery known as Orion's Nebula. Finally, just barely visible to the unaided eye but quite striking here by camera is Barnard's Loop -- a huge gaseous emission nebula surrounding Orion's Belt and Nebula discovered over 100 years ago by the pioneering Orion photographer E. E. Barnard. via NASA http://ift.tt/2GRtZp2
Tuesday, March 20, 2018
MLB: Orioles and P Alex Cobb agree to 4-year, $60M deal - FanRag Sports (ESPN)
from ESPN http://ift.tt/1eW1vUH
via IFTTT
via IFTTT
Windows Remote Assistance Exploit Lets Hackers Steal Sensitive Files
You have always been warned not to share remote access to your computer with untrusted people for any reason—it's a basic cybersecurity advice, and common sense, right? But what if, I say you should not even trust anyone who invites or offer you full remote access to their computers. A critical vulnerability has been discovered in Microsoft's Windows Remote Assistance (Quick Assist) feature

from The Hacker News http://ift.tt/2pwRiNx
via IFTTT
from The Hacker News http://ift.tt/2pwRiNx
via IFTTT
ISS Daily Summary Report – 3/19/2018
Circadian Rhythms: Today, a crewmember began a three day European Space Agency (ESA) Circadian Rhythms experiment by donning the Thermolab Double sensors, which are to be worn for 36 hours. The objective of the experiment is to get a better understanding of any alterations in circadian rhythms in humans during long-term space flights. Such knowledge … Continue reading "ISS Daily Summary Report – 3/19/2018"
from ISS On-Orbit Status Report http://ift.tt/2GPnvXK
via IFTTT
from ISS On-Orbit Status Report http://ift.tt/2GPnvXK
via IFTTT
Anonymous Mongoose
MATLAB Central contributions by Anonymous Mongoose.
from Google Alert - anonymous http://ift.tt/2FNEwnZ
via IFTTT
from Google Alert - anonymous http://ift.tt/2FNEwnZ
via IFTTT
8th St.'s surf is at least 5.33ft high
Maryland-Delaware, March 26, 2018 at 04:00AM
8th St. Summary
At 4:00 AM, surf min of 5.33ft. At 10:00 AM, surf min of 5.34ft. At 4:00 PM, surf min of 5.32ft. At 10:00 PM, surf min of 5.41ft.
Surf maximum: 6.14ft (1.87m)
Surf minimum: 5.33ft (1.62m)
Tide height: 3.75ft (1.14m)
Wind direction: ENE
Wind speed: 10.85 KTS
from Surfline http://ift.tt/1kVmigH
via IFTTT
Apple Blocks Sites From Abusing HSTS Security Standard to Track Users
If you are unaware, the security standard HTTP Strict Transport Security (HSTS) can be abused as a 'supercookie' to surreptitiously track users of almost every modern web browser online without their knowledge even when they use "private browsing." Apple has now added mitigations to its open-source browser infrastructure WebKit that underpins its Safari web browser to prevent HSTS abuse after

from The Hacker News http://ift.tt/2ppi7mm
via IFTTT
from The Hacker News http://ift.tt/2ppi7mm
via IFTTT
Blanche" (Anonymous handmade manuscript of cut-outs of magazine illustrations, loosely narrated ...
1910 · np. by Anonymous. np: No Publisher, 1910. First Edition. Paperback. Like New. 38 pp. Ruled untitled notebook with mounted illustrations on both recto and verso throughout, all with accompanying captions in manuscript. Very Good. A collection of clipped illustrations from magazines, mostly ...
from Google Alert - anonymous http://ift.tt/2u4zKgm
via IFTTT
from Google Alert - anonymous http://ift.tt/2u4zKgm
via IFTTT
Anonymous Recruiter
See the latest Anonymous Recruiter jobs on CV-Library. Browse Full and Part Time roles from Anonymous Recruiter, upload your CV and apply in minutes - CV-Library.
from Google Alert - anonymous http://ift.tt/2FKojj8
via IFTTT
from Google Alert - anonymous http://ift.tt/2FKojj8
via IFTTT
Chicagohenge: Equinox in an Aligned City
Sometimes, in a way, Chicago is like a modern Stonehenge. The way is east to west, and the time is today. Today, and every equinox, the Sun will set exactly to the west, everywhere on Earth. Therefore, today in Chicago, the Sun will set directly down the long equatorially-aligned grid of streets and buildings, an event dubbed #chicagohenge. Featured here is a Chicago Henge picture taken during the last equinox in mid-September of 2017 looking along part of Upper Wacker Drive. Many cities, though, have streets or other features that are well-aligned to Earth's spin axis. Therefore, quite possibly, your favorite street may also run east - west. Tonight at sunset, with a quick glance, you can actually find out. via NASA http://ift.tt/2ppmw8c
Monday, March 19, 2018
Georgia House backs push to keep lottery winners anonymous
ATLANTA (AP) – Georgia lottery players who win big can stay anonymous under a proposal approved by the state House. The House voted 173-1 on Monday in favor of the bill, which legislators say will help public safety. The legislation says those who win at least $250,000 and submit a written request ...
from Google Alert - anonymous http://ift.tt/2pq7cbr
via IFTTT
from Google Alert - anonymous http://ift.tt/2pq7cbr
via IFTTT
Ravens: WR John Brown says cyst on spine, not sickle cell trait, affected his on-field production (ESPN)
from ESPN http://ift.tt/17lH5T2
via IFTTT
via IFTTT
Mastercard “Very Happy” to Support [State] Cryptocurrencies, Just Not Anonymous
Payments giant Mastercard is fully behind supporting state-backed, central bank-issued cryptocurrencies, a senior executive has revealed.
from Google Alert - anonymous http://ift.tt/2u1alnI
via IFTTT
from Google Alert - anonymous http://ift.tt/2u1alnI
via IFTTT
Offseason Needs: Ravens still looking for TE help, and all the other teams' remaining holes - Jamison Hensley (ESPN)
from ESPN http://ift.tt/17lH5T2
via IFTTT
via IFTTT
Reading barcodes with Python and OpenMV
What if I said that there’s a camera that:
- Is low cost at $65.
- Runs MicroPython.
- And can be expanded with shields just like an Arduino/RPi.
Meet OpenMV!
I met Kwabena Agyeman, the founder of OpenMV, during the PyImageSearch Gurus Kickstarter campaign in January 2015. At that time, Kwabena and the OpenMV team were running a Kickstarter of their own. Kwabena’s Kickstarter raised a lot more funds than mine, which really demonstrates (1) the value of the OpenMV product and (2) the eagerness of the embedded community to work with such a tool.
Since the OpenMV Kickstarter, the OpenMV team has been on a mission to provide a low cost, Python-ready, and easy to use camera system for developers and engineers working on embedded computer vision projects.
Given the success of OpenMV so far, perhaps it’s no surprise that there is an active community of developers. You’ll definitely have the support needed to make your project a success. When I started building the barcode scanning system for this post I was incredibly impressed by the responsiveness of their users and forums.
In today’s blog post, you’ll be introduced to OpenMV, their fancy IDE, and we’ll even build your own barcode scanning system.
To get started with the OpenMV cam and barcode decoding with computer vision, just keep reading.
Looking for the source code to this post?
Jump right to the downloads section.
Reading barcodes with Python and OpenMV

Figure 1: The OpenMV can read QR codes among many types of codes — all with built in libraries!
There’s no way of getting around barcodes in today’s world.
Every grocery item or Amazon package you receive has them. Every time you board an airplane or rent a car, barcodes are used. And heaven forbid, the a barcode could be associated with your identity on a hospital wristband during an emergency visit!
But why?
Simply put, barcodes are an easy way for computers to associate an item with a database. It’s therefore important that barcodes are decoded properly so that databases can be updated.
Typical barcode readers use a photoelectric cell to “see” the code. Check out this post by Chris Woodford on Barcodes and barcode scanners.
Given the prominence of cameras in today’s age, we can actually use image processing to detect and decode barcodes.
In a previous post here on PyImageSearch, I demonstrated how to detect barcodes with Python and OpenCV.
Detecting is one piece of the puzzle.
The other piece is decoding the barcode into a useful string.
Unfortunately, OpenCV does not contain built-in barcode detection + reading functionality…
…but there are a few popular libraries for barcode detection, one of which is ZBar. Satya Mallick, a PyImageConf 2018 presenter, wrote a great post about ZBar last month on his blog.
Using ZBar and other similar barcode reading libraries is one method to accomplish the task.
The other option is to use embedded tools and libraries such as OpenMV.
In fact, OpenMV makes it so easy to detect and read barcodes that you could:
- Build your own barcode scanning device
- Create an automated part inspection system on an assembly line
- Utilize OpenMV in a hobby project to help you scan and organize components and peripherals in your workshop
- Use OpenMV to teach middle school or high schoolers about embedded programming
The OpenMV cam
Figure 2: The OpenMV camera is a powerful embedded camera board that runs MicroPython.
Aimed at being the “Arduino of Machine Vision”, the OpenMV cam is embedded (no OS) and is expandable via several available shields (just like an Arduino).
It is also dead-simple to use — you write code with MicroPython (unlike an Arduino).
Python users and readers of this blog will feel at home when building embedded computer vision projects with MicroPython for the OpenMV.
The OpenMV camera is quite capable and would fit well in a small robotics project with servo motors or even in a automated part inspection assembly line.
You can easily interface the OpenMV with other hardware, sensors, microcontrollers, and SBCs over communication protocols such as SPI, I2C, WiFi, and USB.
OpenMV will typically work best if it just has one or two tasks to perform as it does have limited memory (31KB is allocated for scripts). If you need to record stills or video you may plug in a microSD.
Image processing capabilities of the OpenMV include:
- Haar cascades
- Thresholding
- Blob detection
- Drawing lines, circles, and rectangles
- Recording GIFs and MJPEGs
- Reading barcodes (this post)
- Template matching
- …and more!
For the full list, be sure to check out the docs.
Do you need a particular lens for your application? One differentiator is the Standard M12 Lens Mount. Now you can attach that telescopic zoom or fisheye lens for your project. I sure do wish that the Raspberry Pi PiCamera has a lens mount like the OpenMV does.
Barcode detection and decoding with OpenMV and Python
Once you’ve installed the OpenMV IDE, fire it up. We’ll be doing all of our coding in the OpenMV IDE.
Let’s begin by creating a file called
openmv_barcode.py:
# import necessary packages
import sensor
import time
import image

# import the lcd optionally
# to use the LCD, uncomment Lines 9, 24, 33, and 100
# and comment Lines 19 and 20
#import lcd
On Lines 2-4 we import our required MicroPython/OpenMV packages.
Optionally, on Line 9, you can import the
lcdpackage which is required if you want to use the LCD shield.
Next, let’s set up the camera sensor:
# reset the camera
sensor.reset()

# sensor settings
sensor.set_pixformat(sensor.GRAYSCALE)

# non LCD settings
# comment the following lines if you are using the LCD
sensor.set_framesize(sensor.VGA)
sensor.set_windowing((640, 240))

# LCD settings
# uncomment this line to use the LCD with valid resolution
#sensor.set_framesize(sensor.QQVGA2)

# additional sensor settings
sensor.skip_frames(2000)
sensor.set_auto_gain(False)
sensor.set_auto_whitebal(False)
The settings on Lines 12-29 are self explanatory, so please read the code and comments.
I do want to point out that the LCD requires a resolution that fits the screen (
sensor.QQVGA2).
Note: I tried and tried to figure out how to use the full resolution and then make a scaled image which would fit on the LCD, but was unable. Because of this, if you do elect to use the LCD, you’ll be trying to decode barcodes at a lower resolution (which isn’t optimal for traditional 1D barcodes). Needless to say, the LCD is still a good debugging tool, and I wanted to include it so that you can see that it’s very easy to use. As always, if you are able to solve this problem, then I encourage you to leave me a comment below the post to share with me and the community.
I’d also like to point out Line 27. In the “hello world” example you’ll see a keyword argument
time=2000to
sensor.skip_frames. Keyword arguments aren’t supported in this context, so be sure to use this syntax shown on Line 27 (especially if you are working through the “hello world”).
Next, let’s perform initializations:
# initialize the LCD
# uncomment if you are using the LCD
#lcd.init()

# initialize the clock
clock = time.clock()
You’ll want to uncomment Line 33 if you are using the LCD (see the previous code block).
Line 36 initialize our clock for FPS calculations
From there we’ll create (1) a lookup table and (2) a convenience function for determining the type of barcode:
# barcode type lookup table
barcode_type = {
        image.EAN2: "EAN2",
        image.EAN5: "EAN5",
        image.EAN8: "EAN8",
        image.UPCE: "UPCE",
        image.ISBN10: "ISBN10",
        image.EAN13: "EAN13",
        image.ISBN13: "ISBN13",
        image.I25: "I25",
        image.DATABAR: "DATABAR",
        image.DATABAR_EXP: "DATABAR_EXP",
        image.CODABAR: "CODABAR",
        image.CODE39: "CODE39",
        image.PDF417: "PDF417",
        image.CODE93: "CODE93",
        image.CODE128: "CODE128"
}

def barcode_name(code):
        # if the code type is in the dictionary, return the value string
        if code.type() in barcode_type.keys():
                return barcode_type[code.type()]

        # otherwise return a "not defined" string
        return "NOT DEFINED"
As you can see on Lines 39, where I defined a
barcode_typedictionary, the OpenMV can detect and decode quite a few different barcode styles.
That being said, I didn’t have luck with all of them, so the PDF included with the “Downloads” section of this blog post doesn’t include every type of barcode.
Lines 57-63 define a convenience function for grabbing the barcode type without risk of throwing a Python key exception (the OpenMV does not handle exceptions well).
From there, let’s get down to business and start capturing and processing frames! We’ll begin by starting a
whileloop:
# loop over frames and detect + decode barcodes
while True:
        # tick the clock for our FPS counter
        clock.tick()

        # grab a frame
        img = sensor.snapshot()
The first step is to tick the clock for our FPS counter (Line 68).
From there you should grab a frame with
sensor.snapshot(Line 71).
Now, let the fun begin!
We’ve got an image, so let’s see what we can do with it:
# loop over standard barcodes that are detected in the image
        for code in img.find_barcodes():
                # draw a rectangle around the barcode
                img.draw_rectangle(code.rect(), color=127)

                # print information in the IDE terminal
                print("type: {}, quality: {}, payload: {}".format(
                        barcode_name(code),
                        code.quality(),
                        code.payload()))

                # draw the barcode string on the screen similar to cv2.putText
                img.draw_string(10, 10, code.payload(), color=127)
Here we’re finding standard, non-QR codes. All we need to do is call
img.find_barcodes(which encapsulates all barcode detection + reading functionality) and loop over the results (Line 74).
Given the detected barcodes we can:
- Draw a bounding box rectangle around the detected barcode (Line 76).
- Print the type, quality, and payload (Lines 79-82).
- Draw the string on the screen (Line 85). Unfortunately (according to the docs) there is no current way to draw the string in a larger font.
That’s really all there is to it!
QR code decoding is done in a similar fashion:
# loop over QR codes that are detected in the image
        for code in img.find_qrcodes():
                # draw a rectangle around the barcode
                img.draw_rectangle(code.rect(), color=127)

                # print information in the IDE terminal
                print("type: QR, payload: {}".format(code.payload()))

                # draw the barcode string on the screen similar to cv2.putText
                img.draw_string(10, 10, code.payload(), color=127)

        # display the image on the LCD
        # uncomment if you are using the LCD
        #lcd.display(img)

        # print the frames per second for debugging
        print("FPS: {}".format(clock.fps()))
This loop mimics the standard barcode loop, so be sure to review it for details.
Outside of the loop, if you’re using the LCD, you’ll want to display on it (Line 100).
Lastly, we can easily print the FPS (frames per second) in the terminal on Line 103.
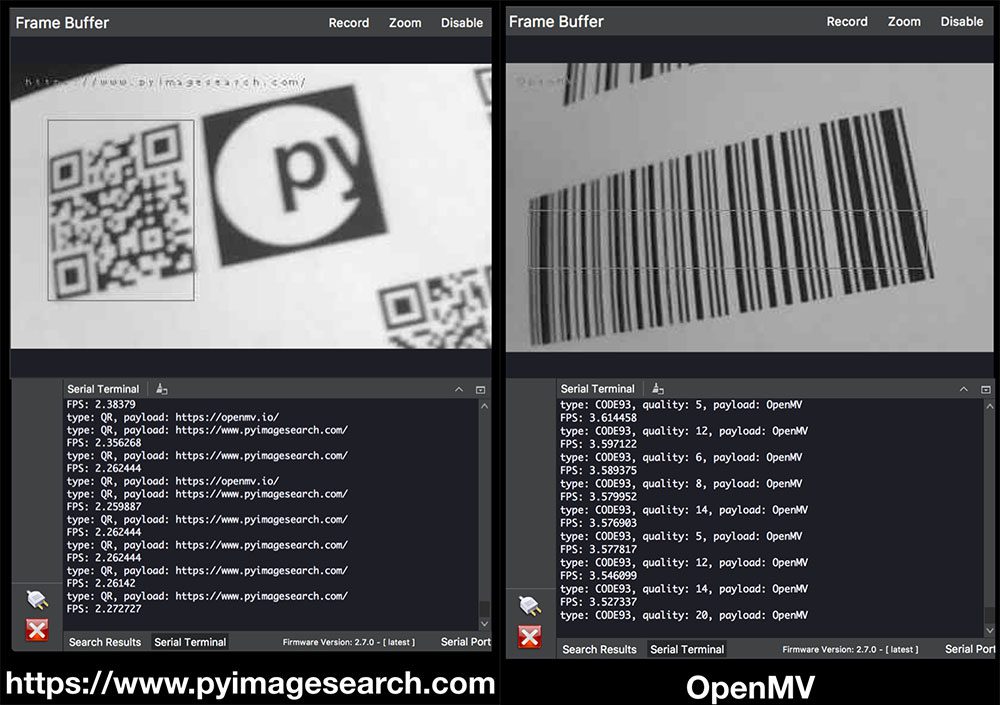
OpenMV Barcode Decoding Results.
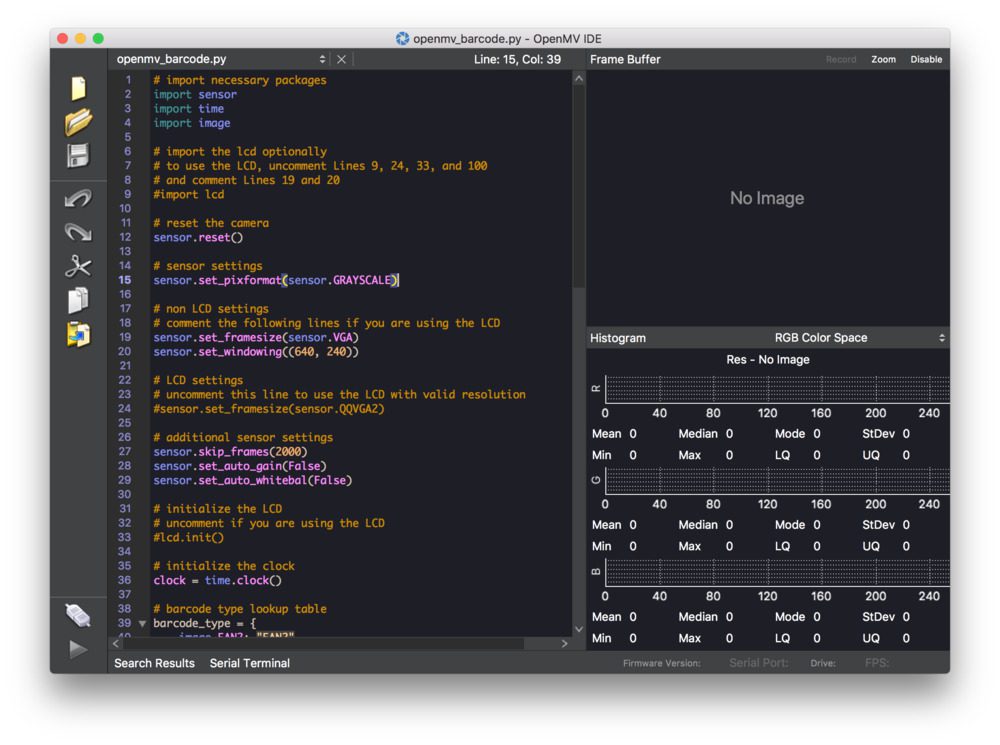
Figure 3: The OpenMV team has put together an awesome IDE for computer vision development. This is what you see when you first open the IDE and load a program.
First, connect your OpenMV cam via USB to your computer.
Then Fire up the IDE as shown in Figure 3.
From there, click the connect button in the lower left.
The IDE may prompt you to update your firmware (which I did without a hitch by clicking the button and waiting about 3-5 minutes).
When you’re ready with your program loaded in the editor, click the green play/program button also in the lower left. This button will set up the OpenMV with your code.
Be patient. It takes about 45-90 seconds for the MicroPython code to compile to machine code and get flashed on the processor. There isn’t a status indicator, so you just need to be patient.
Before long, if you’re printing to the terminal, you’ll see the data such as FPS or barcode information — that’s your queue that everything is working. You’ll also see a live view from the camera sensor in the top right viewfinder.
Now let’s try some barcodes!
In the “Downloads” section, I’ve included a PDF of barcodes for you to print and scan. Here’s what we’re working with:
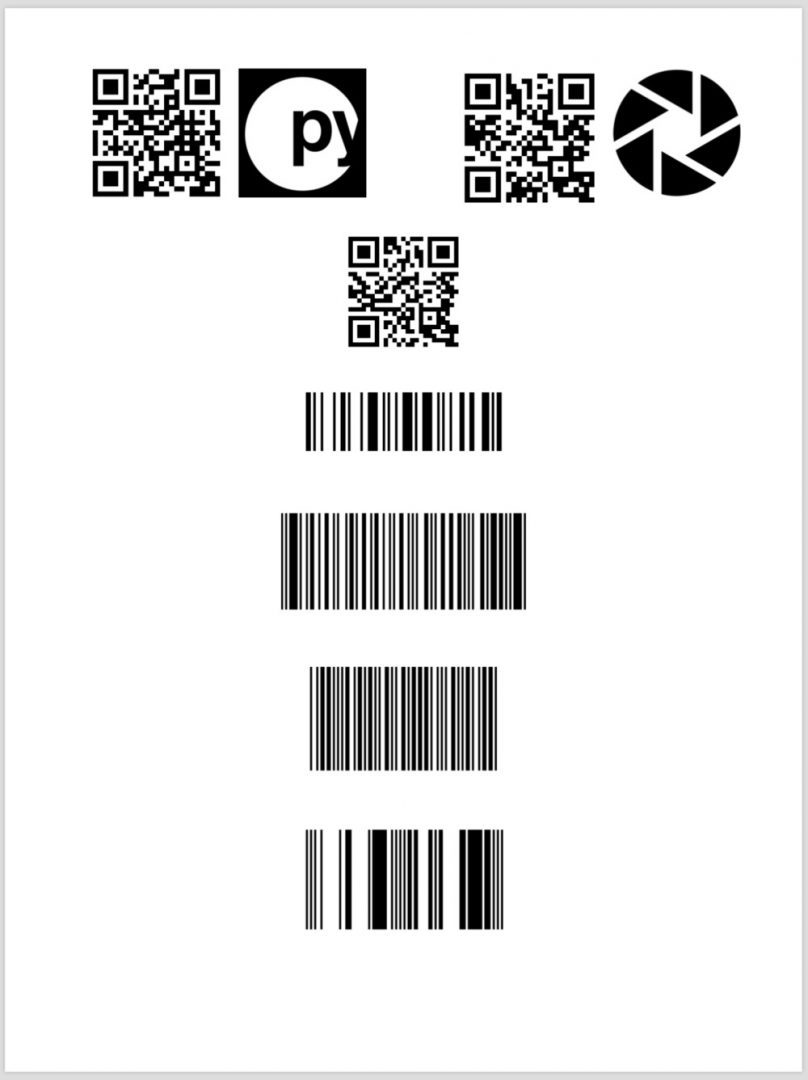
Figure 4: Sample barcodes for testing with the OpenMV camera. Included are QR, CODE128, CODE93, CODE39, and DATABAR barcode images. You may print a PDF from the “Downloads” section of this blog post.
You can see the results here from the IDE’s built in terminal:
FPS: 2.793296
type: QR, payload: https://www.pyimagesearch.com/
FPS: 2.816901
type: QR, payload: https://openmv.io/
FPS: 2.941176
type: QR, payload: http://pyimg.co/dl4cv
FPS: 3.831418
type: CODE128, quality: 48, payload: guru
FPS: 4.484305
ype: CODE93, quality: 15, payload: OpenMV
FPS: 3.849856
type: CODE39, quality: 68, payload: DL4CV
FPS: 3.820961
type: DATABAR, quality: 83, payload: 0100000000020183
FPS: 4.191617
Screenshots of each code and the terminal are below:
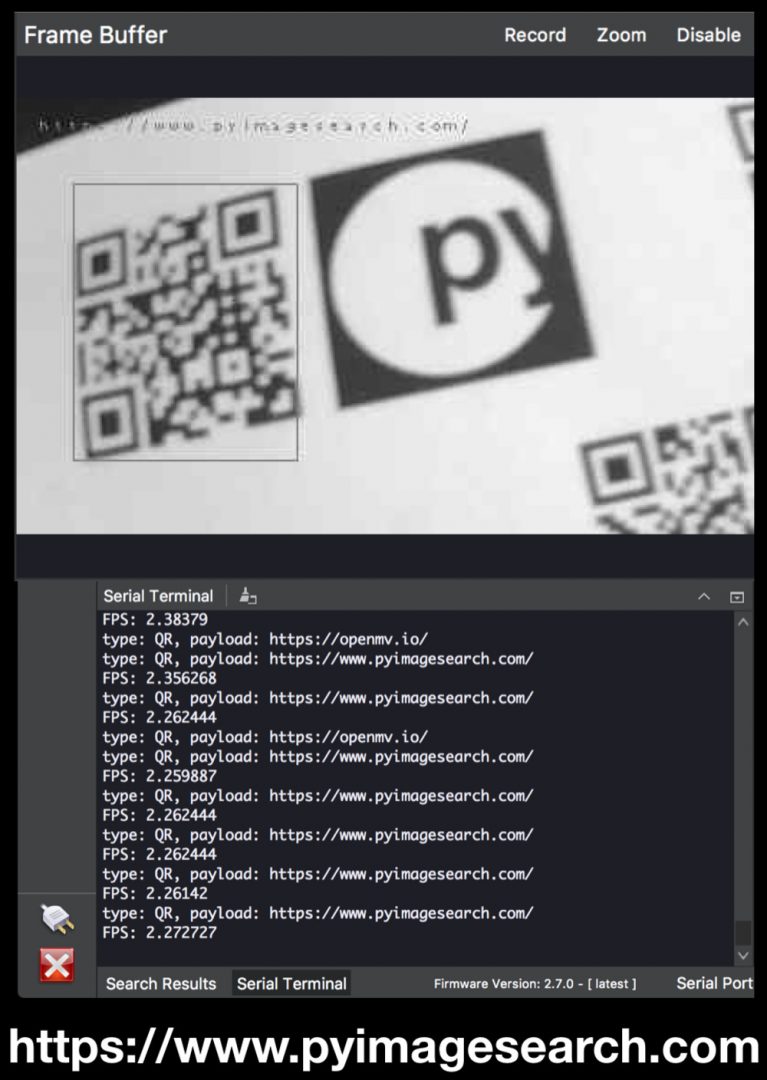
Figure 5: Scanning a QR code with a link to the PyImageSearch homepage.

Figure 6: Scanning a QR code that contains a payload of “https://openmv.io” — the OpenMV homepage.
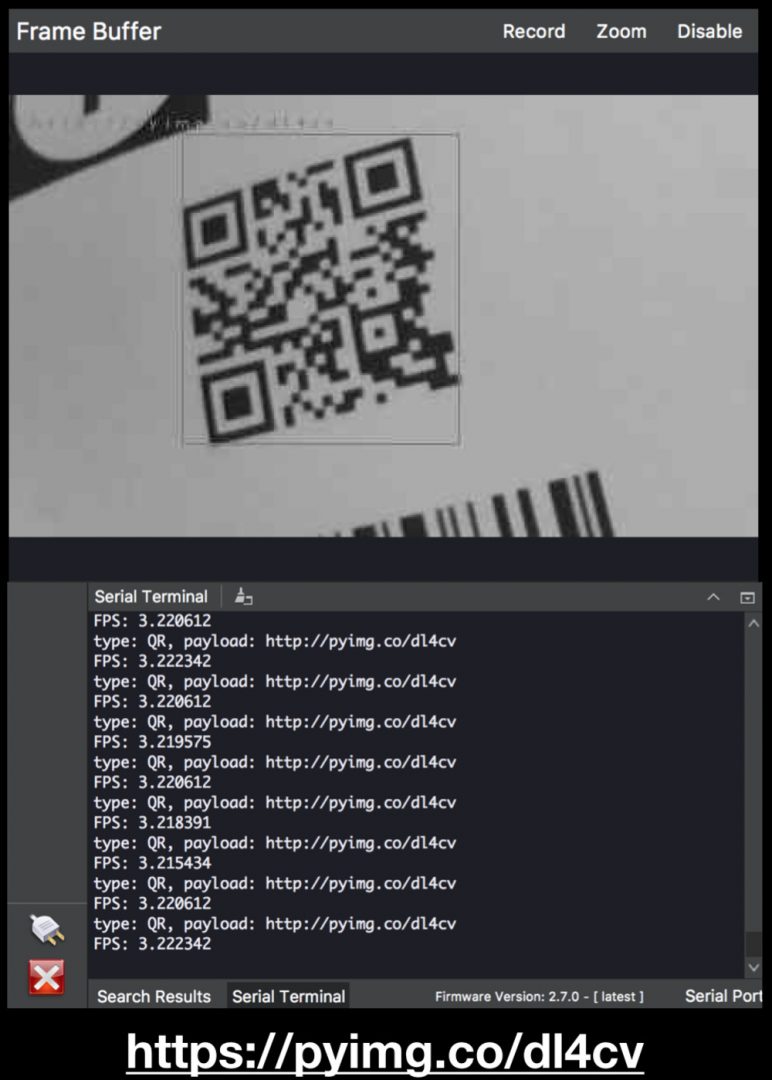
Figure 7: This QR code contains a payload directing you to the Deep Learning for Computer Vision with Python book information page.
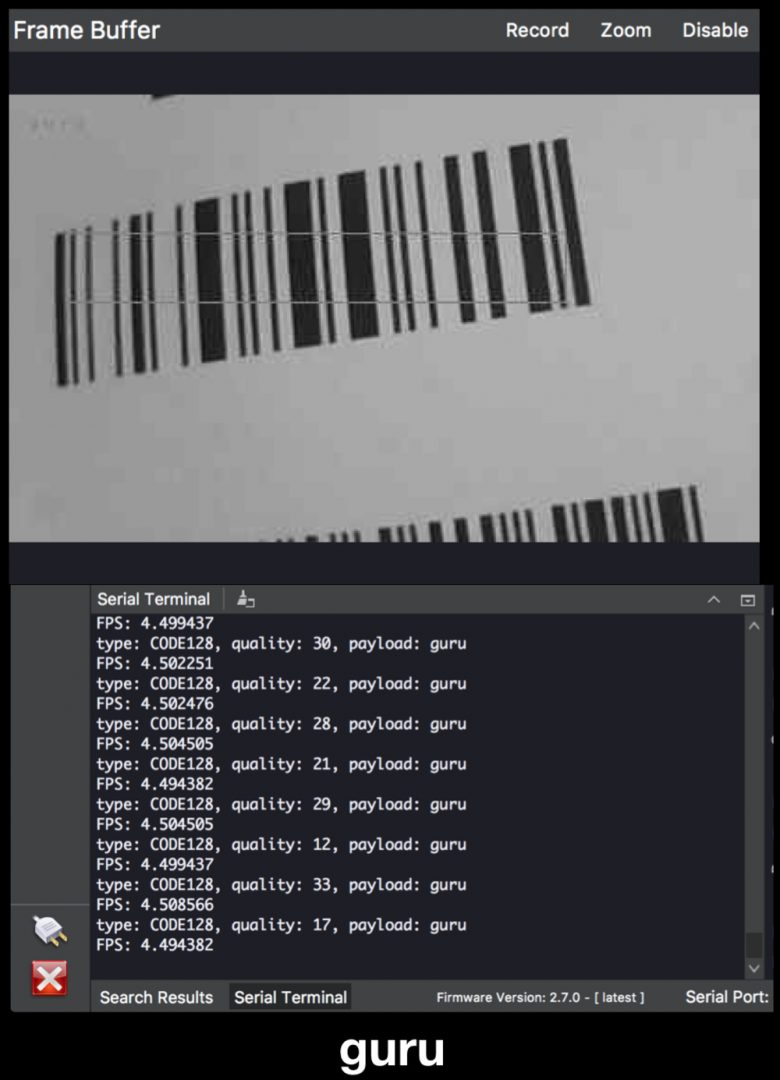
Figure 8: A CODE128 barcode that says “guru” is decoded by the OpenMV.
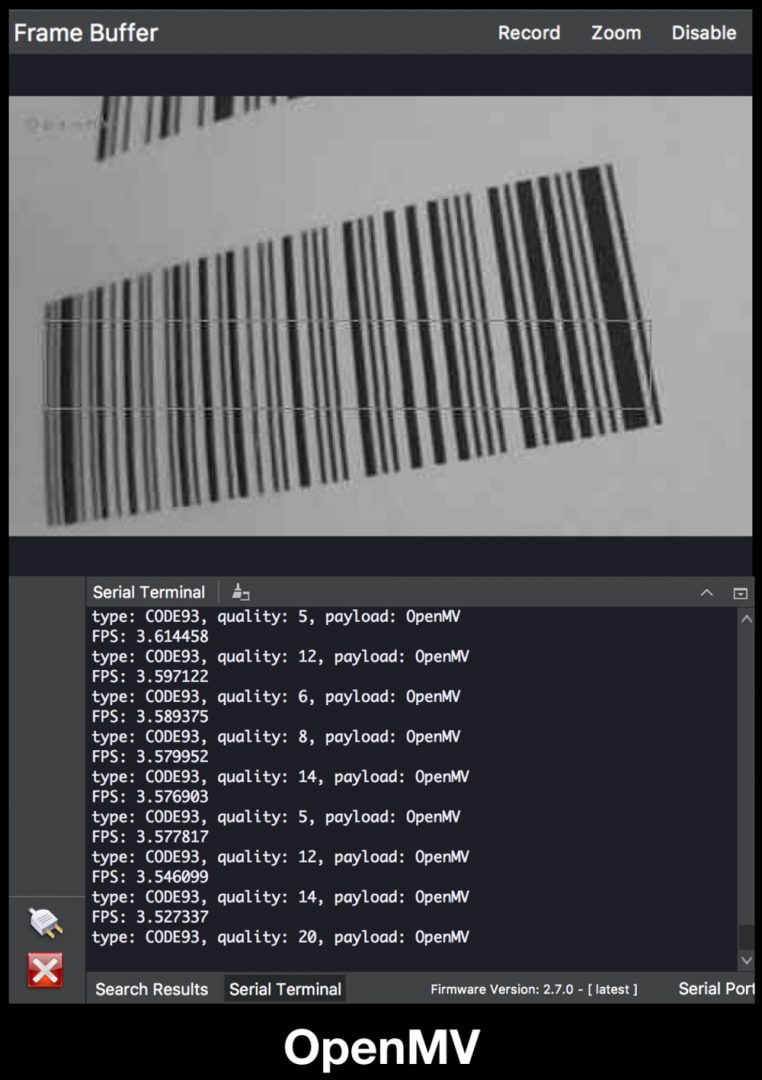
Figure 9: The OpenMV can decode CODE93 barcodes such as this one that has a payload of “OpenMV”.
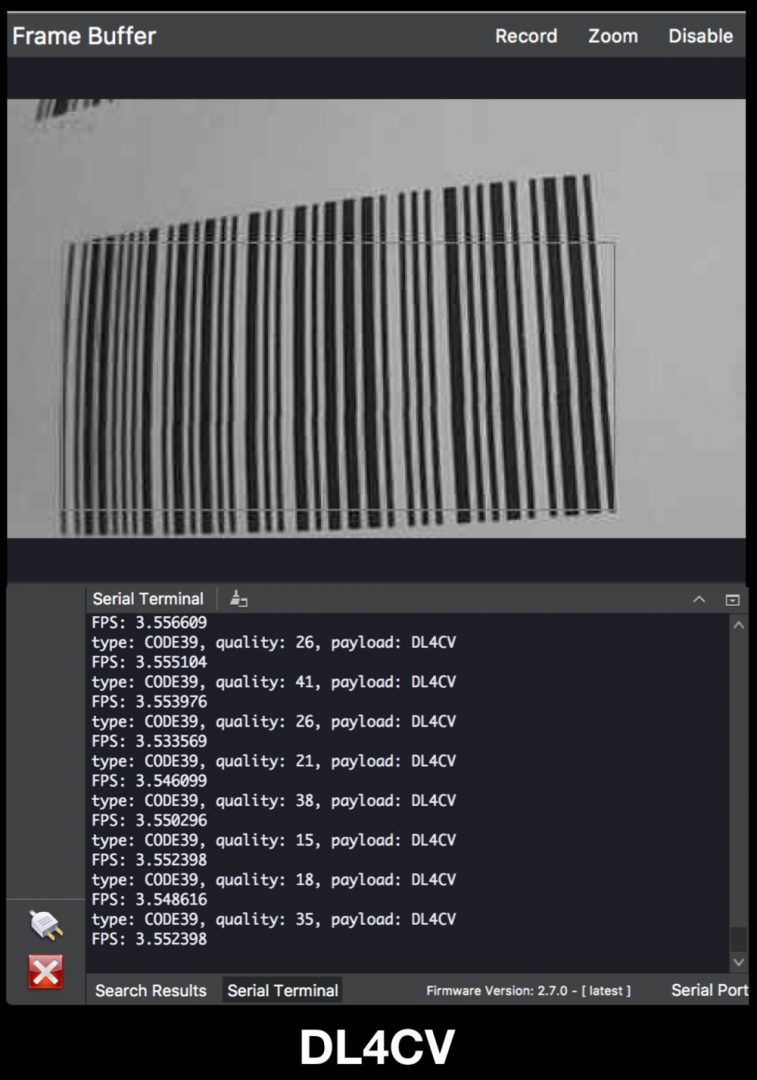
Figure 10: CODE39 barcodes are easy with the OpenMV. The Payload here is “DL4CV”.
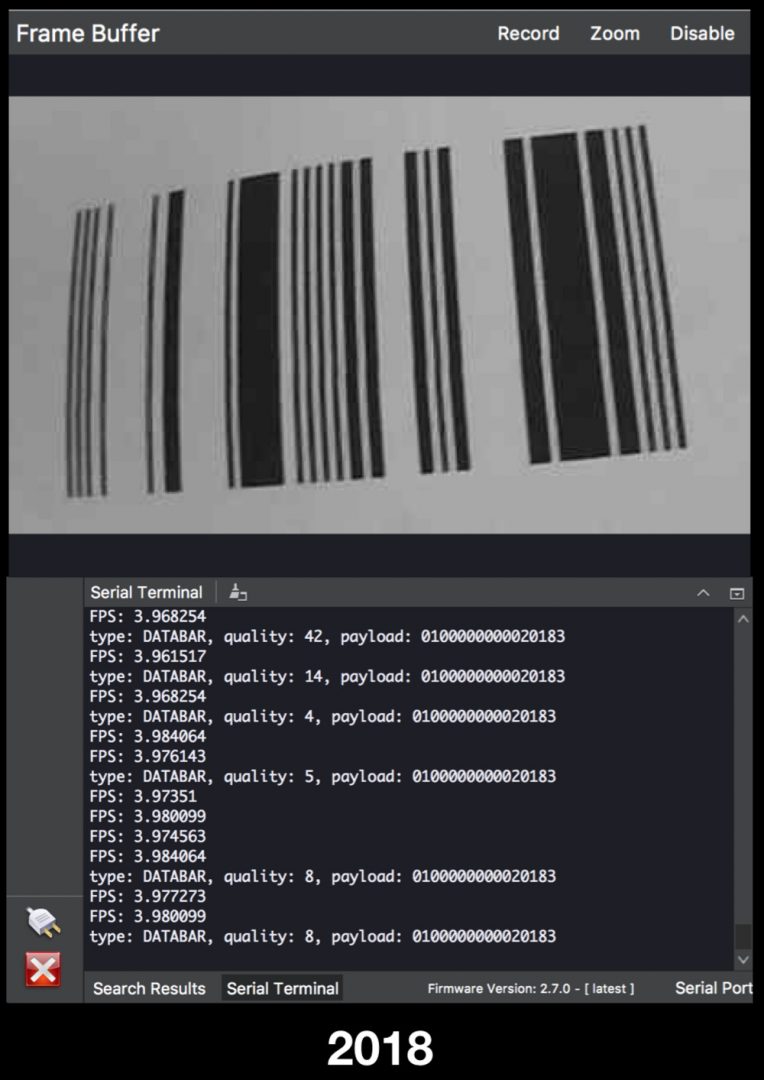
Figure 11: The OpenMV can decode DATABAR codes which are fixed-width and only contain digits. I coded “2018” into this barcode, but as you can see, the OpenMV camera actually reads 16 characters.
And finally, here’s a picture of the IDE in action. Notice how it is reading multiple codes, drawing boxes around the barcodes, and also contains a nice color histogram.
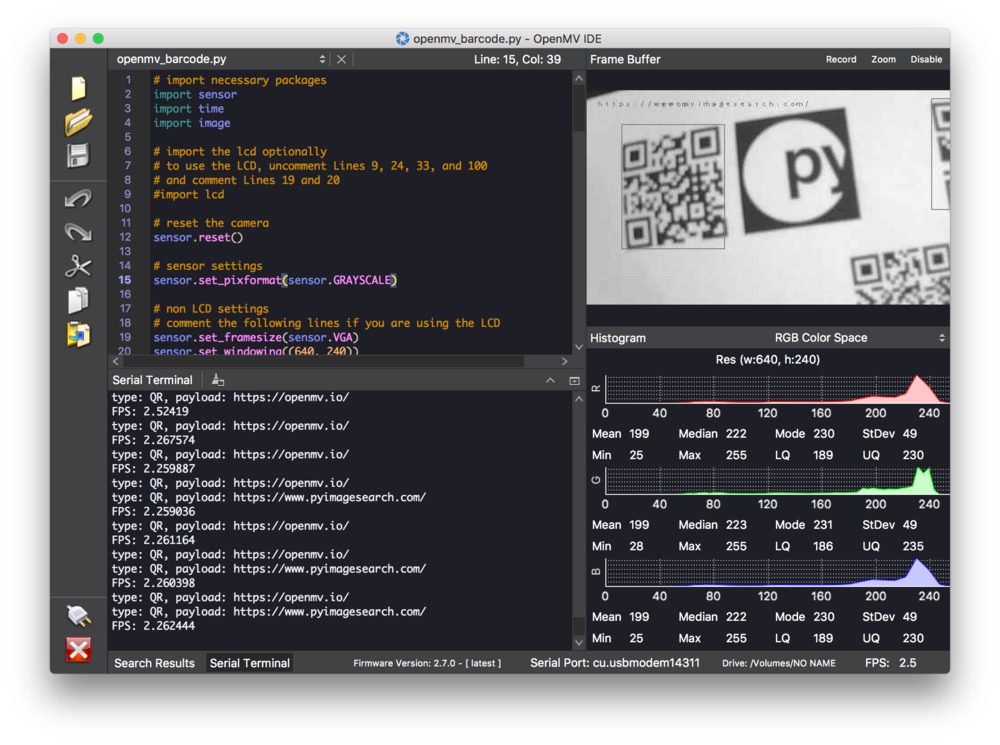
Figure 12: The OpenMV in action detecting barcodes and printing results to the IDE. As you can see, there’s a terminal in the bottom left which is scrolling data. There’s also a live view of the camera feed in the top right of the IDE and color histograms in the bottom right.
Here’s a video of the system in action using the IDE:
The IDE is great for debugging. For a deployable project however, you wouldn’t use the IDE. Instead you’d send the barcode payloads out to an actuator via I2C, SPI, or maybe WiFi to be processed in a database.
The LCD tool is also great for debugging although I found that the required resolution didn’t work for all the barcodes on the
barcodes.pdffile included in the “Downloads”.
Nevertheless, here’s the LCD in action:
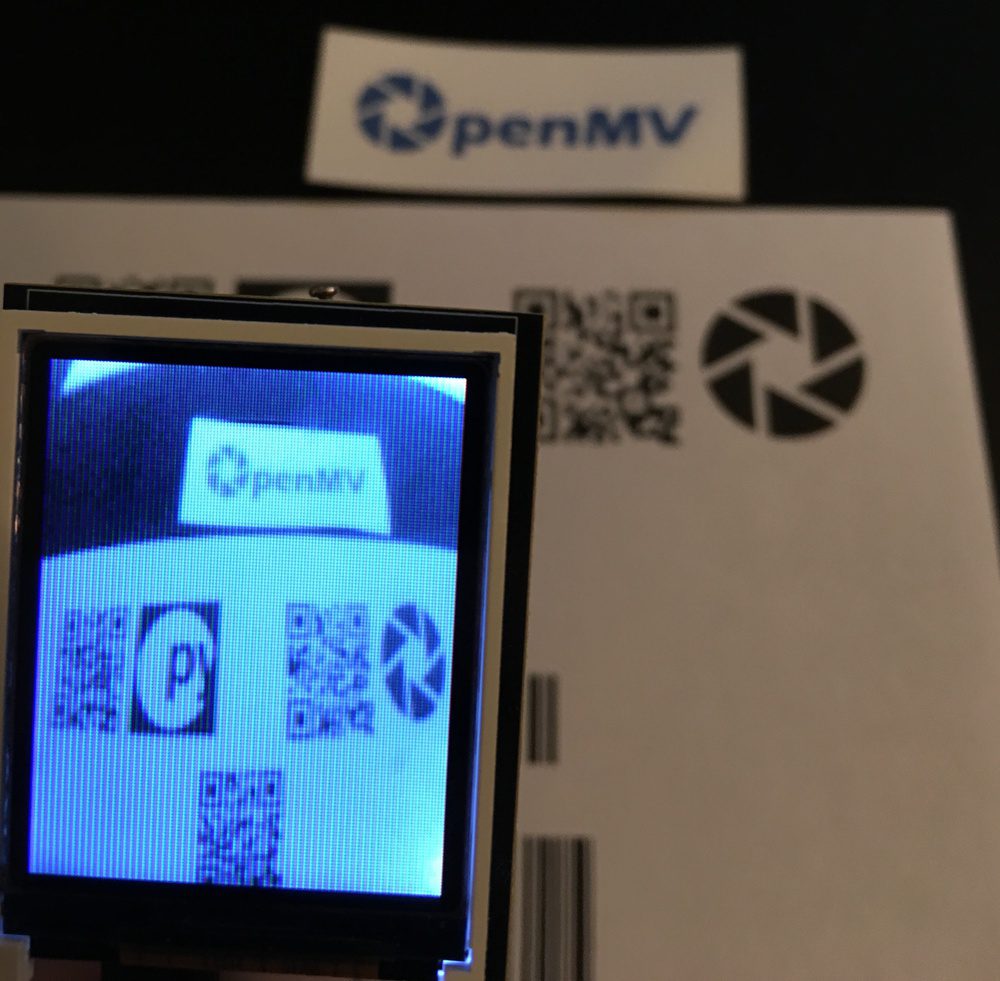
Figure 13: The OpenMV color LCD shield provides a nice viewfinder for the OpenMV. Pictured are a few barcodes for today’s blog post on decoding barcodes with the openMV.
Does the OpenMV run OpenCV?
In short, no — the OpenMV does not run OpenCV. The processor wouldn’t be able to handle it.
There are a number of capabilities of the OpenMV, but don’t think of it as a replacement for a Raspberry Pi which can run an OS and OpenCV.
But don’t let that deter you from considering the OpenMV for your project!
There’s plenty of OpenCV-like functionality built in.
You’ll feel at home working with the OpenMV examples and turning one into a solution that works in your project, but don’t expect to paste some OpenCV code into the OpenMV IDE and expect it to work.
Oh, and the best part?
You don’t need to worry about a complex install! If the OpenMV firmware needs to be updated, just click the button in the IDE and it will update over USB in a matter of minutes.
The easy install, and basic image processing capabilities make it a great teaching tool to get someone interested in CV.
It also would do well in specific projects, provided the project aligns with one of the image processing capabilities of OpenMV — just be sure that you don’t need something more powerful before you go down this path.
Can I connect the OpenMV to my Raspberry Pi?
Of course you can but there are more reasons against doing so.
The first reason is: the Raspberry Pi can do (mostly) everything the OpenMV can do, and then some. I2C? Check. SPI? Check. PWM? Check. WiFi? Check.
That said, the Raspberry Pi doesn’t have a high powered RGB LED and two high power IR LEDs like the OpenMV does.
But back to the point: Why would you need duplicate capabilities?
You most-likely don’t.
Instead, you should not think of the OpenMV as a general purpose SBC — it’s not.
The OpenMV is particularly great for specific embedded use cases. Another great use case for the OpenMV might be one where you’re concerned about power draw such as on a battery powered drone.
The second reason is that compiling the QT GUI for the Raspberry Pi would take 2-3 days. This isn’t practical. Sure you could do it once, and keep a handy .img lying around so you don’t have to do it again, but it just doesn’t seem practical to me.
So yes — you can definitely plug in the OpenMV via USB or via a custom header/wires to a Raspberry Pi. I just don’t think it is the wise thing to do.
If I’m wrong, let’s discuss in the comments section.
Where can I get an OpenMV camera as well as accessories?
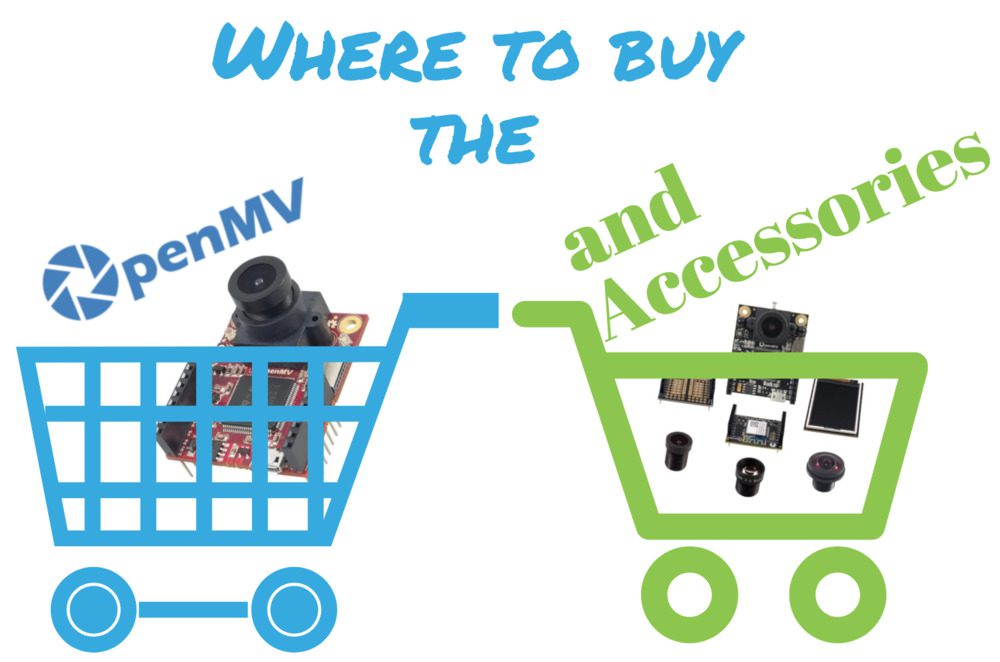
Figure 7: The OpenMV is available at distributors as well as direct at openmv.io. Bulk discounts and kits are available!
The OpenMV is very affordable at $65. Think of it as getting a powerful Arduino and a camera all on one board (that runs MicroPython).
You can pick up an OpenMV Cam at the retailers listed on the sales page, and many of the retailers offer free shipping.
Notable retailers include
- SparkFun (for $65, it comes with plastic case and headers)
- Seed Studio
- Robot Shop
There are a few Chinese retailers serving Asia as well as a number of European and UK retailers.
Looking to buy in bulk for your classroom or for a deployment?
If that’s the case, then you can take advantage of the bulk discounts by ordering direct from OpenMV.io. There’s a piecewise function where you can get 10%, 20%, or even 30% off by buying in bulk.
Shields, shields, shields!
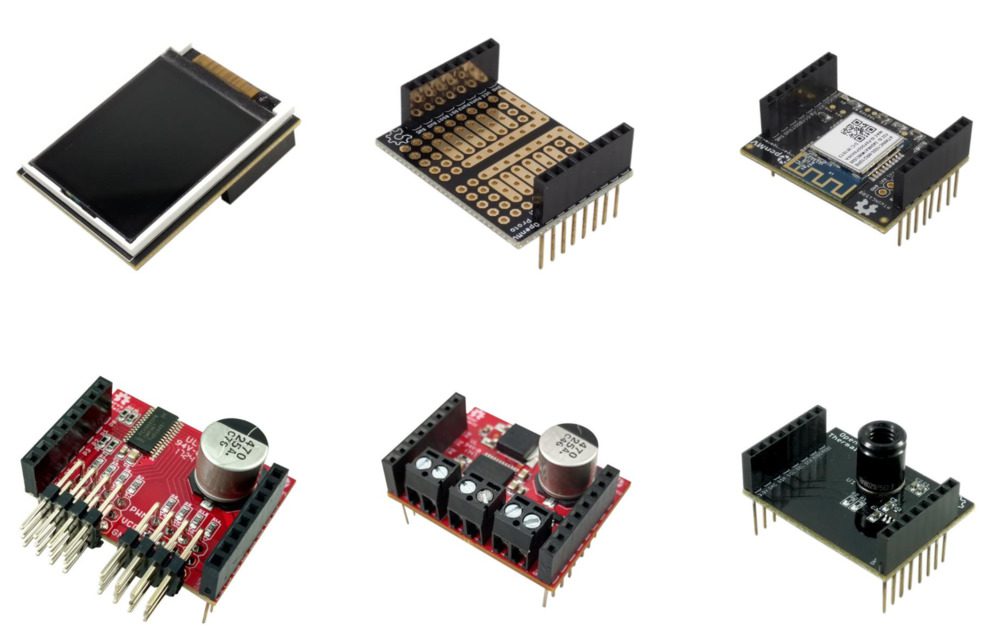
Figure 8: The OpenMV has an assortment of shields available to expand capabilities. Do you want to make your own shield? The hardware is open source, so get started with Eagle CAD or your favorite tool.
There are a number of expansion shields available, so be sure to check the retailers as well as OpenMV direct for purchasing options.
The official shields include:
- WiFi Shield (supports streaming video at 48 Mbps)
- LCD Shield (color!)
- Servo Shield (supports up to 8 servos!)
- Motor Shield (motors, solenoids, or other electromechanicals up to 2A)
- Proto Shield (connect I/O such as a sensor to your OpenMV processor)
- Thermopile Shield (thermal camera shield — it’s no longer sold, but still supported if you can find one)
You’ll need to use your soldering skills in order to attach shields — the headers do not come pre-populated. This is a minor inconvenience, but if you have a soldering iron, you can be up and running in 10 minutes.
It’s also worth noting that all hardware is open source. So if you have electronics skills and need a custom shield and are proficient in Eagle CAD, then you can visit the OpenMV Shield GitHub Repo to select a shield as a starting point to customize for your application.
Do you want a value kit that includes most accessories so you can get started tinkering?
If you order the “Full Set” kit direct from OpenMV.io, you get about 10% off the combined price.
The “Full Set” kit includes 7 pieces:
- 1 – OpenMV Cam M7
- 3 – Shields (Proto Shield, LCD Shield, WiFi Shield)
- 3 – Lenses (IR Lens, Telephoto Lens, Ultra Wide Angle Lens)
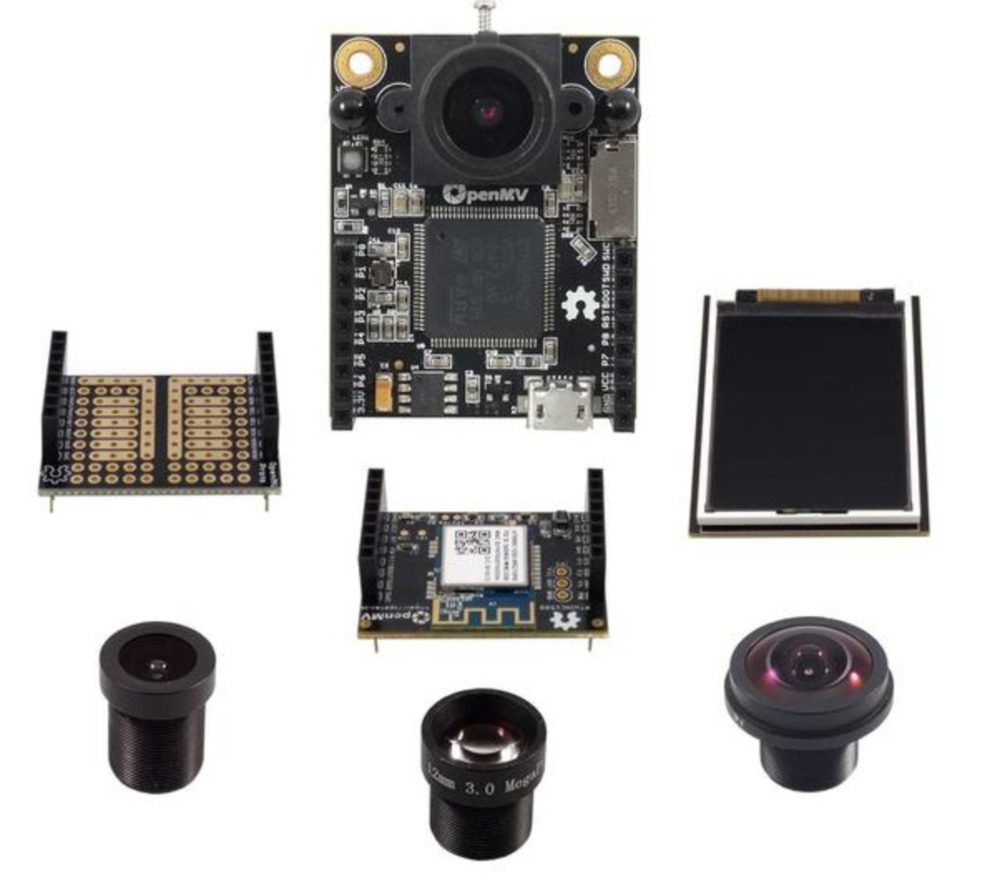
Figure 9: The OpenMV Full Set bundle is a good kit to get started with. It is 10% off versus buying the items individually.
Summary
In today’s blog post we used the OpenMV to perform barcode decoding.
Aimed at being the “Arduino of Machine Vision”, the OpenMV cam is embedded (no OS) and is expandable via several available shields. It’s also extremely easy to use. You can write code on the OpenMV using MicroPython.
However, it’s important to understand that the OpenMV does not run OpenCV — the processor simply would not be able to handle it. That said, there’s plenty of OpenCV-like functionality built in. Using the OpenMV IDE you can put together your own computer vision applications.
Next week I’ll be interviewing Kwabena Agyeman, the creator of OpenMV.
To be notified when next week’s interview with Kwabena goes live, just enter your email address in the form below!
Downloads:
The post Reading barcodes with Python and OpenMV appeared first on PyImageSearch.
from PyImageSearch http://ift.tt/2u02oiC
via IFTTT
Subscribe to:
Posts (Atom)