Image credit: OnMSFT
Over the past few months, I’ve been using Microsoft’s Ubuntu deep learning and data science virtual machine (DSVM) for a few projects I’m working on here at PyImageSearch.
At first, I was a bit hesitant (and perhaps even a bit resistant) to giving it a try — I already have a pre-configured Amazon AWS deep learning AMI that (1) I use often and (2) is publicly available to any PyImageSearch reader who wants to utilize it in their own projects.
And while I’m not a fan of Amazon’s AWS user interface, I’ve gotten used to it over the years. I suppose there is a sort of “familiarity” in its clunky complexity.
But I had heard such good things about the Ubuntu DSVM that I decided to test it out.
I was incredibly impressed.
The interface was easier to use. The performance was great. The price was on point.
…and it didn’t hurt that all code from Deep Learning for Computer Vision with Python ran on it without a single change.
Microsoft even graciously allowed me to author a series of guest posts on their Machine Learning Blog and share my experiences while I was using it, testing it, and evaluating it:
- Deep Learning & Computer Vision in the Microsoft Azure Cloud
- 22 Minutes to 2nd Place in a Kaggle Competition, with Deep Learning & Azure
- Training state-of-the-art neural networks in the Microsoft Azure cloud
Microsoft is serious about establishing themselves as the “go to” cloud environment for deep learning, machine learning, and data science. The quality of their DSVM product shows that.
In the remainder of today’s special edition blog post I’ll be sharing my thoughts on the DSVM and even demonstrating how to start your first instance and run your first deep learning example on it.
To learn more about Microsoft’s deep learning virtual machine (and whether it’s right for you), keep reading!
A review of Microsoft’s deep learning virtual machine
When I first evaluated Microsoft’s data science and deep learning virtual machine (DSVM) I took all code examples from Deep Learning for Computer Vision with Python and ran each and every example on the DSVM.
The process of manually running each example and inspecting the output was a bit tedious but it was also a great way to put the DSVM for the ringer and assess it for:
- Beginner usage (i.e., just getting started with deep learning)
- Practitioner usage, where you’re building deep learning models and need to quickly evaluate performance
- Research usage, where you’re training deep neural networks on large image datasets.
The codebase to Deep Learning for Computer Vision with Python compliments this test perfectly.
The code inside the Starter Bundle is meant to help you take your first step with image classification, deep learning, and Convolutional Neural Networks (CNNs).
If the code ran without a hitch on the DSVM then I could certainly recommend it to beginners looking for a pre-configured deep learning environment.
The chapters + accompanying code in the Practitioner Bundle cover significantly more advanced techniques (transfer learning, fine-tuning GANs, etc). These are the techniques a deep learning practitioner or engineer would be applying in their day to day work.
If the DSVM handled these examples, then I knew I could recommend it to deep learning practitioners.
Finally, the code inside the ImageNet Bundle requires GPU horsepower (the more the better) and I/O performance. Inside this bundle I demonstrate how to replicate the results of state-of-the-art publications (ex. ResNet, SqueezeNet, etc.) on the massive image datasets, such as the 1.2 million image ImageNet dataset.
If the DSVM could handle reproducing the results of state-of-the-art papers, then I knew I could recommend the DSVM to researchers.
In the first half of this blog post I’ll summarize my experience with each of these tests.
From there I’ll show you how to launch your first deep learning instance in the Microsoft cloud and then run your first deep learning code example in the DSVM.
Comprehensive deep learning libraries
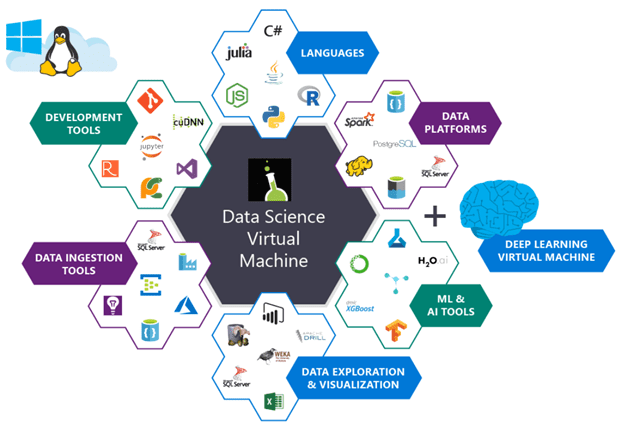
Figure 1: The Microsoft Azure Data Science Virtual Machine comes with all packages shown pre-installed and pre-configured for your immediate use.
Microsoft’s deep learning virtual machine runs in their Azure cloud.
It can technically run either Windows or Linux, but for nearly all deep learning projects, I would recommend you use their Ubuntu DSVM instance (unless you have a specific reason to use Windows).
The list of packages installed on the DSVM is is quite comprehensive — you can find the full list here. I have included the most notable deep learning and computer vision packages (particularly to PyImageSearch readers) below to give you an idea on how comprehensive this list is:
- TensorFlow
- Keras
- mxnet
- Caffe/Caffe2
- Torch/PyTorch
- OpenCV
- Jupyter
- CUDA and cuDNN
- Python 3
The DSVM team releases a new, updated DSVM every few months with the most up to date packages pre-configured and pre-installed. This is a huge testament to not only the DSVM team for keeping this instance running seamlessly (keeping the DSVM free of package conflicts must be a painful process, but it’s totally transparent to the end user), but also Microsoft’s desire to have users enjoying the experience as well.
What about GPUs?
The DSVM can run in both CPU-only and GPU instances.
For the majority of all experiments and tests I ran below, I utilized an Ubuntu GPU instance with the standard NVIDIA K80 GPU.
Additionally, Microsoft granted me to access to their just released NVIDIA V100 behemoth which I ran a few additional quick spot checks with (see results below — it’s fast!)
For all Starter Bundle and Practitioner Bundle experiments I opted to test out Microsoft’s Jupyter Notebook.
The process was incredibly easy.
I copied and pasted the Jupyter Notebook server URL in my browser, launched a new notebook, and within a few minutes I was running examples from the book.
For the ImageNet Bundle experiments I used SSH as replicating the results of state-of-the-art papers required days of training time and I personally do not think that is a proper usage of Jupyter Notebooks.
Easy for deep learning beginners to use
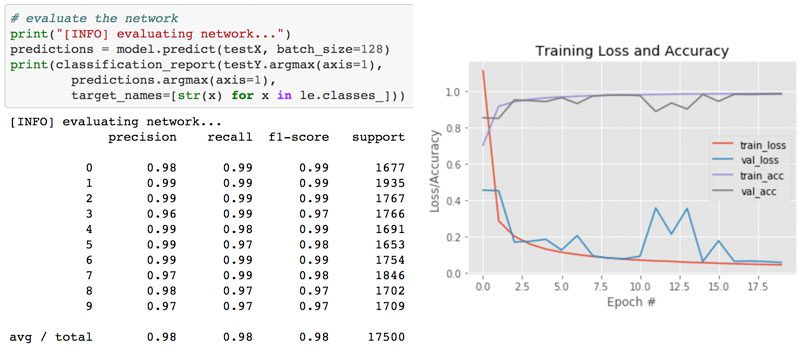
Figure 2: Training the LeNet architecture on the MNIST dataset. This combination is often referred to as the “hello world” example of Deep Learning.
In my first guest post on the Microsoft blog, I trained a simple Convolutional Neural Network (LeNet) on the MNIST handwritten digit dataset. Training LeNet on MNIST is likely the first “real” experiment for a beginner studying deep learning.
Both the model and dataset are straightforward and training can be performed on a CPU or GPU as well.
I took the code from Chapter 14 of Deep Learning for Computer Vision with Python (Starter Bundle) and executed it in a Jupyter Notebook (which you can find here) on the Microsoft DSVM.
The results of which can be seen in Figure 2 above.
I was was able to obtain 98% classification accuracy after 20 epochs of training.
All other code examples from the Starter Bundle of Deep Learning for Computer Vision with Python ran without a hitch as well.
Being able to run the code in browser via a Jupyter Notebook on the Azure DSVM (with no additional configurations) was a great experience and one that I believe users new to deep learning would enjoy and appreciate.
Practical and useful for deep learning practitioners
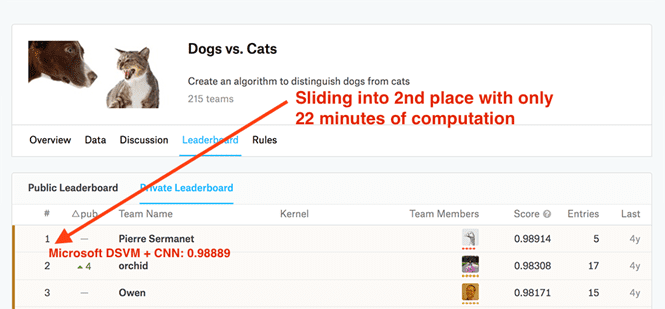
Figure 3: Taking 2nd place on the Kaggle Leaderboard for the dogs vs. cats challenge is a breeze with the Microsoft Azure DSVM (pre-configured) using code from Deep Learning for Computer Vision with Python.
My second post on the Microsoft blog was geared towards practitioners.
A common technique used by deep learning practitioners is to apply transfer learning and in particular, feature extraction, to quickly train a model and obtain high accuracy.
To demonstrate how the DSVM can be used for practitioners looking to quickly train a model and evaluate different hyperparameters, I:
- Utilized feature extraction using a pre-trained ResNet model on the Kaggle Dogs vs. Cats dataset.
- Applied a Logistic Regression classifier with grid searched hyperparameters on the extracted features.
- Obtained a final model capable of capturing 2nd place in the competition.
I also wanted to accomplish all of this in under 25 minutes.
The end result was a model capable of sliding into 2nd place with only 22 minutes of computation (as Figure 3 demonstrates).
You can find a full writeup on how I accomplished this task, including the Jupyter Notebook + code, in this post.
But could it be done faster?
After I had ran the Kaggle Dogs vs. Cats experiment on the NVIDIA K80, Microsoft allowed me access to their just released NVIDIA V100 GPUs.
I had never used an NVIDIA V100 before so I was really excited to see the results.
I was blown away.
While it took 22 minutes for the NVIDIA K80 to complete the pipeline, the NVIDIA V100 completed the task in only 5 minutes — that’s a massive improvement of over 340%!
I believe deep learning practitioners will get a lot of value out of running their experiments on a V100 vs. a K80, but you’ll also need to justify the price as well (covered below).
Powerful enough for state-of-the-art deep learning research
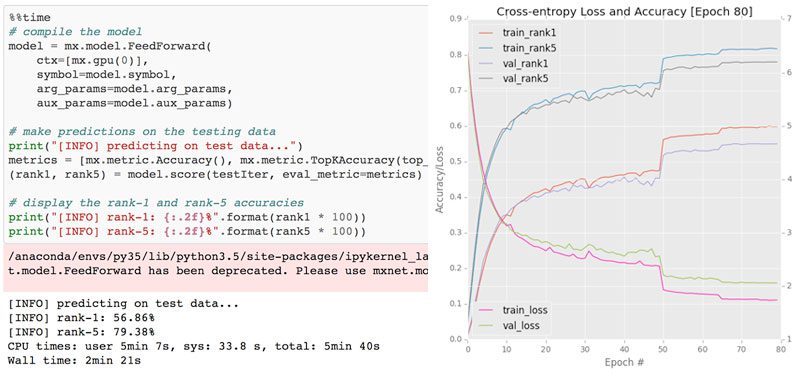
Figure 4: The Microsoft Azure DSVM handles training SqueezeNet on the ImageNet dataset easily.
The DSVM is perfectly suitable for deep learning beginners and practitioners — but what about researchers doing state-of-the-art work? Is the DSVM still useful for them?
To evaluate this question, I:
- Downloaded the entire ImageNet dataset to the VM
- Took the code from Chapter 9 of the ImageNet Bundle of Deep Learning for Computer Vision with Python where I demonstrate how to train SqueezeNet on ImageNet
I chose SqueezeNet for a few reasons:
- I had a local machine already training SqueezeNet on ImageNet for a separate project, enabling me to easily compare results.
- SqueezeNet is one of my personal favorite architectures.
- The resulting model size (< 5MB without quantization) is more readily used in production environments where models need to be deployed over resource constrained networks or devices.
I trained SqueezeNet for a total of 80 epochs on the NVIDIA K80. SGD was used to train the network with an initial learning rate of 1e-2 (I found the Iandola et al. recommendation of 4e-2 to be far too large for stable training). Learning rates were lowered by an order of magnitude at epochs 50, 65, and 75, respectively.
Each epoch took approximately 140 minutes on the K80 so the entire training time was ~1 week.
Using multiple GPUs could have easily reduced training time to 1-3 days, depending on the number of GPUs utilized.
After training is complete, I evaluated on a 50,000 image testing set (which I sampled from the training set so I did not have to submit the results to the ImageNet evaluation server).
Overall, I obtained 58.86% rank-1 and 79.38% rank-5 accuracy. These results are consistent with the results reported by Iandola et al.
Incredibly fast training with the NVIDIA V100
After I trained the SqueezeNet on ImageNet using the NVIDIA K80, I repeated the experiment with a single V100 GPU.
The speedup in training was incredible.
Compared to the K80 (~140 minutes per epoch), the V100 was completing a single epoch in 28 minutes, a huge speedup over over 400%!
I was able to train SqueezeNet and replicate the results in my previous experiment in just over 36 hours.
Deep learning researchers should give the DSVM serious consideration, especially if you do not want to own and maintain the actual hardware.
But what about price?
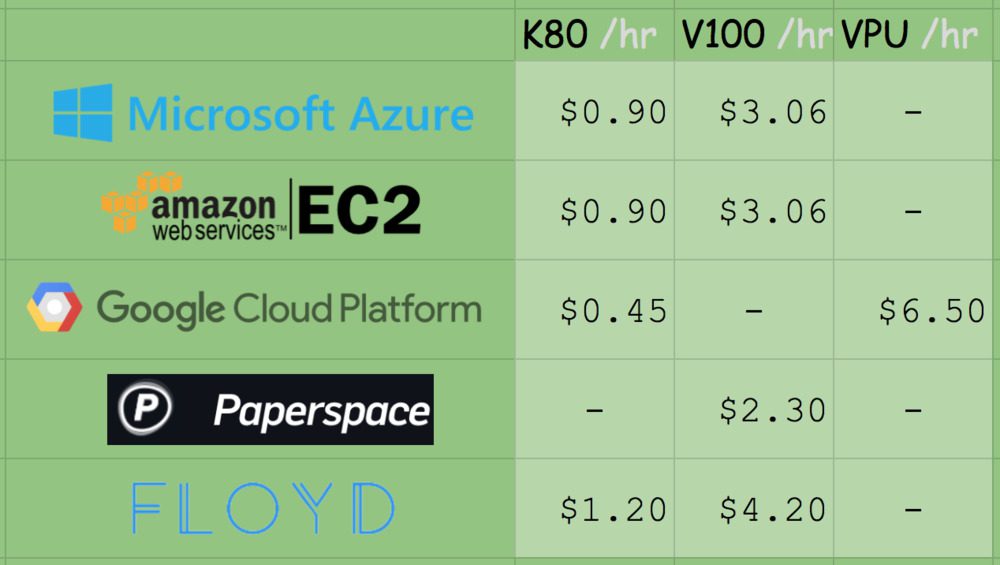
Figure 5: GPU compute pricing comparison for various deep learning + GPU providers.
On Amazon’s EC2, for a p2.xlarge instance, you’ll pay $0.90/hr (1x K80), $7.20/hr (8x K80), or $14.40/hr (16x K80). That is $0.90/hr per K80.
On Microsoft Azure, prices are the exact same $0.90/hr (1x K80), $1.80/hr (2x K80), and $3.60/hr (4x K80). This also comes out to $0.90/hr per K80.
Amazon has V100 machines ready and priced at $3.06/hr (1x V100), $12.24/hr (4x V100), $24.48/hr (8x V100). Be prepared to spend $3.06/hr per V100 on Amazon EC2.
The recently released V100 instances on Azure are priced competitively at $3.06/hr (1x V100), $6.12/hr (2x V100), $12.24/hr (4x V100).This also comes out to $3.06/hr per V100.
Microsoft offers Azure Batch AI pricing, similar to Amazon’s spot pricing, enabling you to potentially get a better deal on instances.
It wouldn’t be a complete (and fair) price comparison unless we look at Google, Paperspace, and Floydhub as well.
Google charges $0.45/hr (1x K80), $0.90 (2x K80), $1.80/hr (4x K80), $3.60/hr (8x K80). This is clearly the best pricing model for the K80 at half the cost of MS/EC2. Google does not have V100 machines available from what I can tell. Instead they offer their own breed, the TPU which is priced at $6.50/hr per TPU.
Paperspace charges $2.30/hr (1x V100) and they’ve got API endpoints.
Floydhub pricing is $4.20/hr (1x V100) but they offer some great team collaboration solutions.
When it comes to reliability, EC2 and Azure stick out. And when you factor in how easy it is to use Azure (compared to EC2) it becomes harder and harder to justify sticking with Amazon for the long run.
If you’re interested in giving the Azure cloud a try, Microsoft offers free trial credits as well; however, the trial cannot be used for GPU machines (I know, this is a bummer, but GPU instances are at a premium).
Starting your first deep learning instance in the Microsoft cloud
Starting a DSVM instance is dead simple — this section will be your quick-start guide to launching one.
For advanced configurations you’ll want to refer to the documentation (as I’ll mainly be selecting the default options).
Additionally, you may want to consider signing up for Microsoft’s free Azure trial so you can test out their Azure cloud without committing to spending your funds
Note: Microsoft’s trial cannot be used for GPU machines. I know, this is a bummer, but GPU instances are at a huge premium.
Let’s begin!
Step 1: Create a user account or login at portal.azure.com.
Step 2: Click “Create Resource” in the top-left.
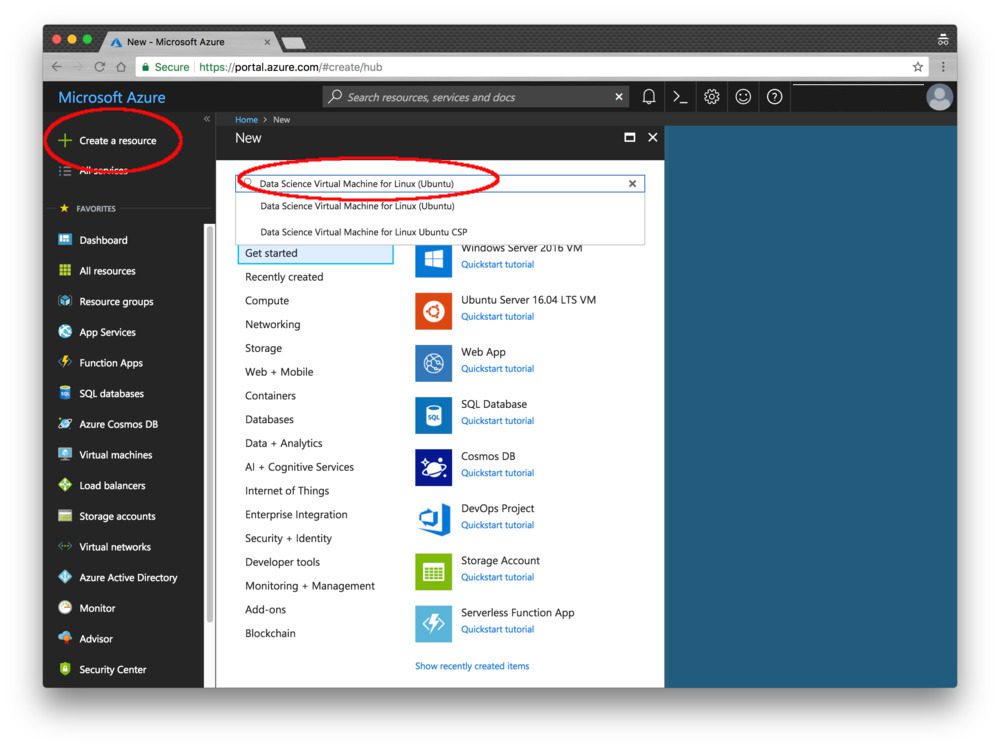
Figure 6: Microsoft Azure “Create Resource” screen.
Step 3: Enter “Data Science Virtual Machine for Linux” in the search box and it will auto-complete as you type. Select the first Ubuntu option.
Step 4: Configure the basic settings: Create a Name (no spaces or special chars). Select HDD (do not select SSD). I elected to use a simple password rather than a key file but this is up to you. Under “Subscription” check to see if you have any free credits you can use. You’ll need to create a “Resource Group” — I used my existing “rg1”.
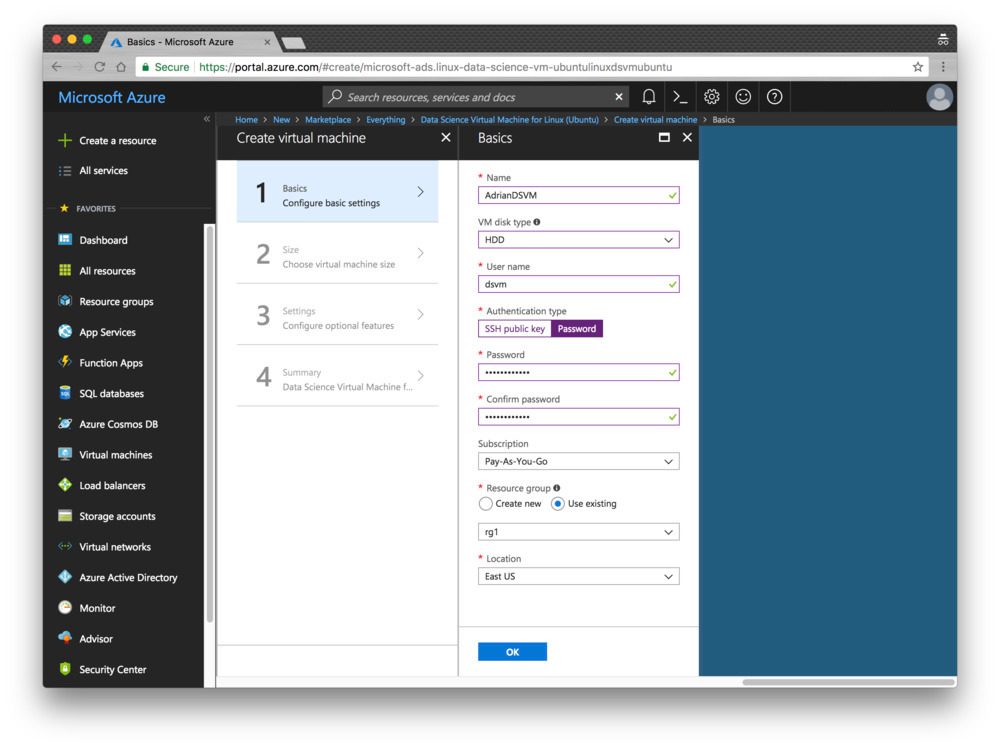
Figure 7: Microsoft Azure resource “Basic Settings”.
Step 5: Choose a Region and then choose your VM. I selected the available K80 instance (NC65_V3). The V100 instance is also available if you scroll down (NC6S_V3). One of my complaints is I don’t understand the naming conventions. I was hoping they were named like sports cars or at least something like “K80-2” for a 2x K80 machine, instead they’re named after the number of vCPUs which is a bit confusing when we’re instead interested in the GPUs.
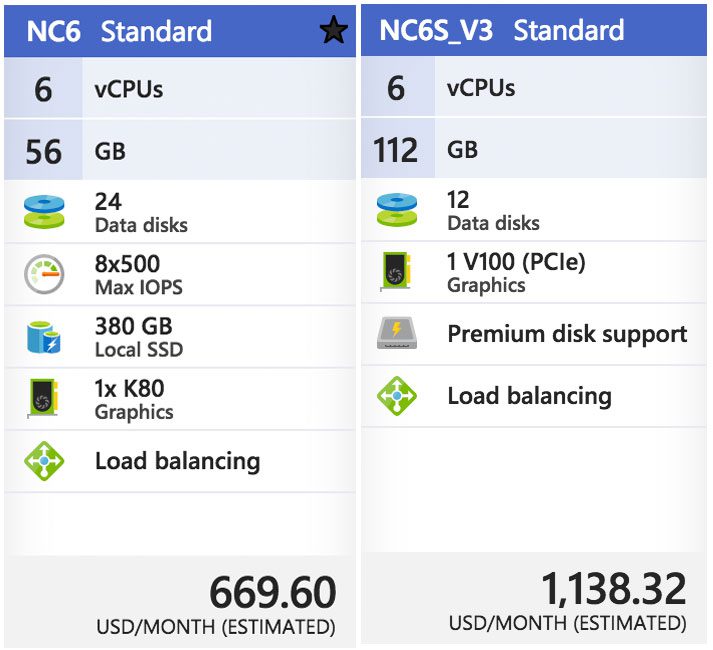
Figure 8: The Microsoft Azure DSVM will run on a K80 GPU and V100 GPU.
Step 6: Review the Summary page and agree to the contract:
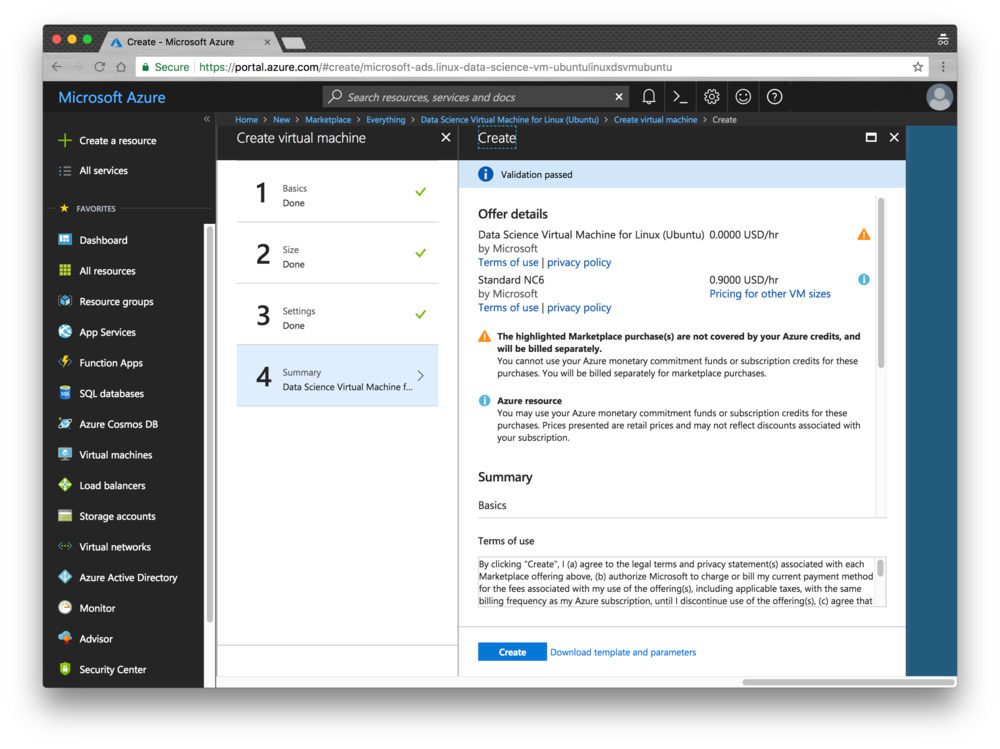
Figure 9: The summary page allows you to review and agree to the contract.
Step 7: Wait while the system deploys — you’ll see a convenient notification when your system is ready.
Step 8: Click “All resources”. You’ll see everything you’re paying for here:
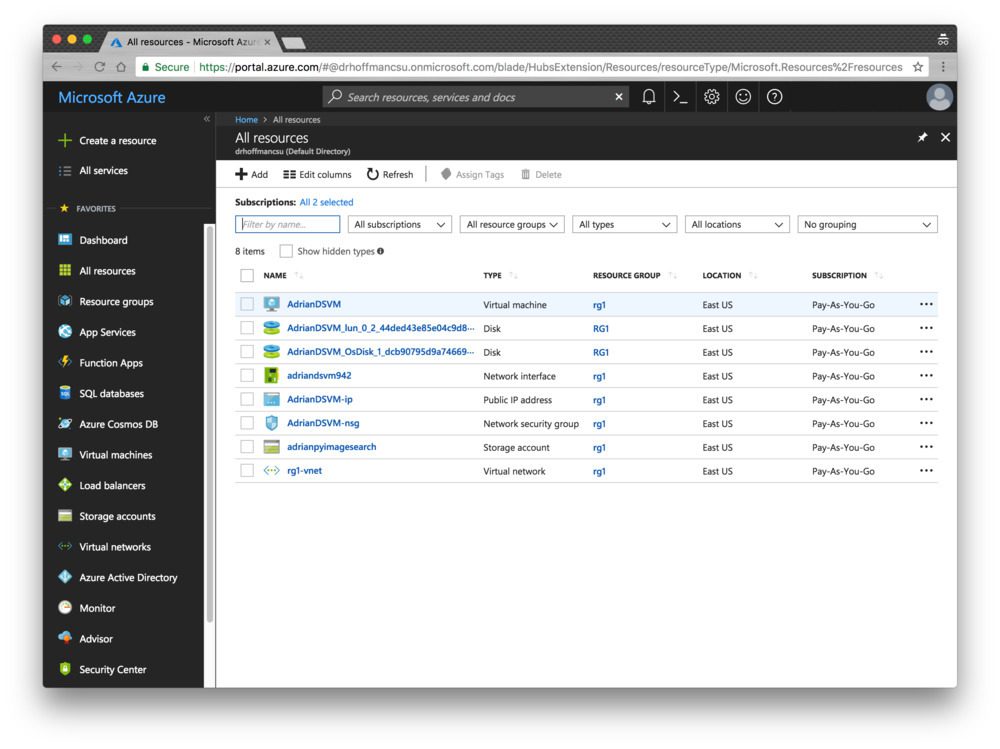
Figure 10: The Azure “All Resources” page shows my DSVM and associated services.
If you select the virtual machine, then you’ll see information about your machine (open the screenshot below in a new tab so you can see a higher resolution version of the image which includes the IP address, etc.):
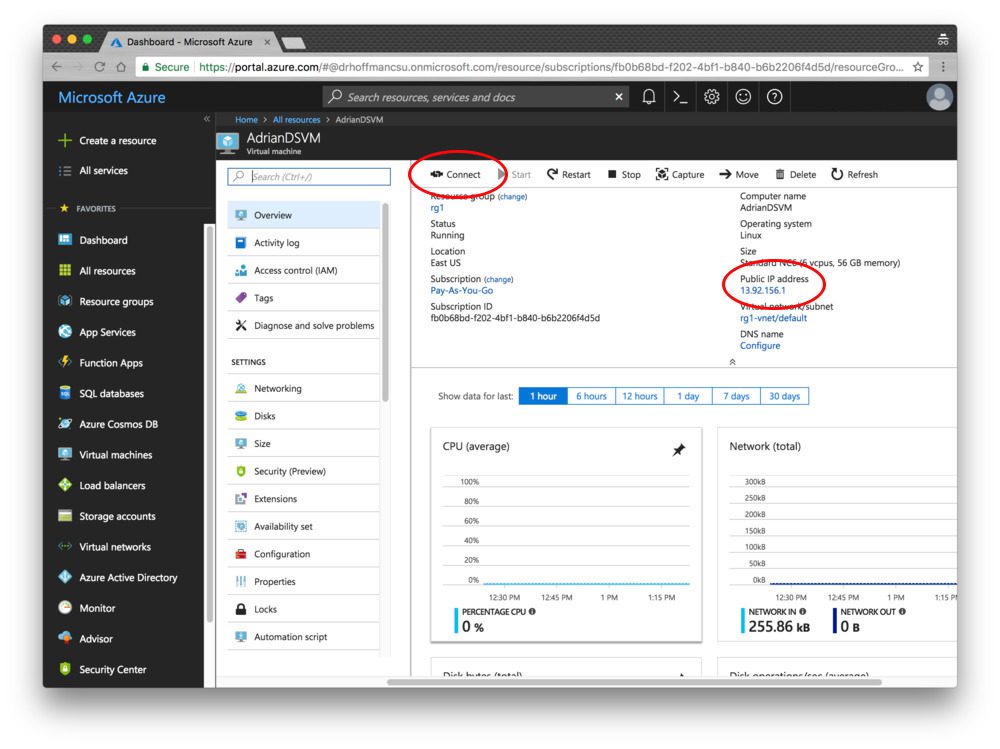
Figure 11: The “Resource Overview” page allows for you to see your instance’s
Step 9: Connect via SSH and/or Jupyter.
Clicking the connect option will provide you with connectivity details for SSH whether you’re using a key file or password:
Unfortunately, a convenient link to Jupyter isn’t shown. To access Jupyter, you’ll need to:
- Open a new tab in your browser
- Navigate to
https://yourAzureDsvmPublicIP:8000
(the “s” after “http” is important). Make sure you fill in the URL with your public IP.
Running code on the deep learning virtual machine
Now, let’s run the LeNet + MNIST example from my first Microsoft post in Jupyter.
This is a two step process:
Step 1: SSH into the machine (see Step 9 in the previous section).
Change directory into the
~/notebooksdirectory.
Clone the repo:
$ git clone https://github.com/jrosebr1/microsoft-dsvm.git
Step 2: Fire up Jupyter in your browser (see Step 9 in the previous section).
Click the
microsoft-dsvmdirectory.
Open the appropriate
.ipynbfile (
pyimagesearch-training-your-first-cnn.ipynb).
But before running the notebook, I’d like to introduce you to a little trick.
It isn’t mandatory, but it can save some headache if you’re working with multiple notebooks in your DSVM.
The motivation for this trick is this: if you execute a notebook but leave it “running”, the kernel still has a lock on the GPU. Whenever you run a different notebook, you’ll see errors such as “resource exhausted”.
The quick fix is to place the following two lines in their very own cell at the very bottom of the notebook:
%%javascript
Jupyter.notebook.session.delete();
Now, when you execute all the cells in the notebook, the notebook will gracefully shut down its own kernel. This way you won’t have to remember to manually shut it down.
From there, you can click somewhere inside the first cell and then click “Cell > Run all”. This will run all cells in the notebook and train LeNet on MNIST. From there you can watch the output in the browser and obtain a result similar to mine below:
Figure 12: Training LeNet on MNIST in the Microsoft Azure cloud and the Data Science Virtual Machine (DSVM).
I like to clear all output when I’m finished or before starting new runs after modifications. You can do this from the “Kernel > Restart & Clear Output” menu selection.
Summary
In today’s blog post, I reviewed and discussed my personal experience with Microsoft’s data science and deep learning virtual machine (DSVM).
I also demonstrated how to launch your first DSVM instance and run your first deep learning example on it.
I’ll be the first to admit that I was a bit hesitant when trying out the DSVM — but I’m glad I did.
Each and every test I threw at the DSVM, ranging from beginner usage to replicating the results of state-of-the-art papers, it handled it with ease.
And when I was able to use Microsoft’s new NVIDIA V100 GPU instances, my experiments flew, seeing a whopping 400% speedup over the NVIDIA K80 instances.
If you’re in the market for a deep learning cloud-based GPU instance, I would encourage you to try out Microsoft’s DSVM — the experience was great, Microsoft’s support was excellent, and the DSVM itself was powerful yet easy to use.
Additionally, Microsoft and the DSVM team will be sponsoring PyImageConf 2018, PyImageSearch’s very own computer vision and deep learning conference.
PyImageConf attendees will have free access to DSVM GPU instances while at the conference, allowing you to:
- Follow along with talks and workshops
- Train their own models
- Better learn from speakers
To learn more about PyImageConf 2018, just click here.
I hope to see you there!
The post My review of Microsoft’s data science virtual machine (DSVM) for deep learning appeared first on PyImageSearch.
from PyImageSearch http://ift.tt/2FSKML9
via IFTTT
2 comments:
Make an Excellent Career in The Field of Data Science Enrolling in Our AI Patasala Data Science Course in Hyderabad.
Data Science Training with Placements
Really nice and interesting post. I was looking for this kind of information and enjoyed reading this one.
data analytics course in hyderabad
Post a Comment