The latest release of dlib is special.
It completely removes the boost.python dependency, making it significantly easier to install across the board on macOS, Ubuntu, and Raspbian.
Thanks to the work of Davis King (the creator and maintainer of the dlib library) and Mischan Toos-Haus (who is responsible for removing the boost.python dependency), we can now:
- Easily leverage all Python + dlib functionality (face detection, facial landmarks, correlation tracking, etc.)…
- …with less dependencies and an easier install process.
In today’s blog post I’ll be providing instructions to install dlib on:
- macOS
- Ubuntu
- Raspbian (Raspberry Pi’s operating system)
These install instructions are complete, easy, to follow, and will get you up and running with dlib + Python bindings in a manner of minutes.
To learn how to install dlib on your system, just keep reading!
Looking for the source code to this post?
Jump right to the downloads section.
Install dlib (the easy, complete guide)
In this guide you’ll learn how to install dlib on macOS, Ubuntu, and Raspbian. Please feel free to skip to the section that corresponds to your operating system.
Once you have installed dlib on your respective operating system we’ll validate the install by using Python, dlib, and OpenCV (provided you have OpenCV installed as well), to detect facial landmarks.
From there, I have provided additional tutorials and guides to help apply dlib to computer vision and machine learning projects, including detecting and counting blinks and building a system to recognize when the driver of a vehicle is becoming drowsy/tired (and alerting them to wake up).
Installing dlib on macOS
I’ll assume you already have XCode installed on your macOS machine. If not, please take the time to open the App Store and install XCode.
From there, you’ll need to install Homebrew, a package manager for macOS, similar to Debian/Ubuntu’s
apt-get:
$ ruby -e "$(curl -fsSL https://raw.githubusercontent.com/Homebrew/install/master/install)"
$ brew update
Note: Make sure you use the “<>” button in the code block above to expand section — this will ensure you copy and paste the entire Homebrew install command.
Once Homebrew is installed you need to update your
PATHto look for Homebrew binaries, packages, and libraries. This can be accomplished by manually editing the file using an editor such as nano, vi, etc. or simply using
echoand redirection:
$ echo -e "\n# Homebrew" >> ~/.bash_profile
$ echo "export PATH=/usr/local/bin:$PATH" >> ~/.bash_profile
You then need to
sourcethe
~/.bash_profilefile to reload the changes:
$ source ~/.bash_profile
We’ll then install
cmake(a utility used for building, testing, and packaging software) along with Python 2.7 and Python 3:
$ brew install cmake
$ brew install python python3
You can verify that Python 2.7 and Python 3 have been successfully installed by using
which:
$ which python2
/usr/local/bin/python2
$ which python3
/usr/local/bin/python3
There are two key points you need to pay attention to here.
The first is that you want to ensure the root path for both Python binaries are in
/usr/local/bin— this is where Homebrew stores the Python binaries.
If your root path instead reads
/usr/binthen you are utilizing the system Python install. We want to avoid using the system Python install so if you see
/usr/bininstead of
/usr/local/binthen it’s most likely due to an error updating your
~/.bash_profile(make sure you go back and ensure the file has been updated properly; this could require manually opening and editing the file).
The second key point to investigate is the Python binary itself:
python2and
python3. Notice how we are not executing just
python— instead we are explicitly supplying the version as well.
This is due to how Homebrew now handles Python installs. In older versions of Homebrew, Homebrew would automatically alias the
pythoncommand to either Python 2.7 or Python 3 — this is no longer the case. Instead, we need to explicitly supply the Python version number.
The name is true for
pipas well: we now use
pip2and
pip3.
Next, let’s prepare our Python environment.
If you are using a Python virtual environment (if you followed any of my OpenCV install tutorials, you likely are using them), you can either create a new Python virtual environment for the dlib install:
$ mkvirtualenv dlib_test -p python3
Or access an existing one:
$ workon cv
Using a Python virtual environment is entirely optional but highly recommended as Python virtual environments are a best practice for Python development. To learn more about Python virtual environments (and how to use them) please consult my OpenCV install tutorials where they are covered extensively.
From there, we can install NumPy (dlib’s only Python dependency) followed by the dlib library itself:
$ pip install numpy
$ pip install dlib
If you are not using Python virtual environments you’ll need to update the
pipcommand to either
pip2or
pip3. If you are using Python 2.7, use
pip2instead of
pip. Similarly, if you are utilizing Python 3, replace
pipwith
pip3.
From there, fire up a Python shell and validate your install of dlib:
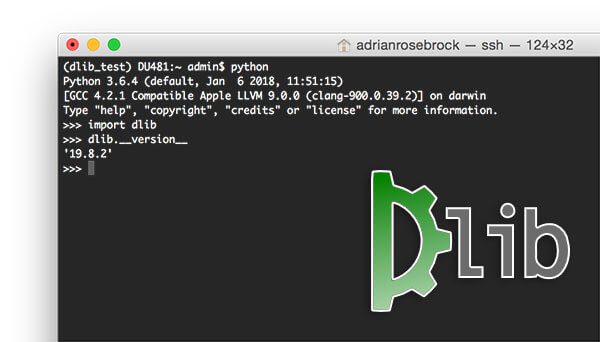
(dlib_test) DU481:~ admin$ python
Python 3.6.4 (default, Jan  6 2018, 11:51:15)
[GCC 4.2.1 Compatible Apple LLVM 9.0.0 (clang-900.0.39.2)] on darwin
Type "help", "copyright", "credits" or "license" for more information.
>>> import dlib
>>> dlib.__version__
'19.8.2'
>>>
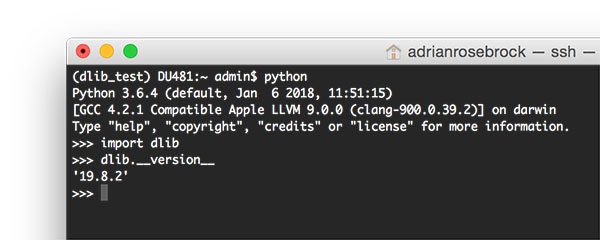
Figure 1: Successfully installing dlib on macOS.
Installing dlib on Ubuntu
The following instructions were gathered on Ubuntu 16.04 but should work on newer versions of Ubuntu as well.
To get started, let’s install our required dependencies:
$ sudo apt-get update
$ sudo apt-get install build-essential cmake
$ sudo apt-get install libopenblas-dev liblapack-dev
$ sudo apt-get install libx11-dev libgtk-3-dev
$ sudo apt-get install python python-dev python-pip
$ sudo apt-get install python3 python3-dev python3-pip
I have included a few notes on the dependencies that you should consider:
- We are installing GTK and X11 for GUI functionality inside dlib. These libraries can be skipped if you do not care about the GUI functionality, saving you 100-200MB in space.
- We install OpenBLAS for linear algebra optimizations which allows dlib functionality to execute faster. You can technically skip this as well but I highly recommend you install OpenBLAS as the optimizations are significant.
Next, let’s prepare our Python environment for the dlib install.
If you are using a Python virtual environment (if you followed any of my OpenCV install tutorials, you likely are using them), you can either create a new Python virtual environment for the dlib install:
$ mkvirtualenv dlib_test -p python3
Or access an existing one:
$ workon cv
Using a Python virtual environment is entirely optional but highly recommended as Python virtual environments are a best practice for Python development. To learn more about Python virtual environments (and how to use them) please consult my OpenCV install tutorials where they are covered extensively.
You can then install dlib on your Ubuntu system:
$ pip install numpy
$ pip install dlib
If you are not using a Python virtual environment make sure you add
sudoto the beginning of the
pip installcommands (otherwise the
pip installcommands will fail due permission errors). Additionally, keep in mind that
pipis used to install packages for Python 2.7 and
pip3is used for Python 3. Depending on which Python version you want to install dlib for you may need to update the
pipcommand above.
Finally, open up a Python shell and verify your dlib install on Ubuntu by importing the
dliblibrary:
(dlib_test) ubuntu@ip-172-31-12-187:~$ python
Python 3.5.2 (default, Nov 23 2017, 16:37:01)
[GCC 5.4.0 20160609] on linux
Type "help", "copyright", "credits" or "license" for more information.
>>> import dlib
>>> dlib.__version__
'19.8.2'
>>>
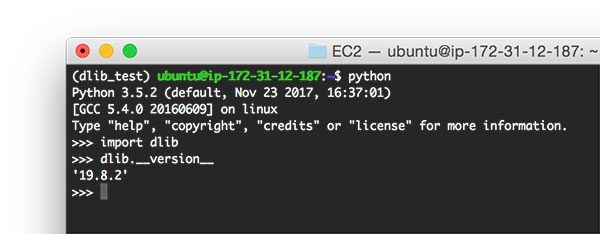
Figure 2: Installing dlib on Ubuntu (Note: I was SSH’d into an Ubuntu machine in the Amazon EC2 cloud from my macOS machine when taking this screenshot, hence why the screenshot looks like the macOS GUI).
Installing dlib on Raspberry Pi/Raspbian
This section covers installing the dlib library on the Raspberry Pi and the Raspbian Stretch operating system. These instructions should work for newer releases of Rasbpian as well.
Our Raspbian dlib install is identical to our Ubuntu dlib install, but with a few minor adjustments:
- Both Python 2.7 and Python 3 are pre-installed on Raspbian so we do not need to install them ourselves.
- We need to install
libatlas-base-dev
. - We can optionally optimize our dlib install on the Raspberry Pi architecture via the
USE_NEON_INSTRUCTIONS
switch (this will require you install dlib from source rather thanpip
).
Let’s get started installing dlib on our Raspberry Pi by ensuring we have met our library/package dependencies:
$ sudo apt-get update
$ sudo apt-get install build-essential cmake
$ sudo apt-get install libopenblas-dev liblapack-dev libatlas-base-dev
$ sudo apt-get install libx11-dev libgtk-3-dev
A few quick notes on both X11/GTK and OpenBLAS:
- We are installing GTK and X11 for GUI functionality inside dlib. These libraries can be skipped if you do not care about the GUI functionality, saving you 100-200MB in space. Space can be a premium on the Raspberry Pi, but again, if you need GUI functionality make sure you install them.
- We install OpenBLAS for linear algebra optimizations which allows dlib functionality to execute faster. You can technically skip this as well but I highly recommend you install OpenBLAS as the optimizations are significant — any optimization you can achieve on the Raspberry Pi is well worth it!
Next, let’s prepare our Python environment for the dlib install on our Raspberry Pi.
If you are using a Python virtual environment (if you followed any of my OpenCV install tutorials, you likely are using them), you can either create a new Python virtual environment for the dlib install:
$ mkvirtualenv dlib_test -p python3
Or access an existing one:
$ workon cv
Using a Python virtual environment is entirely optional but highly recommended as Python virtual environments are a best practice for Python development. To learn more about Python virtual environments (and how to use them) please consult my OpenCV install tutorials where they are covered extensively.
We can then install dlib on Raspberry Pi:
$ pip install numpy
$ pip install dlib
If you are not using a Python virtual environment make sure you add
sudoto the beginning of the
pip installcommands (otherwise the
pip installcommands will fail due permission errors). Additionally, keep in mind that
pipis used to install packages for Python 2.7 and
pip3is used for Python 3. Depending on which Python version you want to install dlib for you may need to update the
pipcommand above.
If you decide you would like to have the NEON instructions utilized to optimize the dlib install, skip installing dlib via
pipand instead install via source:
$ git clone https://github.com/davisking/dlib.git
$ cd dlib
$ python setup.py install --yes USE_NEON_INSTRUCTIONS
Compiling from source will take longer than installing via
pipso be patient.
Finally, open up a Python shell and verify your dlib install on Raspbian by importing the
dliblibrary:
(dlib_test) pi@raspberrypi:~ $ python
Python 3.5.3 (default, Jan 19 2017, 14:11:04)
[GCC 6.3.0 20170124] on linux
Type "help", "copyright", "credits" or "license" for more information.
>>> import dlib
>>> dlib.__version__
'19.8.99'
Note: The dlib install version for the Raspberry Pi is different from my macOS and Ubuntu output as I installed from source to leverage the NEON optimizations rather than installing via pip.
Figure 3: Successfully installing dlib on the Raspberry Pi and Raspbian operating system.
Testing your dlib install
As a final example of using dlib on the Raspberry Pi, here is a short example I put together where we detect facial landmarks in an input image:
# import the necessary packages
from imutils import face_utils
import dlib
import cv2

# initialize dlib's face detector (HOG-based) and then create
# the facial landmark predictor
p = "shape_predictor_68_face_landmarks.dat"
detector = dlib.get_frontal_face_detector()
predictor = dlib.shape_predictor(p)

# load the input image and convert it to grayscale
image = cv2.imread("example.jpg")
gray = cv2.cvtColor(image, cv2.COLOR_BGR2GRAY)

# detect faces in the grayscale image
rects = detector(gray, 0)

# loop over the face detections
for (i, rect) in enumerate(rects):
        # determine the facial landmarks for the face region, then
        # convert the facial landmark (x, y)-coordinates to a NumPy
        # array
        shape = predictor(gray, rect)
        shape = face_utils.shape_to_np(shape)

        # loop over the (x, y)-coordinates for the facial landmarks
        # and draw them on the image
        for (x, y) in shape:
                cv2.circle(image, (x, y), 2, (0, 255, 0), -1)

# show the output image with the face detections + facial landmarks
cv2.imshow("Output", image)
cv2.waitKey(0)
Note: This example assumes you have both OpenCV and dlib installed on your system. If you do not have OpenCV installed, please refer to my OpenCV install tutorials.
For a detailed review of the code above used for facial landmark prediction, please refer to my previous tutorial on the basics of facial landmarks.
To execute the above script:
- Make sure you have installed OpenCV, dlib, and imutils (
pip install --upgrade imutils
). - Use the “Downloads” section below to download the source code + example image + pre-trained dlib facial landmark predictor.
From there, you can issue the following command to execute our example script:
$ python facial_landmarks.py
You should then see the following output where the facial landmarks are displayed on the image:
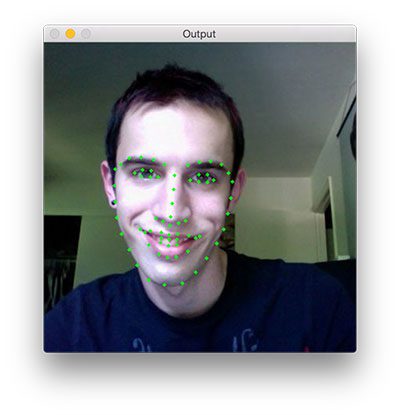
Figure 4: Detecting facial landmarks using the dlib library and Python.
Fun fact: The picture above is me ~8 years ago during my undergraduate college days. I actually had hair back then!
What now?
Now that you’re up and running with dlib I would recommend you:
- Install OpenCV on your system as well (if you haven’t already). I have a number of OpenCV install tutorials for macOS, Ubuntu, and Raspbian available here.
- Use your OpenCV + dlib install to build practical, real-world projects.
I would recommend starting with this tutorial where you’ll learn how to apply real-time facial landmark detection:
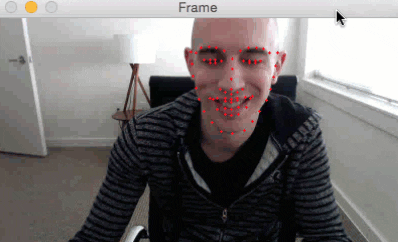
Figure 5: Using dlib to apply real-time facial landmark detector.
From there, you can utilize facial landmarks to build an eye blink detector:
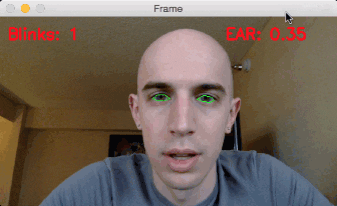
Figure 6: Building an eye blink detector with dlib, OpenCV, and Python.
And then finally we put all the pieces together from the previous two tutorials to build a drowsiness detector:
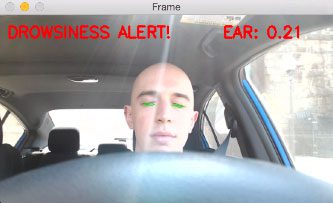
Figure 7: Creating a drowsiness detector with dlib, OpenCV, and Python.
Be sure to take a look at the tutorials! They are fun, hands-on, and will give you a ton of experience building real-world computer vision applications with dlib and OpenCV.
Summary
In today’s blog post you learned how to install dlib on macOS, Ubuntu, and Raspbian.
Thanks to the work of Davis King and Mischan Toos-Haus it is now easier than ever to install dlib, requiring less dependencies and a faster
pip installprocess.
Take a second now to give both Davis and Mischan a huge thanks for their hard work and their contributions to the open source community.
I hope you enjoyed this blog post! To be notified when future PyImageSearch tutorials are published, be sure to enter your email address in the form below.
Downloads:
The post Install dlib (the easy, complete guide) appeared first on PyImageSearch.
from PyImageSearch http://ift.tt/2rtz0zQ
via IFTTT
No comments:
Post a Comment