
Back in September 2017, Davis King released v19.7 of dlib — and inside the release notes you’ll find a short, inconspicuous bullet point on dlib’s new 5-point facial landmark detector:
- Added a 5 point face landmarking model that is over 10x smaller than the 68 point model, runs faster, and works with both HOG and CNN generated face detections.
My goal here today is to introduce you to the new dlib facial landmark detector which is faster (by 8-10%), more efficient, and smaller (by a factor of 10x) than the original version.
Inside the rest of today’s blog post we’ll be discussing dlib’s new facial landmark detector, including:
- How the 5-point facial landmark detector works
- Considerations when choosing between the new 5-point version or the original 68-point facial landmark detector for your own applications
- How to implement the 5-point facial landmark detector in your own scripts
- A demo of the 5-point facial landmark detector in action
To learn more about facial landmark detection with dlib, just keep reading.
Looking for the source code to this post?
Jump right to the downloads section.
(Faster) Facial landmark detector with dlib
In the first part of this blog post we’ll discuss dlib’s new, faster, smaller 5-point facial landmark detector and compare it to the original 68-point facial landmark detector that was distributed with the the library.
From there we’ll implement facial landmark detection using Python, dlib, and OpenCV, followed by running it and viewing the results.
Finally, we’ll discuss some of the limitations of using a 5-point facial landmark detector and highlight some of the scenarios in which you should be using the 68-point facial landmark detector of the 5-point version.
Dlib’s 5-point facial landmark detector
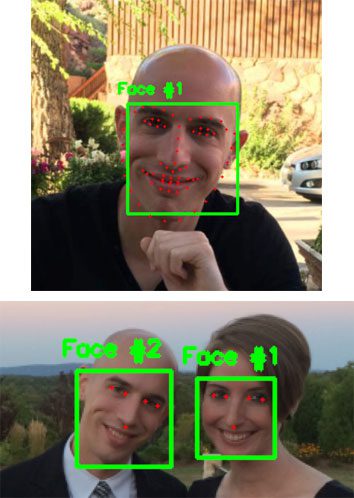
Figure 1: A comparison of the dlib 68-point facial landmarks (top) and the 5-point facial landmarks (bottom).
Figure 1 above visualizes the difference between dlib’s new 5-point facial landmark detector versus the original 68-point detector.
While the 68-point detector localizes regions along the eyes, eyebrows, nose, mouth, and jawline, the 5-point facial landmark detector reduces this information to:
- 2 points for the left eye
- 2 points for the right eye
- 1 point for the nose
The most appropriate use case for the 5-point facial landmark detector is face alignment.
In terms of speedup, I found the new 5-point detector to be 8-10% faster than the original version, but the real win here is model size: 9.2MB versus 99.7MB, respectively (over 10x smaller).
It’s also important to note that facial landmark detectors tend to be very fast to begin with (especially if they are implemented correctly, as they are in dlib).
The real win in terms of speedup will be to determine which face detector you should use. Some face detectors are faster (but potentially less accurate) than others. If you remember back to our drowsiness detection series:
- Drowsiness detection with OpenCV
- Raspberry Pi: Facial landmarks + drowsiness detection with OpenCV and dlib
You’ll recall that we used the more accurate HOG + Linear SVM face detector for the laptop/desktop implementation, but required a less accurate but faster Haar cascade to achieve real-time speed on the Raspberry Pi.
In general, you’ll find the following guidelines to be a good starting point when choosing a face detection model:
- Haar cascades: Fast, but less accurate. Can be a pain to tune parameters.
- HOG + Linear SVM: Typically (significantly) more accurate than Haar cascades with less false positives. Normally less parameters to tune at test time. Can be slow compared to Haar cascades.
- Deep learning-based detectors: Significantly more accurate and robust than Haar cascades and HOG + Linear SVM when trained correctly. Can be very slow depending on depth and complexity of model. Can be sped up by performing inference on GPU (you can see an OpenCV deep learning face detector in this post).
Keep these guidelines in mind when building your own applications that leverage both face detection and facial landmarks.
Implementing facial landmarks with dlib, OpenCV, and Python
Now that we have discussed dlib’s 5-point facial landmark detector, let’s write some code to demonstrate and see it in action.
Open up a new file, name it
faster_facial_landmarks.py, and insert the following code:
# import the necessary packages
from imutils.video import VideoStream
from imutils import face_utils
import argparse
import imutils
import time
import dlib
import cv2
On Lines 2-8 we import necessary packages, notably
dliband two modules from
imutils.
The imutils package has been updated to handle both the 68-point and 5-point facial landmark models. Ensure that you upgrade it in your environment via:
$ pip install --upgrade imutils
Again, updating imutils will allow you to work with both 68-point and 5-point facial landmarks.
From there, let’s parse command line arguments:
# construct the argument parser and parse the arguments
ap = argparse.ArgumentParser()
ap.add_argument("-p", "--shape-predictor", required=True,
        help="path to facial landmark predictor")
args = vars(ap.parse_args())
We have one command line argument:
--shape-predictor. This argument allows us to change the path to the facial landmark predictor that will be loaded at runtime.
Note: Confused about command line arguments? Be sure to check out my recent post where command line arguments are covered in depth.
Next, let’s load the shape predictor and initialize our video stream:
# initialize dlib's face detector (HOG-based) and then create the
# facial landmark predictor
print("[INFO] loading facial landmark predictor...")
detector = dlib.get_frontal_face_detector()
predictor = dlib.shape_predictor(args["shape_predictor"])

# initialize the video stream and sleep for a bit, allowing the
# camera sensor to warm up
print("[INFO] camera sensor warming up...")
vs = VideoStream(src=1).start()
# vs = VideoStream(usePiCamera=True).start() # Raspberry Pi
time.sleep(2.0)
On Lines 19 and 20, we initialize dlib’s pre-trained HOG + Linear SVM face
detectorand load the
shape_predictorfile.
In order to access the camera, we’ll be using the
VideoStreamclass from imutils.
You can select (via commenting/uncommenting Lines 25 and 26) whether you’ll use a:
- Built-in/USB webcam
- Or if you’ll be using a PiCamera on your Raspberry Pi
From there, let’s loop over the frames and do some work:
# loop over the frames from the video stream
while True:
        # grab the frame from the threaded video stream, resize it to
        # have a maximum width of 400 pixels, and convert it to
        # grayscale
        frame = vs.read()
        frame = imutils.resize(frame, width=400)
        gray = cv2.cvtColor(frame, cv2.COLOR_BGR2GRAY)

        # detect faces in the grayscale frame
        rects = detector(gray, 0)

        # check to see if a face was detected, and if so, draw the total
        # number of faces on the frame
        if len(rects) > 0:
                text = "{} face(s) found".format(len(rects))
                cv2.putText(frame, text, (10, 20), cv2.FONT_HERSHEY_SIMPLEX,
                        0.5, (0, 0, 255), 2)
First, we read a
framefrom the video stream, resize it, and convert to grayscale (Lines 34-36).
Then let’s use our HOG + Linear SVM
detectorto detect faces in the grayscale image (Line 39).
From there, we draw the total number of faces in the image on the original
frameby first making sure that at least one face was detected (Lines 43-46).
Next, let’s loop over the face detections and draw the landmarks:
# loop over the face detections
        for rect in rects:
                # compute the bounding box of the face and draw it on the
                # frame
                (bX, bY, bW, bH) = face_utils.rect_to_bb(rect)
                cv2.rectangle(frame, (bX, bY), (bX + bW, bY + bH),
                        (0, 255, 0), 1)

                # determine the facial landmarks for the face region, then
                # convert the facial landmark (x, y)-coordinates to a NumPy
                # array
                shape = predictor(gray, rect)
                shape = face_utils.shape_to_np(shape)

                # loop over the (x, y)-coordinates for the facial landmarks
                # and draw each of them
                for (i, (x, y)) in enumerate(shape):
                        cv2.circle(frame, (x, y), 1, (0, 0, 255), -1)
                        cv2.putText(frame, str(i + 1), (x - 10, y - 10),
                                cv2.FONT_HERSHEY_SIMPLEX, 0.35, (0, 0, 255), 1)
Beginning on Line 49, we loop over the faces in
rects.
We draw the face bounding box on the original frame (Lines 52-54), by using our
face_utilsmodule from
imutils(which you can read more about here).
Then we pass the face to
predictorto determine the facial landmarks (Line 59) and subsequently we convert the facial landmark coordinates to a NumPy array.
Now here’s the fun part. To visualize the landmarks, we’re going to draw tiny dots using
cv2.circleand number each of the coordinates.
On Line 64, we loop over the landmark coordinates. Then we draw a small filled-in circle as well as the landmark number on the original
frame.
Let’s finish our facial landmark script out:
# show the frame
        cv2.imshow("Frame", frame)
        key = cv2.waitKey(1) & 0xFF

        # if the `q` key was pressed, break from the loop
        if key == ord("q"):
                break

# do a bit of cleanup
cv2.destroyAllWindows()
vs.stop()
In this block, we display the frame (Line 70), break out of the loop if “q” is pressed (Lines 71-75), and perform cleanup (Lines 78 and 79).
Running our facial landmark detector
Now that we have implemented our facial landmark detector, let’s test it out.
Be sure to scroll down to the “Downloads” section of this blog post to download the source code and 5-point facial landmark detector.
From there, open up a shell and execute the following command:
$ python faster_facial_landmarks.py \
        --shape-predictor shape_predictor_5_face_landmarks.dat
Figure 2: The dlib 5-point facial landmark detector in action.
As you can see from the GIF above, we have successfully localized the 5 facial landmarks, including:
- 2 points for the left eye
- 2 points for the right eye
- 1 point for the bottom of the nose
I have included a longer demonstration of the facial landmark detector in the video below:
Is dlib’s 5-point or 68-point facial landmark detector faster?
In my own tests I found that dlib’s 5-point facial landmark detector is 8-10% faster than the original 68-point facial landmark detector.
A 8-10% speed up is significant; however, what’s more important here is the size of the model.
The original 68-point facial landmark is nearly 100MB, weighing in at 99.7MB.
The 5-point facial landmark detector is under 10MB, at only 9.2MB — this is over a 10x smaller model!
When you’re building your own applications that utilize facial landmarks, you now have a substantially smaller model file to distribute with the rest of your app.
A smaller model size is nothing to scoff at either — just think of the reduced download time/resources for mobile app users!
Limitations of the 5-point facial landmark detector
The primary usage of the 5-point facial landmark detector will be face alignment:

Figure 3: Face alignment applied to obtain a canonical rotation of an input face.
For face alignment, the 5-point facial landmark detector can be considered a drop-in replacement for the 68-point detector — the same general algorithm applies:
- Compute the 5-point facial landmarks
- Compute the center of each eye based on the two landmarks for each eye, respectively
- Compute the angle between the eye centroids by utilizing the midpoint between the eyes
- Obtain a canonical alignment of the face by applying an affine transformation
While the 68-point facial landmark detector may give us slightly better approximation to the eye centers, in practice you’ll find that the 5-point facial landmark detector works just as well.
All that said, while the 5-point facial landmark detector is certainly smaller (9.2MB versus 99.7MB, respectively), it cannot be used in all situations.
A great example of such a situation is drowsiness detection:
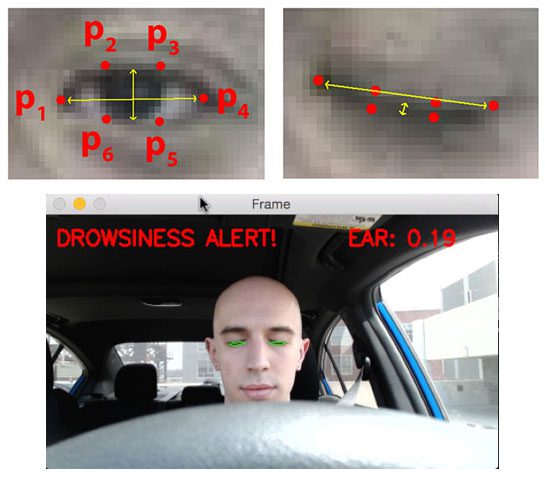
Figure 4: We make use of dlib to calculate the facial landmarks + Eye Aspect Ratio (EAR) which in turn can alert us for drowsiness.
When applying drowsiness detection we need to compute the Eye Aspect Ratio (EAR) which is the ratio of the eye landmark width to the eye landmark height.
When using the 68-point facial landmark detector we have six points per eye, enabling us to perform this computation.
However, with the 5-point facial landmark detector we only have two points per eye (essentially  and
and  from Figure 4 above) — this is not enough enough to compute the eye aspect ratio.
If your plan is to build a drowsiness detector or any other application that requires more points along the face, including facial landmarks along the:
- Eyes
- Eyebrows
- Nose
- Mouth
- Jawline
…then you’ll want to use the 68-point facial landmark detector instead of the 5-point one.
Interested in learning from Davis King, author of dlib and CV/ML expert?

If you’re interested in learning from Davis King and other computer vision + deep learning experts, then look no further than PyImageConf, PyImageSearch’s very own practical, hands-on computer vision and deep learning conference.
At PyImageConf on August 26-28th in San Francisco, CA, you’ll be able to attend talks and workshops by 10+ prominent speakers and workshop hosts, including Davis King, Francois Chollet (AI researcher at Google and author of Keras), Katherine Scott (SimpleCV and PlanetLabs), Agustín Azzinnari + Alan Descoins (Faster R-CNN and object detection experts at TryoLabs), myself, and more!
You should plan to attend if you:
- Are eager to learn from top educators in the field
- Are a working for a large company and are thinking of spearheading a computer vision product or app
- Are an entrepreneur who is ready to ride the computer vision and deep learning wave
- Are a student looking to make connections to help you both now with your research and in the near future to secure a job
- Enjoy PyImageSearch’s blog and community and are ready to further develop relationships with live training
I guarantee you’ll be more than happy with your investment in time and resources attending PyImageConf — the talks and workshops will pay huge dividends on your own computer vision + deep learning projects.
To learn more about the conference, you can read the formal announcement here.
And from there, you can use the following link to grab your ticket!
Summary
In today’s blog post we discussed dlib’s new, faster, more compact 5-point facial landmark detector.
This 5-point facial landmark detector can be considered a drop-in replacement for the 68-point landmark detector originally distributed with the dlib library.
After discussing the differences between the two facial landmark detectors, I then provided an example script of applying the 5-point version to detect the eye and nose region of my face.
In my tests, I found the 5-point facial landmark detector to be 8-10% faster than the 68-point version while being 10x faster.
To download the source code + 5-point facial landmark detector used in this post, just enter your email address in the form below — I’ll also be sure to email you when new computer vision tutorials are published here on the PyImageSearch blog.
Downloads:
The post (Faster) Facial landmark detector with dlib appeared first on PyImageSearch.
from PyImageSearch https://ift.tt/2Gs2CoB
via IFTTT
No comments:
Post a Comment