In today’s blog post we are going to create a deep learning REST API that wraps a Keras model in an efficient, scalable manner.
Our Keras + deep learning REST API will be capable of batch processing images, scaling to multiple machines (including multiple web servers and Redis instances), and round-robin scheduling when placed behind a load balancer.
To accomplish this we will be using:
- Keras
- Redis (an in-memory data structure store)
- Flask (a micro web framework for Python)
- Message queuing and message broker programming paradigms
This blog post is a bit more advanced than other tutorials on PyImageSearch and is intended for readers:
- Who are familiar with the Keras deep learning library
- Who have an understanding of web frameworks and web services (and ideally coded a simple website/web service before)
- Who understand basic data structures, such as hash tables/dictionaries, lists, along with their associated asymptotic complexities
To learn how to create your own scalable Keras + deep learning REST API, just keep reading!
Looking for the source code to this post?
Jump right to the downloads section.
A scalable Keras + deep learning REST API
Today’s tutorial is broken into multiple parts.
We’ll start with a brief discussion of the Redis data store and how it can be used to facilitate message queuing and message brokering.
From there, we’ll configure our Python development environment by installing the required Python packages to build our Keras deep learning REST API.
Once we have our development environment configured we can implement our actual Keras deep learning REST API using the Flask web framework. After implementing, we’ll start the Redis and Flask servers, follow by submitting inference requests to our deep learning API endpoint using both cURL and Python.
Finally, we’ll end with a short discussion on the considerations you should keep in mind when building your own deep learning REST API.
A short introduction to Redis as a REST API message broker/message queue
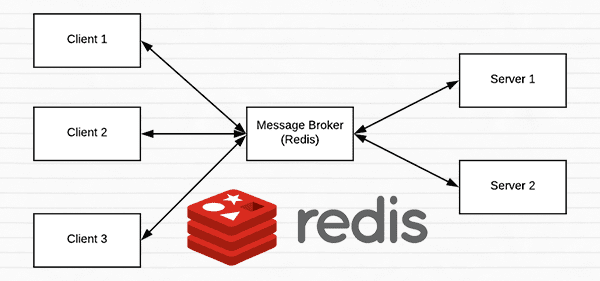
Figure 1: Redis can be used as a message broker/message queue for our deep learning REST API
Redis is an in-memory data store. It is different than a simple key/value store (such as memcached) as it can can store actual data structures.
Today we’re going to utilize Redis as a message broker/message queue. This involves:
- Running Redis on our machine
- Queuing up data (images) to our Redis store to be processed by our REST API
- Polling Redis for new batches of input images
- Classifying the images and returning the results to the client
To read more about Redis, I encourage you to review this short introduction.
Configuring and installing Redis for our Keras REST API
Redis is very easy to install. Below you’ll find the commands to download, extract, and install Redis on your system:
$ wget http://download.redis.io/redis-stable.tar.gz
$ tar xvzf redis-stable.tar.gz
$ cd redis-stable
$ make
$ sudo make install
To start the Redis server, use the following command:
$ redis-server
Leave this terminal open to keep the Redis data store running.
In another terminal, you can validate Redis is up and running:
$ redis-cli ping
PONG
Provided that you get a
PONGback from Redis, you’re ready to go.
Configuring your Python development environment to build a Keras REST API
I recommend that you work on this project inside of a Python virtual environment so that it does not impact system level Python and projects.
To do this, you’ll need to install pip, virtualenv, and virtualenvwrapper (provided you haven’t already):
$ cd ~
$ wget https://bootstrap.pypa.io/get-pip.py
$ sudo python get-pip.py
$ sudo pip install virtualenv virtualenvwrapper
You’ll also need to edit your
~/.bashrc(or
~/.bash_profileon macOS) to include the following lines:
# virtualenv and virtualenvwrapper
export WORKON_HOME=$HOME/.virtualenvs
source /usr/local/bin/virtualenvwrapper.sh
Then, simply source the file in the terminal depending on your OS:
Ubuntu
$ source ~/.bashrc
macOS
$ source ~/.bash_profile
From there, you can create a Python virtual environment specifically for this project:
$ mkvirtualenv keras_flask -p python3
And once your environment is ready and activated, let’s install the necessary packages for our Keras REST API into the environment:
$ pip install numpy
$ pip install scipy h5py
$ pip install tensorflow # tensorflow-gpu for GPU machines
$ pip install keras
$ pip install flask gevent
$ pip install imutils requests
$ pip install redis
$ pip install Pillow
That’s it — and notice that we don’t actually need OpenCV for this project because we’ll be making use of PIL/Pillow.
Implementing a scalable Keras REST API
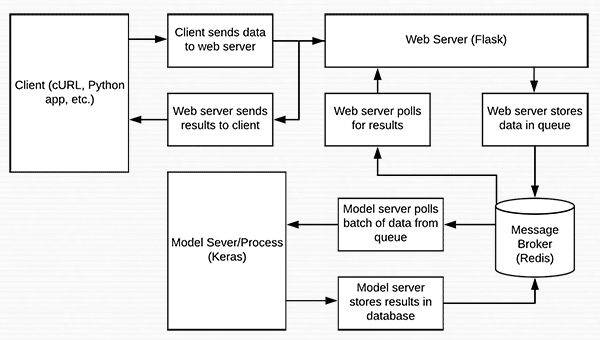
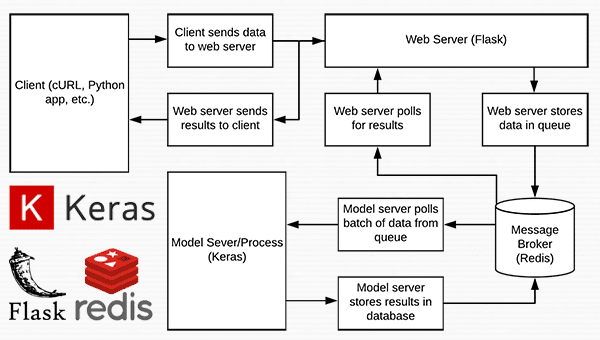
Figure 2: Our deep learning Keras + Redis + Flask REST API data flow diagram
Let’s get started building our server script. For convenience I’ve implemented the server in a single file, however it can be modularized as you see fit.
For best results and to avoid copy/paste errors, I encourage you to use the “Downloads” section of this blog post to grab the associated scripts and images.
Let’s open up
run_keras_server.pyand walk through it together:
# import the necessary packages
from keras.applications import ResNet50
from keras.preprocessing.image import img_to_array
from keras.applications import imagenet_utils
from threading import Thread
from PIL import Image
import numpy as np
import base64
import flask
import redis
import uuid
import time
import json
import sys
import io
There are quite a few imports listed above, notably
ResNet50,
flask, and
redis.
For the sake of simplicity, we’ll be using ResNet pre-trained on the ImageNet dataset. I’ll point out where you can swap out ResNet for your own models.
The
flaskmodule contains the Flask library (used to build our web API). The
redismodule will enable us to interface with the Redis data store.
From there, let’s initialize constants which will be used throughout
run_keras_server.py:
# initialize constants used to control image spatial dimensions and
# data type
IMAGE_WIDTH = 224
IMAGE_HEIGHT = 224
IMAGE_CHANS = 3
IMAGE_DTYPE = "float32"

# initialize constants used for server queuing
IMAGE_QUEUE = "image_queue"
BATCH_SIZE = 32
SERVER_SLEEP = 0.25
CLIENT_SLEEP = 0.25
We’ll be passing
float32images to the server with dimensions of 224 x 224 and containing
3channels.
Our server can handle a
BATCH_SIZE = 32. If you have GPU(s) on your production system, you’ll want to tune your
BATCH_SIZEfor optimal performance.
I’ve found that setting both
SERVER_SLEEPand
CLIENT_SLEEPto
0.25seconds (the amount of time the server and client will pause before polling Redis again, respectively) will work well on most systems. Definitely adjust these constants if you’re building a production system.
Let’s kick off our Flask app and Redis server:
# initialize our Flask application, Redis server, and Keras model
app = flask.Flask(__name__)
db = redis.StrictRedis(host="localhost", port=6379, db=0)
model = None
Here you can see how easy it is to start Flask.
I’ll assume that before you run this server script that your Redis server is running. Our Python script connect to the Redis store on our
localhoston port
6379(the default host and port values for Redis).
Don’t forget to initialize a global Keras
modelto
Nonehere as well.
From there let’s handle serialization of images:
def base64_encode_image(a):
        # base64 encode the input NumPy array
        return base64.b64encode(a).decode("utf-8")

def base64_decode_image(a, dtype, shape):
        # if this is Python 3, we need the extra step of encoding the
        # serialized NumPy string as a byte object
        if sys.version_info.major == 3:
                a = bytes(a, encoding="utf-8")

        # convert the string to a NumPy array using the supplied data
        # type and target shape
        a = np.frombuffer(base64.decodestring(a), dtype=dtype)
        a = a.reshape(shape)

        # return the decoded image
        return a
Redis will act as our temporary data store on the server. Images will come in to the server via a variety of methods such as cURL, a Python script, or even a mobile app.
Furthermore, images could come in only every once in awhile (a few every hours or days) or at a very high rate (multiple per second). We need to put the images somewhere as they queue up prior to being processed. Our Redis store will act as the temporary storage.
In order to store our images in Redis, they need to be serialized. Since images are just NumPy arrays, we can utilize base64 encoding to serialize the images. Using base64 encoding also has the added benefit of allowing us to use JSON to store additional attributes with the image.
Our
base64_encode_imagefunction handles the serialization and is defined on Lines 35-37.
Similarly, we need to deserialize our image prior to passing them through our model. This is handled by the
base64_decode_imagefunction on Lines 39-51.
Let’s pre-process our image:
def prepare_image(image, target):
        # if the image mode is not RGB, convert it
        if image.mode != "RGB":
                image = image.convert("RGB")

        # resize the input image and preprocess it
        image = image.resize(target)
        image = img_to_array(image)
        image = np.expand_dims(image, axis=0)
        image = imagenet_utils.preprocess_input(image)

        # return the processed image
        return image
On Line 53, I’ve defined a
prepare_imagefunction which pre-processes our input image for classification using the ResNet50 implementation in Keras.. When utilizing your own models I would suggest modifying this function to perform any required pre-processing, scaling, or normalization.
From there we’ll define our classification method:
def classify_process():
        # load the pre-trained Keras model (here we are using a model
        # pre-trained on ImageNet and provided by Keras, but you can
        # substitute in your own networks just as easily)
        print("* Loading model...")
        model = ResNet50(weights="imagenet")
        print("* Model loaded")
The
classify_processfunction will be kicked off in its own thread as we’ll see in
__main__below. This function will poll for image batches from the Redis server, classify the images, and return the results to the client.
Line 72 loads the
model. I’ve sandwiched this action with terminal
Loading the model happens only once when this thread is launched — it would be terribly slow if we had to load the model each time we wanted to process an image and furthermore it could lead to a server crash due to memory exhaustion.
After loading the model, this thread will continually poll for new images and then classify them:
# continually poll for new images to classify
        while True:
                # attempt to grab a batch of images from the database, then
                # initialize the image IDs and batch of images themselves
                queue = db.lrange(IMAGE_QUEUE, 0, BATCH_SIZE - 1)
                imageIDs = []
                batch = None

                # loop over the queue
                for q in queue:
                        # deserialize the object and obtain the input image
                        q = json.loads(q.decode("utf-8"))
                        image = base64_decode_image(q["image"], IMAGE_DTYPE,
                                (1, IMAGE_HEIGHT, IMAGE_WIDTH, IMAGE_CHANS))

                        # check to see if the batch list is None
                        if batch is None:
                                batch = image

                        # otherwise, stack the data
                        else:
                                batch = np.vstack([batch, image])

                        # update the list of image IDs
                        imageIDs.append(q["id"])
Here we’re first using the Redis database’s
lrangefunction to get, at most,
BATCH_SIZEimages from our queue (Line 79).
From there we initialize our
imageIDsand
batch(Lines 80 and 81) and begin looping over the
queuebeginning on Line 84.
In the loop, we first decode the object and deserialize it into a NumPy array,
image(Lines 86-88).
Next, on Lines 90-96, we’ll add the
imageto the
batch(or if the
batchis currently
Nonewe just set the
batchto the current
image).
We also append the
idof the image to
imageIDs(Line 99).
Let’s finish out the loop and function:
# check to see if we need to process the batch
                if len(imageIDs) > 0:
                        # classify the batch
                        print("* Batch size: {}".format(batch.shape))
                        preds = model.predict(batch)
                        results = imagenet_utils.decode_predictions(preds)

                        # loop over the image IDs and their corresponding set of
                        # results from our model
                        for (imageID, resultSet) in zip(imageIDs, results):
                                # initialize the list of output predictions
                                output = []

                                # loop over the results and add them to the list of
                                # output predictions
                                for (imagenetID, label, prob) in resultSet:
                                        r = {"label": label, "probability": float(prob)}
                                        output.append(r)

                                # store the output predictions in the database, using
                                # the image ID as the key so we can fetch the results
                                db.set(imageID, json.dumps(output))

                        # remove the set of images from our queue
                        db.ltrim(IMAGE_QUEUE, len(imageIDs), -1)

                # sleep for a small amount
                time.sleep(SERVER_SLEEP)
In this code block, we check if there are any images in our batch (Line 102).
If we have a batch of images, we make predictions on the entire batch by passing it through the model (Line 105).
From there, we loop over a the
imageIDsand corresponding prediction
results(Lines 110-122). These lines append labels and probabilities to an output list and then store the output in the Redis database using the
imageIDas the key (Lines 116-122).
We remove the set of images that we just classified from our queue using
ltrimon Line 125.
And finally, we sleep for the set
SERVER_SLEEPtime and await the next batch of images to classify.
Let’s handle the
/predictendpoint of our REST API next:
@app.route("/predict", methods=["POST"])
def predict():
        # initialize the data dictionary that will be returned from the
        # view
        data = {"success": False}

        # ensure an image was properly uploaded to our endpoint
        if flask.request.method == "POST":
                if flask.request.files.get("image"):
                        # read the image in PIL format and prepare it for
                        # classification
                        image = flask.request.files["image"].read()
                        image = Image.open(io.BytesIO(image))
                        image = prepare_image(image, (IMAGE_WIDTH, IMAGE_HEIGHT))

                        # ensure our NumPy array is C-contiguous as well,
                        # otherwise we won't be able to serialize it
                        image = image.copy(order="C")

                        # generate an ID for the classification then add the
                        # classification ID + image to the queue
                        k = str(uuid.uuid4())
                        d = {"id": k, "image": base64_encode_image(image)}
                        db.rpush(IMAGE_QUEUE, json.dumps(d))
As you’ll see later, when we POST to the REST API, we’ll be using the
/predictendpoint. Our server could, of course, have multiple endpoints.
We use the
@app.routedecorator above our function in the format shown on Line 130 to define our endpoint so that Flask knows what function to call. We could easily have another endpoint which uses AlexNet instead of ResNet and we’d define the endpoint with associated function in a similar way. You get the idea, but for our purposes today, we just have one endpoint called
/predict.
Our
predictmethod defined on Line 131 will handle the POST requests to the server. The goal of this function is to build the JSON
datathat we’ll send back to the client.
If the POST data contains an image (Lines 137 and 138) we convert the image to PIL/Pillow format and preprocess it (Lines 141-143).
While developing this script, I spent considerable time debugging my serialization and deserialization functions, only to figure out that I needed Line 147 to convert the array to C-contiguous ordering (which is something you can read more about here). Honestly, it was a pretty big pain in the ass to figure out, but I hope it helps you get up and running quickly.
If you were wondering about the
idmentioned back on Line 99, it is actually generated here using
uuid, a universally unique identifier, on Line 151. We use a UUID to prevent hash/key conflicts.
Next, we append the
idas well as the
base64encoding of the
imageto the
ddictionary. It’s very simple to push this JSON data to the Redis
dbusing
rpush(Line 153).
Let’s poll the server to return the predictions:
# keep looping until our model server returns the output
                        # predictions
                        while True:
                                # attempt to grab the output predictions
                                output = db.get(k)

                                # check to see if our model has classified the input
                                # image
                                if output is not None:
                                        # add the output predictions to our data
                                        # dictionary so we can return it to the client
                                        output = output.decode("utf-8")
                                        data["predictions"] = json.loads(output)

                                        # delete the result from the database and break
                                        # from the polling loop
                                        db.delete(k)
                                        break

                                # sleep for a small amount to give the model a chance
                                # to classify the input image
                                time.sleep(CLIENT_SLEEP)

                        # indicate that the request was a success
                        data["success"] = True

        # return the data dictionary as a JSON response
        return flask.jsonify(data)
We’ll loop continuously until the model server returns the output predictions. We start an infinite loop and attempt to get the predictions Lines 157-159.
From there, if the
outputcontains predictions, we deserialize the results and add them to
datawhich will be returned to the client.
We also
deletethe result from the
db(since we have pulled the results form the database and no longer need to store them in the database) and
breakout of the loop (Lines 163-172).
Otherwise, we don’t have any predictions and we need to sleep and continue to poll (Line 176).
If we reach Line 179, we’ve successfully got our predictions. In this case we add a
successvalue of
Trueto the client data (Line 179).
Note: For this example script, I didn’t bother adding timeout logic in the above loop which would ideally add a
successvalue of
Falseto the data. I’ll leave that up to you to handle and implement.
Lastly we call
flask.jsonifyon
dataand return it to the client (Line 182). This completes our predict function.
To demo our Keras REST API, we need a
__main__function to actually start the server:
# if this is the main thread of execution first load the model and
# then start the server
if __name__ == "__main__":
        # load the function used to classify input images in a *separate*
        # thread than the one used for main classification
        print("* Starting model service...")
        t = Thread(target=classify_process, args=())
        t.daemon = True
        t.start()

        # start the web server
        print("* Starting web service...")
        app.run()
Lines 186-196 define the
__main__function which will kick off our
classify_processthread (Lines 190-192) and run the Flask app (Line 196).
Starting the scalable Keras REST API
To test our Keras deep learning REST API, be sure to download the source code + example images using the “Downloads” section of this blog post.
From there, let’s start the Redis server if it isn’t already running:
$ redis-server
Then, in a separate terminal, let’s start our REST API Flask server:
$ python run_keras_server.py
Using TensorFlow backend.
 * Loading Keras model and Flask starting server...please wait until server has fully started
...
 * Running on http://127.0.0.1:5000
Additionally, I would suggest waiting until your model is loaded completely into memory before submitting requests to the server.
Now we can move on to testing the server with both cURL and Python.
Using cURL to access our Keras REST API
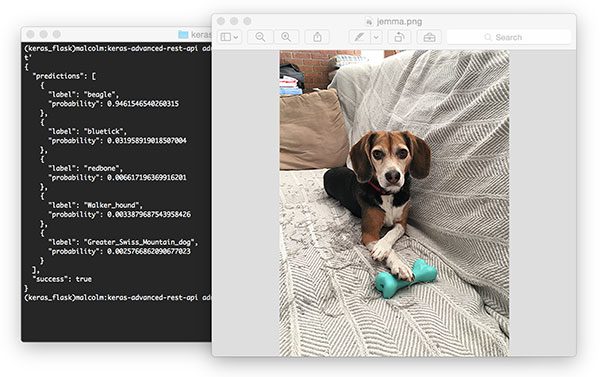
Figure 3: Using cURL to test our Keras REST API server. Pictured is my family beagle, Jemma. She is classified as a beagle with 94.6% confidence by our ResNet model.
The cURL tool is available pre-installed on most (Unix-based) operating systems. We can POST an image file to our deep learning REST API at the
/predictendpoint by using the following command:
$ curl -X POST -F image=@jemma.png 'http://localhost:5000/predict'
You’ll receive the predictions back in JSON format right in your terminal:
{
  "predictions": [
    {
      "label": "beagle",
      "probability": 0.9461546540260315
    },
    {
      "label": "bluetick",
      "probability": 0.031958919018507004
    },
    {
      "label": "redbone",
      "probability": 0.006617196369916201
    },
    {
      "label": "Walker_hound",
      "probability": 0.0033879687543958426
    },
    {
      "label": "Greater_Swiss_Mountain_dog",
      "probability": 0.0025766862090677023
    }
  ],
  "success": true
}
Let’s try passing another image, this time a space shuttle:
$ curl -X POST -F image=@space_shuttle.png 'http://localhost:5000/predict'
{
  "predictions": [
    {
      "label": "space_shuttle",
      "probability": 0.9918227791786194
    },
    {
      "label": "missile",
      "probability": 0.006030891090631485
    },
    {
      "label": "projectile",
      "probability": 0.0021368064917623997
    },
    {
      "label": "warplane",
      "probability": 1.980597062356537e-06
    },
    {
      "label": "submarine",
      "probability": 1.8291866581421345e-06
    }
  ],
  "success": true
}
The results of which can be seen below:
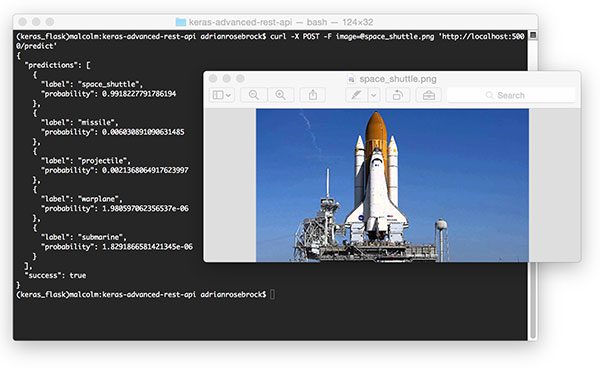
Figure 4: Submitting an input image to our Keras REST API and obtaining the prediction results.
Once again our Keras REST API has correctly classified the input image.
Using Python to submit requests to the Keras REST API
As you can see, verification using cURL was quite easy. Now let’s build a Python script that will POST an image and parse the returning JSON programmatically.
Let’s review
simple_request.py:
# import the necessary packages
import requests

# initialize the Keras REST API endpoint URL along with the input
# image path
KERAS_REST_API_URL = "http://localhost:5000/predict"
IMAGE_PATH = "jemma.png"
We use Python
requestsin this script to handle POSTing data to the server.
Our server is running on the
localhostand can be accessed on port
5000with the endpoint
/predictas is specified by the
KERAS_REST_API_URLvariable (Line 6). If the server is running remotely or on a different machine, be sure to specify the appropriate domain/ip, port, and endpoint.
We also define an
IMAGE_PATH(Line 7). In this case,
jemma.pngis in the same directory as our script. If you want to test with other images, be sure to specify the full path to your input image.
Let’s load the image and send it off to the server:
# load the input image and construct the payload for the request
image = open(IMAGE_PATH, "rb").read()
payload = {"image": image}

# submit the request
r = requests.post(KERAS_REST_API_URL, files=payload).json()

# ensure the request was sucessful
if r["success"]:
        # loop over the predictions and display them
        for (i, result) in enumerate(r["predictions"]):
                print("{}. {}: {:.4f}".format(i + 1, result["label"],
                        result["probability"]))

# otherwise, the request failed
else:
        print("Request failed")
We read the image on Line 10 in binary mode and put the it into a payload dictionary.
The payload is POST’ed to the server with
requests.poston Line 14.
If we get a
successmessage, we can loop over the predictions and print them to the terminal. I made this script simple, but you could also draw the highest prediction text on the image using OpenCV if you want to get fancy.
Running the simple request script
Putting the script to work is easy. Open up a terminal and execute the following command (provided both our Flask server and Redis server are running, of course).
$ python simple_request.py
1. beagle: 0.9462
2. bluetick: 0.0320
3. redbone: 0.0066
4. Walker_hound: 0.0034
5. Greater_Swiss_Mountain_dog: 0.0026
Figure 5: Using Python to programmatically consume the results of our Keras deep learning REST API.
For the
space_shuttle.png, simply modify the
IMAGE_PATHvariable:
IMAGE_PATH = "space_shuttle.png"
And from there, run the script again:
$ python simple_request.py
1. space_shuttle: 0.9918
2. missile: 0.0060
3. projectile: 0.0021
4. warplane: 0.0000
5. submarine: 0.0000
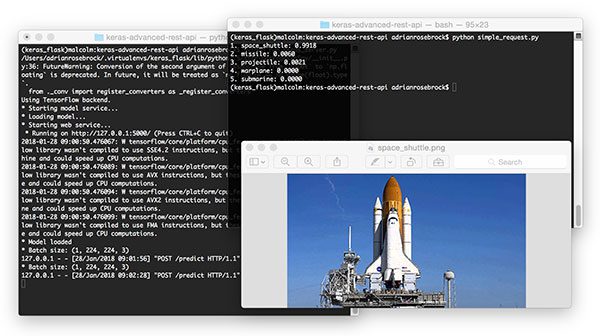
Figure 6: A second example of programmatically consuming our Keras deep learning REST API. Here a space shuttle is classified with 99% confidence by ResNet + Keras REST API.
Considerations when scaling your deep learning REST API
If you anticipate heavy load for extended periods of time on your deep learning REST API you may want to consider a load balancing algorithm such as round-robin scheduling to help evenly distribute requests across multiple GPU machines and Redis servers.
Keep in mind that Redis is an in-memory data store so we can only store as many images in the queue we have available memory.
A single 224 x 224 x 3 image with a
float32data type will consume 60,2112 bytes of memory.
Assuming a server with a modest 16GB of RAM, this implies that we can hold approximately 26,500 images in our queue, but at that point we likely would want to add more GPU servers to burn through the queue faster.
However, there is a subtle problem…
Depending on how you deploy your deep learning REST API, there is a subtle problem with keeping the
classify_processfunction in the same file as the rest of our web API code.
Most web servers, including Apache and nginx, allow for multiple client threads.
If you keep
classify_processin the same file as your
predictview, then you may load multiple models if your server software deems it necessary to create a new thread to serve the incoming client requests — for every new thread, a new view will be created, and therefore a new model will be loaded.
The solution is to move
classify_processto an entirely separate process and then start it along with your Flask web server and Redis server.
In next week’s blog post I’ll build on today’s solution, show how to resolve this problem, and demonstrate:
- How to configure the Apache web server to serve our deep learning REST API
- How to run
classify_process
as an entirely separate Python script, avoiding “multiple model syndrome” - Provide stress test results, confirming and verifying that our deep learning REST API can scale under heavy load
What now?

If you’re interested in taking a deeper dive into deep learning and discovering how to:
- Train Convolutional Neural Networks on your own custom datasets
- Study advanced deep learning techniques, including object detection, multi-GPU training, transfer learning, and Generative Adversarial Networks (GANs)
- Replicate the results of state-of-the-art papers, including ResNet, SqueezeNet, VGGNet, and others
…then be sure to take a look at my new book, Deep Learning for Computer Vision with Python!
My complete, self-study deep learning book is trusted by members of top machine learning schools, companies, and organizations, including Microsoft, Google, Stanford, MIT, CMU, and more!
Be sure to take a look — and while you’re at it, don’t forget to grab your (free) table of contents + sample chapters.
Summary
In today’s blog post we learned how to build a scalable Keras + deep learning REST API.
To accomplish this, we:
- Built a simple Flask app to load our Keras model into memory and accept incoming requests.
- Utilized Redis to act as an in-memory message queue/message broker.
- Utilized threading to batch process input images, write them back to the message queue and then return the results to the client.
This method can scale to multiple machines, including multiple web servers and Redis instances.
I hope you enjoyed today’s blog post!
Be sure to enter your email address in the form below to be notified when future tutorials are published here on PyImageSearch!
Downloads:
The post A scalable Keras + deep learning REST API appeared first on PyImageSearch.
from PyImageSearch http://ift.tt/2nqkmUG
via IFTTT
No comments:
Post a Comment