Shipping deep learning models to production is a non-trivial task.
If you don’t believe me, take a second and look at the “tech giants” such as Amazon, Google, Microsoft, etc. — nearly all of them provide some method to ship your machine learning/deep learning models to production in the cloud.
Going with a model deployment service is perfectly fine and acceptable…but what if you wanted to own the entire process and not rely on external services?
This type of situation is more common than you may think. Consider:
- An in-house project where you cannot move sensitive data outside your network
- A project that specifies that the entire infrastructure must reside within the company
- A government organization that needs a private cloud
- A startup that is in “stealth mode” and needs to stress test their service/application in-house
How would you go about shipping your deep learning models to production in these situations, and perhaps most importantly, making it scalable at the same time?
Today’s post is the final chapter in our three part series on building a deep learning model server REST API:
- Part one (which was posted on the official Keras.io blog!) is a simple Keras + deep learning REST API which is intended for single threaded use with no concurrent requests. This method is a perfect fit if this is your first time building a deep learning web server or if you’re working on a home/hobby project.
- In part two we demonstrated how to leverage Redis along with message queueing/message brokering paradigms to efficiently batch process incoming inference requests (but with a small caveat on server threading that could cause problems).
- In the final part of this series, I’ll show you how to resolve these server threading issues, further scale our method, provide benchmarks, and demonstrate how to efficiently scale deep learning in production using Keras, Redis, Flask, and Apache.
As the results of our stress test will demonstrate, our single GPU machine can easily handle 500 concurrent requests (0.05 second delay in between each one) without ever breaking a sweat — this performance continues to scale as well.
To learn how to ship your own deep learning models to production using Keras, Redis, Flask, and Apache, just keep reading.
Looking for the source code to this post?
Jump right to the downloads section.
Deep learning in production with Keras, Redis, Flask, and Apache
The code for this blog post is primarily based on our previous post, but with some minor modifications — the first part of today’s guide will review these changes along with our project structure.
From there we’ll move on to configuring our deep learning web application, including installing and configuring any packages you may need (Redis, Apache, etc.).
Finally, we’ll stress test our server and benchmark our results.
For a quick overview of our deep learning production system (including a demo) be sure to watch the video above!
Our deep learning project structure
Our project structure is as follows:
├── helpers.py
├── jemma.png
├── keras_rest_api_app.wsgi
├── run_model_server.py
├── run_web_server.py
├── settings.py
├── simple_request.py
└── stress_test.py
Let’s review the important files:
-
run_web_server.py
contains all our Flask web server code — Apache will load this when starting our deep learning web app. -
run_model_server.py
will:- Load our Keras model from disk
- Continually poll Redis for new images to classify
- Classify images (batch processing them for efficiency)
- Write the inference results back to Redis so they can be returned to the client via Flask
-
settings.py
contains all Python-based settings for our deep learning productions service, such as Redis host/port information, image classification settings, image queue name, etc. -
helpers.py
contains utility functions that bothrun_web_server.py
andrun_model_server.py
will use (namelybase64
encoding). -
keras_rest_api_app.wsgi
contains our WSGI settings so we can serve the Flask app from our Apache server. -
simple_request.py
can be used to programmatically consume the results of our deep learning API service. -
jemma.png
is a photo of my family’s beagle. We’ll be using her as an example image when calling the REST API to validate it is indeed working. - Finally, we’ll use
stress_test.py
to stress our server and measure image classification throughout.
As described last week, we have a single endpoint on our Flask server,
/predict. This method lives in
run_web_server.pyand will compute the classification for an input image on demand. Image pre-processing is also handled in
run_web_server.py.
In order to make our server production-ready, I’ve pulled out the
classify_processfunction from last week’s single script and placed it in
run_model_server.py. This script is very important as it will load our Keras model and grab images from our image queue in Redis for classification. Results are written back to Redis (the
/predictendpoint and corresponding function in
run_web_server.pymonitors Redis for results to send back to the client).
But what good is a deep learning REST API server unless we know its capabilities and limitations?
In
stress_test.py, we test our server. We’ll accomplish this by kicking off 500 concurrent threads which will send our images to the server for classification in parallel. I recommend running this on the server localhost to start, and then running it from a client that is off site.
Building our deep learning web app
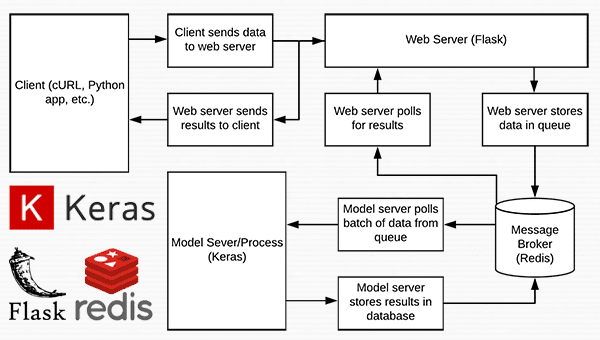
Figure 1: Data flow diagram for a deep learning REST API server built with Python, Keras, Redis, and Flask.
Nearly every single line of code used in this project comes from our previous post on building a scalable deep learning REST API — the only change is that we are moving some of the code to separate files to facilitate scalability in a production environment.
As a matter of completeness I’ll be including the source code to each file in this blog post (and in the “Downloads” section of this blog post). For a detailed review of the files, please see the previous post.
Settings and configurations
# initialize Redis connection settings
REDIS_HOST = "localhost"
REDIS_PORT = 6379
REDIS_DB = 0

# initialize constants used to control image spatial dimensions and
# data type
IMAGE_WIDTH = 224
IMAGE_HEIGHT = 224
IMAGE_CHANS = 3
IMAGE_DTYPE = "float32"

# initialize constants used for server queuing
IMAGE_QUEUE = "image_queue"
BATCH_SIZE = 32
SERVER_SLEEP = 0.25
CLIENT_SLEEP = 0.25
In
settings.pyyou’ll be able to change parameters for the server connectivity, image dimensions + data type, and server queuing.
Helper utilities
# import the necessary packages
import numpy as np
import base64
import sys

def base64_encode_image(a):
        # base64 encode the input NumPy array
        return base64.b64encode(a).decode("utf-8")

def base64_decode_image(a, dtype, shape):
        # if this is Python 3, we need the extra step of encoding the
        # serialized NumPy string as a byte object
        if sys.version_info.major == 3:
                a = bytes(a, encoding="utf-8")

        # convert the string to a NumPy array using the supplied data
        # type and target shape
        a = np.frombuffer(base64.decodestring(a), dtype=dtype)
        a = a.reshape(shape)

        # return the decoded image
        return a
The
helpers.pyfile contains two functions — one for
base64encoding and the other for decoding.
Encoding is necessary so that we can serialize + store our image in Redis. Likewise, decoding is necessary so that we can deserialize the image into NumPy array format prior to pre-processing.
The deep learning web server
# import the necessary packages
from keras.preprocessing.image import img_to_array
from keras.applications import imagenet_utils
from PIL import Image
import numpy as np
import settings
import helpers
import flask
import redis
import uuid
import time
import json
import io

# initialize our Flask application and Redis server
app = flask.Flask(__name__)
db = redis.StrictRedis(host=settings.REDIS_HOST,
        port=settings.REDIS_PORT, db=settings.REDIS_DB)

def prepare_image(image, target):
        # if the image mode is not RGB, convert it
        if image.mode != "RGB":
                image = image.convert("RGB")

        # resize the input image and preprocess it
        image = image.resize(target)
        image = img_to_array(image)
        image = np.expand_dims(image, axis=0)
        image = imagenet_utils.preprocess_input(image)

        # return the processed image
        return image

@app.route("/")
def homepage():
        return "Welcome to the PyImageSearch Keras REST API!"

@app.route("/predict", methods=["POST"])
def predict():
        # initialize the data dictionary that will be returned from the
        # view
        data = {"success": False}

        # ensure an image was properly uploaded to our endpoint
        if flask.request.method == "POST":
                if flask.request.files.get("image"):
                        # read the image in PIL format and prepare it for
                        # classification
                        image = flask.request.files["image"].read()
                        image = Image.open(io.BytesIO(image))
                        image = prepare_image(image,
                                (settings.IMAGE_WIDTH, settings.IMAGE_HEIGHT))

                        # ensure our NumPy array is C-contiguous as well,
                        # otherwise we won't be able to serialize it
                        image = image.copy(order="C")

                        # generate an ID for the classification then add the
                        # classification ID + image to the queue
                        k = str(uuid.uuid4())
                        image = helpers.base64_encode_image(image)
                        d = {"id": k, "image": image}
                        db.rpush(settings.IMAGE_QUEUE, json.dumps(d))

                        # keep looping until our model server returns the output
                        # predictions
                        while True:
                                # attempt to grab the output predictions
                                output = db.get(k)

                                # check to see if our model has classified the input
                                # image
                                if output is not None:
                                        # add the output predictions to our data
                                        # dictionary so we can return it to the client
                                        output = output.decode("utf-8")
                                        data["predictions"] = json.loads(output)

                                        # delete the result from the database and break
                                        # from the polling loop
                                        db.delete(k)
                                        break

                                # sleep for a small amount to give the model a chance
                                # to classify the input image
                                time.sleep(settings.CLIENT_SLEEP)

                        # indicate that the request was a success
                        data["success"] = True

        # return the data dictionary as a JSON response
        return flask.jsonify(data)

# for debugging purposes, it's helpful to start the Flask testing
# server (don't use this for production
if __name__ == "__main__":
        print("* Starting web service...")
        app.run()
Here in
run_web_server.py, you’ll see
predict, the function associated with our REST API
/predictendpoint.
The
predictfunction pushes the encoded image into the Redis queue and then continually loops/polls until it obains the prediction data back from the model server. We then JSON-encode the data and instruct Flask to send the data back to the client.
The deep learning model server
# import the necessary packages
from keras.applications import ResNet50
from keras.applications import imagenet_utils
import numpy as np
import settings
import helpers
import redis
import time
import json

# connect to Redis server
db = redis.StrictRedis(host=settings.REDIS_HOST,
        port=settings.REDIS_PORT, db=settings.REDIS_DB)

def classify_process():
        # load the pre-trained Keras model (here we are using a model
        # pre-trained on ImageNet and provided by Keras, but you can
        # substitute in your own networks just as easily)
        print("* Loading model...")
        model = ResNet50(weights="imagenet")
        print("* Model loaded")

        # continually pool for new images to classify
        while True:
                # attempt to grab a batch of images from the database, then
                # initialize the image IDs and batch of images themselves
                queue = db.lrange(settings.IMAGE_QUEUE, 0,
                        settings.BATCH_SIZE - 1)
                imageIDs = []
                batch = None

                # loop over the queue
                for q in queue:
                        # deserialize the object and obtain the input image
                        q = json.loads(q.decode("utf-8"))
                        image = helpers.base64_decode_image(q["image"],
                                settings.IMAGE_DTYPE,
                                (1, settings.IMAGE_HEIGHT, settings.IMAGE_WIDTH,
                                        settings.IMAGE_CHANS))

                        # check to see if the batch list is None
                        if batch is None:
                                batch = image

                        # otherwise, stack the data
                        else:
                                batch = np.vstack([batch, image])

                        # update the list of image IDs
                        imageIDs.append(q["id"])

                # check to see if we need to process the batch
                if len(imageIDs) > 0:
                        # classify the batch
                        print("* Batch size: {}".format(batch.shape))
                        preds = model.predict(batch)
                        results = imagenet_utils.decode_predictions(preds)

                        # loop over the image IDs and their corresponding set of
                        # results from our model
                        for (imageID, resultSet) in zip(imageIDs, results):
                                # initialize the list of output predictions
                                output = []

                                # loop over the results and add them to the list of
                                # output predictions
                                for (imagenetID, label, prob) in resultSet:
                                        r = {"label": label, "probability": float(prob)}
                                        output.append(r)

                                # store the output predictions in the database, using
                                # the image ID as the key so we can fetch the results
                                db.set(imageID, json.dumps(output))

                        # remove the set of images from our queue
                        db.ltrim(settings.IMAGE_QUEUE, len(imageIDs), -1)

                # sleep for a small amount
                time.sleep(settings.SERVER_SLEEP)

# if this is the main thread of execution start the model server
# process
if __name__ == "__main__":
        classify_process()
The
run_model_server.pyfile houses our
classify_processfunction. This function loads our model and then runs predictions on a batch of images. This process is ideally excuted on a GPU, but a CPU can also be used.
In this example, for sake of simplicity, we’ll be using ResNet50 pre-trained on the ImageNet dataset. You can modify
classify_processto utilize your own deep learning models.
The WSGI configuration
# add our app to the system path
import sys
sys.path.insert(0, "/var/www/html/keras-complete-rest-api")

# import the application and away we go...
from run_web_server import app as application
Our next file,
keras_rest_api_app.wsgi, is a new component to our deep learning REST API compared to last week.
This WSGI configuration file adds our server directory to the system path and imports the web app to kick off all the action. We point to this file in our Apache server settings file,
/etc/apache2/sites-available/000-default.conf, later in this blog post.
The stress test
# USAGE
# python stress_test.py

# import the necessary packages
from threading import Thread
import requests
import time

# initialize the Keras REST API endpoint URL along with the input
# image path
KERAS_REST_API_URL = "http://localhost/predict"
IMAGE_PATH = "jemma.png"

# initialize the number of requests for the stress test along with
# the sleep amount between requests
NUM_REQUESTS = 500
SLEEP_COUNT = 0.05

def call_predict_endpoint(n):
        # load the input image and construct the payload for the request
        image = open(IMAGE_PATH, "rb").read()
        payload = {"image": image}

        # submit the request
        r = requests.post(KERAS_REST_API_URL, files=payload).json()

        # ensure the request was sucessful
        if r["success"]:
                print("[INFO] thread {} OK".format(n))

        # otherwise, the request failed
        else:
                print("[INFO] thread {} FAILED".format(n))

# loop over the number of threads
for i in range(0, NUM_REQUESTS):
        # start a new thread to call the API
        t = Thread(target=call_predict_endpoint, args=(i,))
        t.daemon = True
        t.start()
        time.sleep(SLEEP_COUNT)

# insert a long sleep so we can wait until the server is finished
# processing the images
time.sleep(300)
Our
stress_test.pyscript will help us to test the server and determine its limitations. I always recommend stress testing your deep learning REST API server so that you know if (and more importantly, when) you need to add additional GPUs, CPUs, or RAM. This script kicks off
NUM_REQUESTSthreads and POSTs to the
/predictendpoint. It’s up to our Flask web app from there.
Configuring our deep learning production environment
This section will discuss how to install and configure the necessary prerequisites for our deep learning API server.
We’ll use my PyImageSearch Deep Learning AMI (freely available to you to use) as a base. I chose a p2.xlarge instance with a single GPU for this example.
You can modify the code in this example to leverage multiple GPUs as well by:
- Running multiple model server processes
- Maintaining an image queue for each GPU and corresponding model process
However, keep in mind that your machine will still be limited by I/O. It may be beneficial to instead utilize multiple machines, each with 1-4 GPUs than trying to scale to 8 or 16 GPUs on a single machine.
Compile and installing Redis
Redis, an efficient in-memory database, will act as our queue/message broker.
Obtaining and installing Redis is very easy:
$ wget http://download.redis.io/redis-stable.tar.gz
$ tar xvzf redis-stable.tar.gz
$ cd redis-stable
$ make
$ sudo make install
Create your deep learning Python virtual environment
Let’s create a Python virtual environment for this project. Please see last week’s tutorial for instructions on how to install
virtualenvand
virtualenvwrapperif you are new to Python virtual environments.
When you’re ready, create the virtual environment:
$ mkvirtualenv keras_flask -p python3
From there, let’s install the necessary packages:
$ pip install numpy
$ pip install scipy h5py
$ pip install tensorflow==1.4.1 # tensorflow-gpu==1.4.1 for GPU machines
$ pip install keras
$ pip install flask gevent
$ pip install imutils requests
$ pip install redis
$ pip install Pillow
Note: We use TensorFlow 1.4.1 since we are using CUDA 8. You should use TensorFlow 1.5 if using CUDA 9.
Install the Apache web server
Other web servers can be used such as nginx but since I have more experience with Apache (and therefore more familiar with Apache in general), I’ll be using Apache for this example.
Apache can be installed via:
$ sudo apt-get install apache2
If you’ve created a virtual environment using Python 3 you’ll want to install the Python 3 WSGI + Apache module:
$ sudo apt-get install libapache2-mod-wsgi-py3
$ sudo a2enmod wsgi
Otherwise, Python 2.7 users should install the Pytohn 2.7 WSGI + Apache module:
$ sudo apt-get install libapache2-mod-wsgi
$ sudo a2enmod wsgi
To validate that Apache is installed, open up a browser and enter the IP address of your web server. If you can’t see the server splash screen then be sure to open up Port 80 and Port 5000.
In my case, the IP address of my server is
54.187.46.215(yours will be different). Entering this in a browser I see:
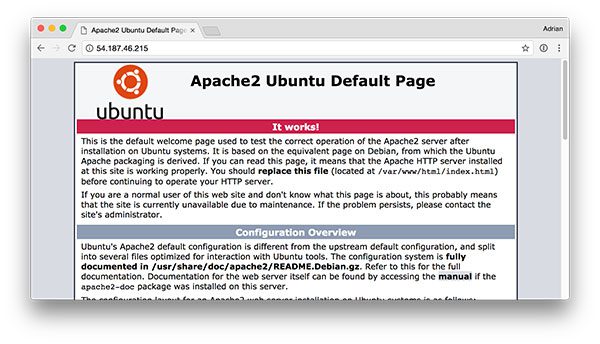
Figure 2: The default Apache splash screen lets us know that Apache is installed and that it can be accessed from an open port 80.
…which is the default Apache homepage.
Sym-link your Flask + deep learning app
By default, Apache serves content from
/var/www/html. I would recommend creating a sym-link from
/var/www/htmlto your Flask web app.
I have uploaded my deep learning + Flask app to my home directory in a directory named
keras-complete-rest-api:
$ ls ~
keras-complete-rest-api
I can sym-link it to
/var/www/htmlvia:
$ cd /var/www/html/
$ sudo ln -s ~/keras-complete-rest-api keras-complete-rest-api
Update your Apache configuration to point to the Flask app
In order to configure Apache to point to our Flask app, we need to edit
/etc/apache2/sites-available/000-default.conf.
Open in your favorite text editor (here I’ll be using
vi):
$ sudo vi /etc/apache2/sites-available/000-default.conf
At the top of the file supply your
WSGIPythonHome(path to Python
bindirectory) and
WSGIPythonPath(path to Python
site-packagesdirectory) configurations:
WSGIPythonHome /home/ubuntu/.virtualenvs/keras_flask/bin
WSGIPythonPath /home/ubuntu/.virtualenvs/keras_flask/lib/python3.5/site-packages

<VirtualHost *:80>
        ...
</VirtualHost>
Since we are using Python virtual environments in this example (I have named my virtual environment
keras_flask), we supply the path to the
binand
site-packagesdirectory for the Python virtual environment.
Then in body of
<VirtualHost>, right after
ServerAdminand
DocumentRoot, add:
<VirtualHost *:80>
        ...

        WSGIDaemonProcess keras_rest_api_app threads=10
        WSGIScriptAlias / /var/www/html/keras-complete-rest-api/keras_rest_api_app.wsgi

        <Directory /var/www/html/keras-complete-rest-api>
                WSGIProcessGroup keras_rest_api_app
                WSGIApplicationGroup %{GLOBAL}
                Order deny,allow
                Allow from all
        </Directory>

        ...
</VirtualHost>
Sym-link CUDA libraries (optional, GPU only)
If you’re using your GPU for deep learning and want to leverage CUDA (and why wouldn’t you), Apache unfortunately has no knowledge of CUDA’s
*.solibraries in
/usr/local/cuda/lib64.
I’m not sure what the “most correct” way instruct to Apache of where these CUDA libraries live, but the “total hack” solution is to sym-link all files from
/usr/local/cuda/lib64to
/usr/lib:
$ cd /usr/lib
$ sudo ln -s /usr/local/cuda/lib64/* ./
If there is a better way to make Apache aware of the CUDA libraries, please let me know in the comments.
Restart the Apache web server
Once you’ve edited your Apache configuration file and optionally sym-linked the CUDA deep learning libraries, be sure to restart your Apache server via:
$ sudo service apache2 restart
Testing your Apache web server + deep learning endpoint
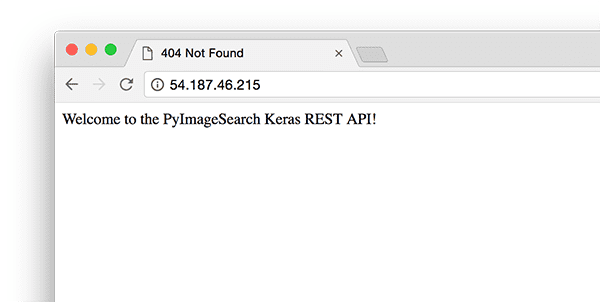
To test that Apache is properly configured to deliver your Flask + deep learning app, refresh your web browser:
You should now see the text “Welcome to the PyImageSearch Keras REST API!” in your browser.
Once you’ve reached this stage your Flask deep learning app should be ready to go.
All that said, if you run into any problems make sure you refer to the next section…
TIP: Monitor your Apache error logs if you run into trouble
I’ve been using Python + web frameworks such as Flask and Django for years and I still make mistakes when getting my environment configured properly.
While I wish there was a bullet proof way to make sure everything works out of the gate, the truth is something is likely going to gum up the works along the way.
The good news is that WSGI logs Python events, including failures, to the server log.
On Ubuntu, the Apache server log is located in
/var/log/apache2/:
$ ls /var/log/apache2
access.log error.log other_vhosts_access.log
When debugging, I often keep a terminal open that runs:
$ tail -f /var/log/apache2/error.log
…so I can see the second an error rolls in.
Use the error log to help you get Flask up and running on your server.
Starting your deep learning model server
Your Apache server should already be running. If not, you can start it via:
$ sudo service apache2 start
You’ll then want to start the Redis store:
$ redis-server
And in a separate terminal launch the Keras model server:
$ python run_model_server.py
* Loading model...
...
* Model loaded
From there try to submit an example image to your deep learning API service:
$ curl -X POST -F image=@jemma.png 'http://localhost/predict'
{
  "predictions": [
    {
      "label": "beagle",
      "probability": 0.9461532831192017
    },
    {
      "label": "bluetick",
      "probability": 0.031958963721990585
    },
    {
      "label": "redbone",
      "probability": 0.0066171870566904545
    },
    {
      "label": "Walker_hound",
      "probability": 0.003387963864952326
    },
    {
      "label": "Greater_Swiss_Mountain_dog",
      "probability": 0.0025766845792531967
    }
  ],
  "success": true
}
If everything is working, you should receive formatted JSON output back from the deep learning API model server with the class predictions + probabilities.
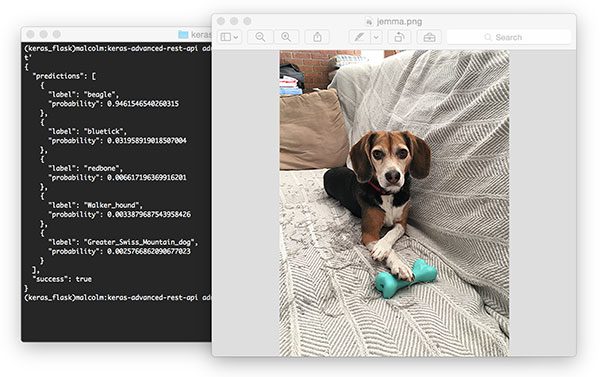
Figure 4: Using cURL to test our Keras REST API server. Pictured is my family beagle, Jemma. She is classified as a beagle with 94.6% confidence by our ResNet model.
Stress testing your deep learning REST API
Of course, this is just an example. Let’s stress test our deep learning REST API.
Open up another terminal and execute the following command:
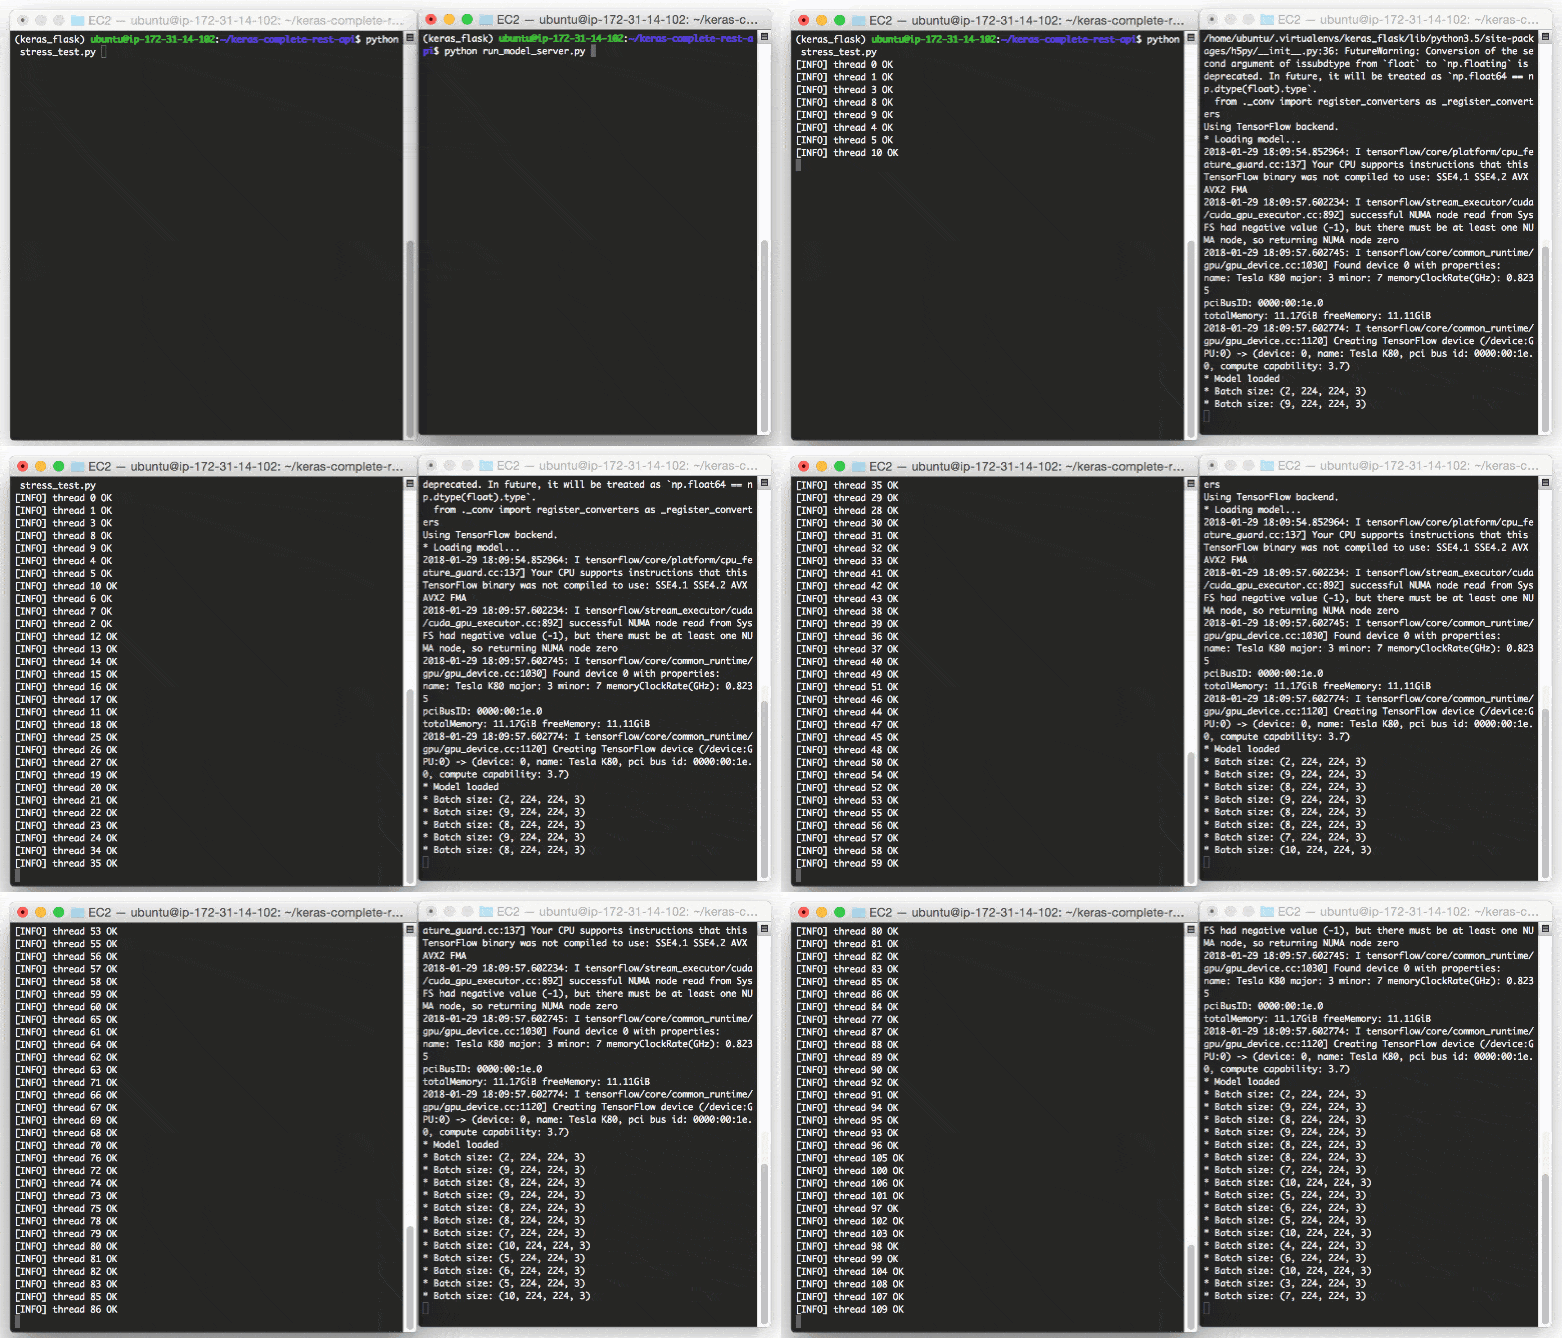
$ python stress_test.py
[INFO] thread 3 OK
[INFO] thread 0 OK
[INFO] thread 1 OK
...
[INFO] thread 497 OK
[INFO] thread 499 OK
[INFO] thread 498 OK
In your
run_model_server.pyoutput you’ll start to see the following lines logged to the terminal:
* Batch size: (4, 224, 224, 3)
* Batch size: (9, 224, 224, 3)
* Batch size: (9, 224, 224, 3)
* Batch size: (8, 224, 224, 3)
...
* Batch size: (2, 224, 224, 3)
* Batch size: (10, 224, 224, 3)
* Batch size: (7, 224, 224, 3)
Even with a new request coming in every 0.05 seconds our batch size never gets larger than ~10-12 images per batch.
Our model server handles the load easily without breaking a sweat and it can easily scale beyond this.
If you do overload the server (perhaps your batch size is too big and you run out of GPU memory with an error message), you should stop the server, and use the Redis CLI to clear the queue:
$ redis-cli
> FLUSHALL
From there you can adjust settings in
settings.pyand
/etc/apache2/sites-available/000-default.conf. Then you may restart the server.
For a full demo, please see the video below:
Recommendations for deploying your own deep learning models to production
One of the best pieces of advice I can give is to keep your data, in particular your Redis server, close to the GPU.
You may be tempted to spin up a giant Redis server with hundreds of gigabytes of RAM to handle multiple image queues and serve multiple GPU machines.
The problem here will be I/O latency and network overhead.
Assuming 224 x 224 x 3 images represented as float32 array, a batch size of 32 images will be ~19MB of data. This implies that for each batch request from a model server, Redis will need to pull out 19MB of data and send it to the server.
On fast switches this isn’t a big deal, but you should consider running both your model server and Redis on the same server to keep your data close to the GPU.
Summary
In today’s blog post we learned how to deploy a deep learning model to production using Keras, Redis, Flask, and Apache.
Most of the tools we used here are interchangeable. You could swap in TensorFlow or PyTorch for Keras. Django could be used instead of Flask. Nginx could be swapped in for Apache.
The only tool I would not recommend swapping out is Redis. Redis is arguably the best solution for in-memory data stores. Unless you have a specific reason to not use Redis, I would suggest utilizing Redis for your queuing operations.
Finally, we stress tested our deep learning REST API.
We submitted a total of 500 requests for image classification to our server with 0.05 second delays in between each — our server was not phased (the batch size for the CNN was never more than ~37% full).
Furthermore, this method is easily scalable to additional servers. If you place these servers behind a load balancer you can easily scale this method further.
I hope you enjoyed today’s blog post!
To be notified when future blog posts are published on PyImageSearch, be sure to enter your email address in the form below!
Downloads:
The post Deep learning in production with Keras, Redis, Flask, and Apache appeared first on PyImageSearch.
from PyImageSearch http://ift.tt/2E2uf1X
via IFTTT
No comments:
Post a Comment