Today I’m going to share a little known secret with you regarding the OpenCV library:
You can perform fast, accurate face detection with OpenCV using a pre-trained deep learning face detector model shipped with the library.
You may already know that OpenCV ships out-of-the-box with pre-trained Haar cascades that can be used for face detection…
…but I’m willing to bet that you don’t know about the “hidden” deep learning-based face detector that has been part of OpenCV since OpenCV 3.3.
In the remainder of today’s blog post I’ll discuss:
- Where this “hidden” deep learning face detector lives in the OpenCV library
- How you can perform face detection in images using OpenCV and deep learning
- How you can perform face detection in video using OpenCV and deep learning
As we’ll see, it’s easily to swap out Haar cascades for their more accurate deep learning face detector counterparts.
To learn more about face detection with OpenCV and deep learning, just keep reading!
Looking for the source code to this post?
Jump right to the downloads section.
Face detection with OpenCV and deep learning
Today’s blog post is broken down into three parts.
In the first part we’ll discuss the origin of the more accurate OpenCV face detectors and where they live inside the OpenCV library.
From there I’ll demonstrate how you can perform face detection in images using OpenCV and deep learning.
I’ll then wrap up the blog post discussing how you can apply face detection to video streams using OpenCV and deep learning as well.
Where do these “better” face detectors live in OpenCV and where did they come from?
Back in August 2017, OpenCV 3.3 was officially released, bringing it with it a highly improved “deep neural networks” (
dnn) module.
This module supports a number of deep learning frameworks, including Caffe, TensorFlow, and Torch/PyTorch.
The primary contributor to the
dnnmodule, Aleksandr Rybnikov, has put a huge amount of work into making this module possible (and we owe him a big round of thanks and applause).
And since the release of OpenCV 3.3, I’ve been sharing a number of deep learning OpenCV tutorials, including:
- Deep Learning with OpenCV
- Object detection with deep learning and OpenCV
- Real-time object detection with deep learning and OpenCV
- Deep learning on the Raspberry Pi with OpenCV
- Raspberry Pi: Deep learning object detection with OpenCV
- Deep learning: How OpenCV’s blobFromImage works
However, what most OpenCV users do not know is that Rybnikov has included a more accurate, deep learning-based face detector included in the official release of OpenCV (although it can be a bit hard to find if you don’t know where to look).
The Caffe-based face detector can be found in the
face_detectorsub-directory of the dnn samples:
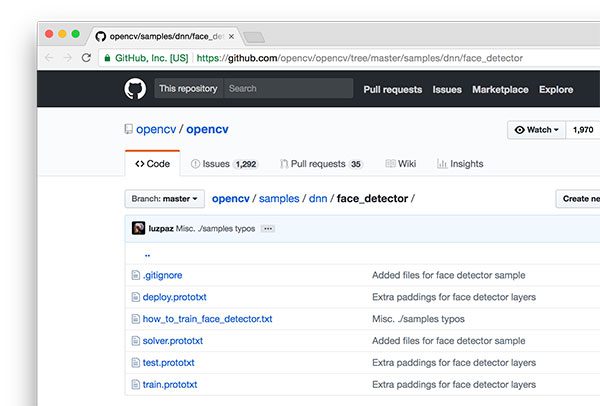
Figure 1: The OpenCV repository on GitHub has an example of deep learning face detection.
When using OpenCV’s deep neural network module with Caffe models, you’ll need two sets of files:
- The .prototxt file(s) which define the model architecture (i.e., the layers themselves)
- The .caffemodel file which contains the weights for the actual layers
Both files are required to when using models trained using Caffe for deep learning.
However, you’ll only find the prototxt files here in the GitHub repo.
The weight files are not included in the OpenCV
samplesdirectory and it requires a bit more digging to find them…
Where can I can I get the more accurate OpenCV face detectors?
For your convenience, I have included both the:
- Caffe prototxt files
- and Caffe model weight files
…inside the “Downloads” section of this blog post.
To skip to the downloads section, just click here.
How does the OpenCV deep learning face detector work?
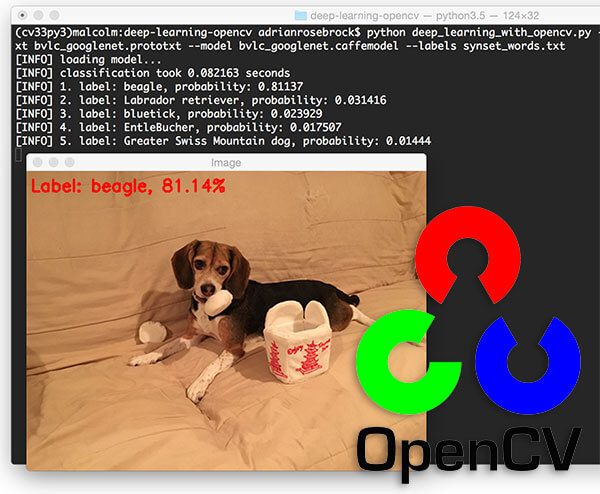
Figure 2: Deep Learning with OpenCV’s DNN module.
OpenCV’s deep learning face detector is based on the Single Shot Detector (SSD) framework with a ResNet base network (unlike other OpenCV SSDs that you may have seen which typically use MobileNet as the base network).
A full review of SSDs and ResNet is outside the scope of this blog post, so if you’re interested in learning more about Single Shot Detectors (including how to train your own custom deep learning object detectors), start with this article here on the PyImageSearch blog and then take a look at my book, Deep Learning for Computer Vision with Python, which includes in-depth discussions and code enabling you to train your own object detectors.
Face detection in images with OpenCV and deep learning
In this first example we’ll learn how to apply face detection with OpenCV to single input images.
In the next section we’ll learn how to modify this code and apply face detection with OpenCV to videos, video streams, and webcams.
Open up a new file, name it
detect_faces.py, and insert the following code:
# import the necessary packages
import numpy as np
import argparse
import cv2

# construct the argument parse and parse the arguments
ap = argparse.ArgumentParser()
ap.add_argument("-i", "--image", required=True,
        help="path to input image")
ap.add_argument("-p", "--prototxt", required=True,
        help="path to Caffe 'deploy' prototxt file")
ap.add_argument("-m", "--model", required=True,
        help="path to Caffe pre-trained model")
ap.add_argument("-c", "--confidence", type=float, default=0.5,
        help="minimum probability to filter weak detections")
args = vars(ap.parse_args())
Here we are importing our required packages (Lines 2-4) and parsing command line arguments (Lines 7-16).
We have three required arguments:
-
--image
: The path to the input image. -
--prototxt
: The path to the Caffe prototxt file. -
--model
: The path to the pretrained Caffe model.
An optional argument,
--confidence, can overwrite the default threshold of 0.5 if you wish.
From there lets load our model and create a blob from our image:
# load our serialized model from disk
print("[INFO] loading model...")
net = cv2.dnn.readNetFromCaffe(args["prototxt"], args["model"])

# load the input image and construct an input blob for the image
# by resizing to a fixed 300x300 pixels and then normalizing it
image = cv2.imread(args["image"])
(h, w) = image.shape[:2]
blob = cv2.dnn.blobFromImage(cv2.resize(image, (300, 300)), 1.0,
        (300, 300), (104.0, 177.0, 123.0))
First, we load our model using our
--prototxtand
--modelfile paths. We store the model as
net(Line 20).
Then we load the
image(Line 24), extract the dimensions (Line 25), and create a
blob(Lines 26 and 27).
The
dnn.blobFromImagetakes care of pre-processing which includes setting the
blobdimensions and normalization. If you’re interested in learning more about the
dnn.blobFromImagefunction, I review in detail in this blog post.
Next, we’ll apply face detection:
# pass the blob through the network and obtain the detections and
# predictions
print("[INFO] computing object detections...")
net.setInput(blob)
detections = net.forward()
To detect faces, we pass the
blobthrough the
neton Lines 32 and 33.
And from there we’ll loop over the
detectionsand draw boxes around the detected faces:
# loop over the detections
for i in range(0, detections.shape[2]):
        # extract the confidence (i.e., probability) associated with the
        # prediction
        confidence = detections[0, 0, i, 2]

        # filter out weak detections by ensuring the `confidence` is
        # greater than the minimum confidence
        if confidence > args["confidence"]:
                # compute the (x, y)-coordinates of the bounding box for the
                # object
                box = detections[0, 0, i, 3:7] * np.array([w, h, w, h])
                (startX, startY, endX, endY) = box.astype("int")

                # draw the bounding box of the face along with the associated
                # probability
                text = "{:.2f}%".format(confidence * 100)
                y = startY - 10 if startY - 10 > 10 else startY + 10
                cv2.rectangle(image, (startX, startY), (endX, endY),
                        (0, 0, 255), 2)
                cv2.putText(image, text, (startX, y),
                        cv2.FONT_HERSHEY_SIMPLEX, 0.45, (0, 0, 255), 2)

# show the output image
cv2.imshow("Output", image)
cv2.waitKey(0)
We begin looping over the detections on Line 36.
From there, we extract the
confidence(Line 39) and compare it to the confidence threshold (Line 43). We perform this check to filter out weak detections.
If the confidence meets the minimum threshold, we proceed to draw a rectangle and along with the probability of the detection on Lines 46-56.
To accomplish this, we first calculate the (x, y)-coordinates of the bounding box (Lines 46 and 47).
We then build our confidence
textstring (Line 51) which contains the probability of the detection.
In case the our
textwould go off-image (such as when the face detection occurs at the very top of an image), we shift it down by 10 pixels (Line 52).
Our face rectangle and confidence
textis drawn on the
imageon Lines 53-56.
From there we loop back for additional detections following the process again. If no
detectionsremain, we’re ready to show our output
imageon the screen (Lines 59 and 60).
Face detection in images with OpenCV results
Let’s try out the OpenCV deep learning face detector.
Make sure you use the “Downloads” section of this blog post to download:
- The source code used in this blog post
- The Caffe prototxt files for deep learning face detection
- The Caffe weight files used for deep learning face detection
- The example images used in this post
From there, open up a terminal and execute the following command:
$ python detect_faces.py --image rooster.jpg --prototxt deploy.prototxt.txt \
        --model res10_300x300_ssd_iter_140000.caffemodel
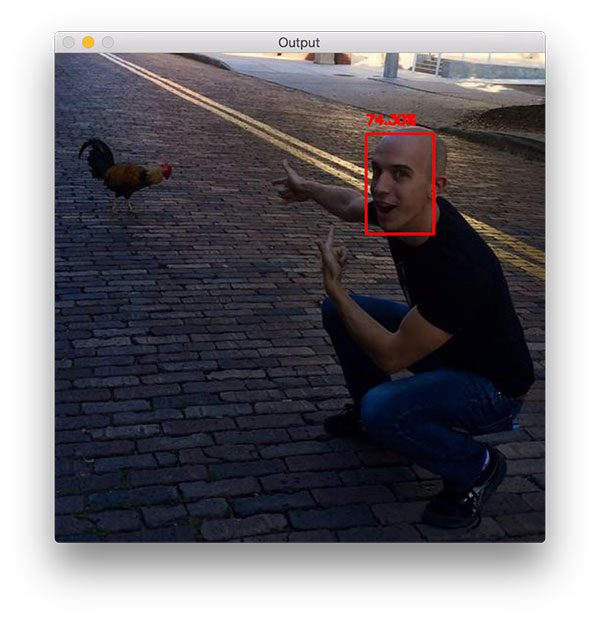
Figure 3: My face is detected in this image with 74% confidence using the OpenCV deep learning face detector.
The above photo is of me during my first trip to Ybor City in Florida, where chickens are allowed to roam free throughout the city. There are even laws protecting the chickens which I thought was very cool. Even though I grew up in rural farmland, I was still totally surprised to see a rooster crossing the road — which of course spawned many “Why did the chicken cross the road?” jokes.
Here you can see my face is detected with 74.30% confidence, even though my face is at an angle. OpenCV’s Haar cascades are notorious for missing faces that are not at a “straight on” angle, but by using OpenCV’s deep learning face detectors, we are able to detect my face.
And now we’ll see how another example works, this time with three faces:
$ python detect_faces.py --image iron_chic.jpg --prototxt deploy.prototxt.txt \
        --model res10_300x300_ssd_iter_140000.caffemodel
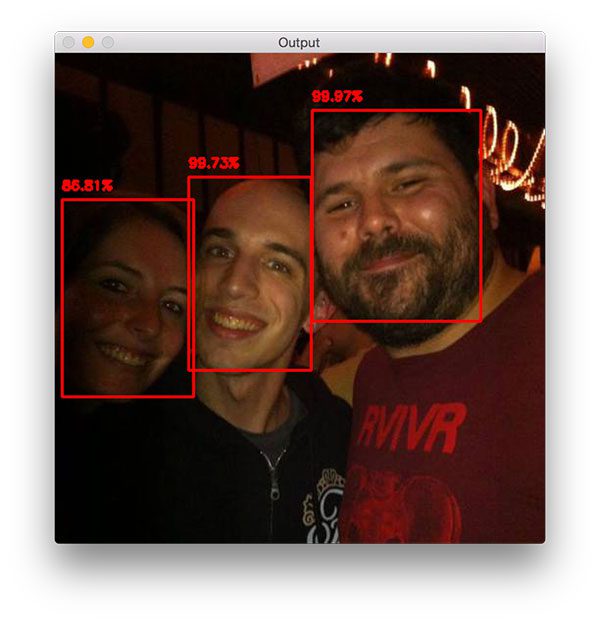
Figure 4: The OpenCV DNN face detector finds all three images without any trouble.
This photo was taken in Gainesville, FL after one of my favorite bands finished up a show at Loosey’s, a popular bar and music venue in the area. Here you can see my fiance (left), me (middle), and Jason (right), a member of the band.
I’m incredibly impressed that OpenCV can detect Trisha’s face, despite the lighting conditions and shadows cast on her face in the dark venue (and with 86.81% probability!)
Again, this just goes to show how much better (in terms of accuracy) the deep learning OpenCV face detectors are over their standard Haar cascade counterparts shipped with the library.
Face detection in video and webcam with OpenCV and deep learning
Now that we have learned how to apply face detection with OpenCV to single images, let’s also apply face detection to videos, video streams, and webcams.
Luckily for us, most of our code in the previous section on face detection with OpenCV in single images can be reused here!
Open up a new file, name it
detect_faces_video.py, and insert the following code:
# import the necessary packages
from imutils.video import VideoStream
import numpy as np
import argparse
import imutils
import time
import cv2

# construct the argument parse and parse the arguments
ap = argparse.ArgumentParser()
ap.add_argument("-p", "--prototxt", required=True,
        help="path to Caffe 'deploy' prototxt file")
ap.add_argument("-m", "--model", required=True,
        help="path to Caffe pre-trained model")
ap.add_argument("-c", "--confidence", type=float, default=0.5,
        help="minimum probability to filter weak detections")
args = vars(ap.parse_args())
Compared to above, we will need to import three additional packages:
VideoStream,
imutils, and
time.
If you don’t have
imutilsin your virtual environment, you can install it via:
$ pip install imutils
Our command line arguments are mostly the same, except we do not have an
--imagepath argument this time. We’ll be using our webcam’s video feed instead.
From there we’ll load our model and initialize the video stream:
# load our serialized model from disk
print("[INFO] loading model...")
net = cv2.dnn.readNetFromCaffe(args["prototxt"], args["model"])

# initialize the video stream and allow the camera sensor to warm up
print("[INFO] starting video stream...")
vs = VideoStream(src=0).start()
time.sleep(2.0)
Loading the model is the same as above.
We initialize a
VideoStreamobject specifying camera with index zero as the source (in general this would be your laptop’s built in camera or your desktop’s first camera detected).
A few quick notes here:
- Raspberry Pi + picamera users can replace Line 25 with
vs = VideoStream(usePiCamera=True).start()
if you wish to use the Raspberry Pi camera module. - If you to parse a video file (rather than a video stream) swap out the
VideoStream
class forFileVideoStream
. You can learn more about the FileVideoStream class in this blog post.
We then allow the camera sensor to warm up for 2 seconds (Line 26).
From there we loop over the frames and compute face detections with OpenCV:
# loop over the frames from the video stream
while True:
        # grab the frame from the threaded video stream and resize it
        # to have a maximum width of 400 pixels
        frame = vs.read()
        frame = imutils.resize(frame, width=400)

        # grab the frame dimensions and convert it to a blob
        (h, w) = frame.shape[:2]
        blob = cv2.dnn.blobFromImage(cv2.resize(frame, (300, 300)), 1.0,
                (300, 300), (104.0, 177.0, 123.0))

        # pass the blob through the network and obtain the detections and
        # predictions
        net.setInput(blob)
        detections = net.forward()
This block should look mostly familiar to the static image version in the previous section.
In this block, we’re reading a
framefrom the video stream (Line 32), creating a
blob(Lines 37 and 38), and passing the
blobthrough the deep neural
netto obtain face detections (Lines 42 and 43).
We can now loop over the detections, compare to the confidence threshold, and draw face boxes + confidence values on the screen:
# loop over the detections
        for i in range(0, detections.shape[2]):
                # extract the confidence (i.e., probability) associated with the
                # prediction
                confidence = detections[0, 0, i, 2]

                # filter out weak detections by ensuring the `confidence` is
                # greater than the minimum confidence
                if confidence < args["confidence"]:
                        continue

                # compute the (x, y)-coordinates of the bounding box for the
                # object
                box = detections[0, 0, i, 3:7] * np.array([w, h, w, h])
                (startX, startY, endX, endY) = box.astype("int")

                # draw the bounding box of the face along with the associated
                # probability
                text = "{:.2f}%".format(confidence * 100)
                y = startY - 10 if startY - 10 > 10 else startY + 10
                cv2.rectangle(frame, (startX, startY), (endX, endY),
                        (0, 0, 255), 2)
                cv2.putText(frame, text, (startX, y),
                        cv2.FONT_HERSHEY_SIMPLEX, 0.45, (0, 0, 255), 2)
For a detailed review of this code block, please review the previous section where we perform face detection to still, static images. The code here is nearly identical.
Now that our OpenCV face detections have been drawn, let’s display the frame on the screen and wait for a keypress:
# show the output frame
        cv2.imshow("Frame", frame)
        key = cv2.waitKey(1) & 0xFF

        # if the `q` key was pressed, break from the loop
        if key == ord("q"):
                break

# do a bit of cleanup
cv2.destroyAllWindows()
vs.stop()
We display the
frameon the screen until the “q” key is pressed at which point we
breakout of the loop and perform cleanup.
Face detection in video and webcam with OpenCV results
To try out the OpenCV deep learning face detector make sure you use the “Downloads” section of this blog post to grab:
- The source code used in this blog post
- The Caffe prototxt files for deep learning face detection
- The Caffe weight files used for deep learning face detection
Once you have downloaded the files, running the deep learning OpenCV face detector with a webcam feed is easy with this simple command:
$ python detect_faces_video.py --prototxt deploy.prototxt.txt \
        --model res10_300x300_ssd_iter_140000.caffemodel
Figure 5: Face detection in video with OpenCV’s DNN module.
You can see a full video demonstration, including my commentary, in the following video:
Summary
In today’s blog post you discovered a little known secret about the OpenCV library — OpenCV ships out-of-the-box with a more accurate face detector (as compared to OpenCV’s Haar cascades).
The more accurate OpenCV face detector is deep learning based, and in particular, utilizes the Single Shot Detector (SSD) framework with ResNet as the base network.
Thanks to the hard work of Aleksandr Rybnikov and the other contributors to OpenCV’s
dnnmodule, we can enjoy these more accurate OpenCV face detectors in our own applications.
The deep learning face detectors can be hard to find in the OpenCV library, so
for your convenience, I have put gathered the Caffe prototxt and weight files for you — just use the “Downloads” form below to download the (more accurate) deep learning-based OpenCV face detector.
See you next week with another great computer vision + deep learning tutorial!
Downloads:
The post Face detection with OpenCV and deep learning appeared first on PyImageSearch.
from PyImageSearch http://ift.tt/2CnHc9G
via IFTTT
No comments:
Post a Comment