Today we are going to discuss a fundamental developer, engineer, and computer scientist skill — command line arguments.
Specifically, we’ll be discussing:
- What are command line arguments
- Why we use command line arguments
- How to parse command line arguments with Python
Command line arguments are an elementary skill that you must learn how to use, especially if you are trying to apply more advanced computer vision, image processing, or deep learning concepts.
If you are new to command line arguments or do not know how to use them that’s okay! But you still need to take the time to educate yourself on how to use them — this post will help you do exactly that.
By the end of today’s post you will have a strong understanding of command line arguments, how they work, and how to use them.
Looking for the source code to this post?
Jump right to the downloads section.
Python, argparse, and command line arguments
Each day I receive 3-5 emails or comments from PyImageSearch readers who are struggling with command line arguments.
In fact, just an hour before I decided to write this blog post, I received the following email from Arjun:
Hey Adrian, I just downloaded the source code to your deep learning face detection blog post, but when I execute it I get the following error:
$ python detect_faces.py
usage: detect_faces.py [-h] -i IMAGE -p PROTOTXT -m MODEL [-c CONFIDENCE]
detect_faces.py: error: the following arguments are required: -i/–image, -p/–prototxt, -m/–modelHelp!
Arjun is far from alone in struggling with this error.
Many other readers run into similar problems when working with command line arguments — but the honest truth is that nearly all of these errors can be avoided by taking the time to educate yourself on command line arguments.
Inside the rest of today’s post you’ll learn that command line arguments are a lot easier to work with than they seem (even if you have never used them before).
You’ll find that you do not have to modify a single line of code to work with them. And by the end of the post you’ll be able to work with command line arguments like a pro.
Let’s get started.
What are command line arguments?
Command line arguments are flags given to a program/script at runtime. They contain additional information for our program so that it can execute.
Not all programs have command line arguments as not all programs need them. That being said, on this blog we make extensive use of command line arguments in our Python scripts and I’d even go so far to say that 98% of the articles on this blog make use of them.
Why do we use command line arguments?
As stated, command line arguments give additional information to a program at runtime.
This allows us to give our program different input on the fly without changing the code.
You can draw the analogy that a command line argument is similar to a function parameter. If you know how functions are declared and called in various programming languages, then you’ll immediately feel at home when you discover how to use command line arguments.
Given that this is computer vision and image processing blog, a lot of the arguments you’ll see here are image paths or video paths.
In the case of deep learning, for which this blog is also known, you’ll see model paths or epoch counts as command line arguments.
In the remainder of today’s post we will learn about the Python argparse package via two script examples.
I’ll also be showing how PyCharm users can run a script without ever leaving PyCharm if they so choose.
The argparse Python library
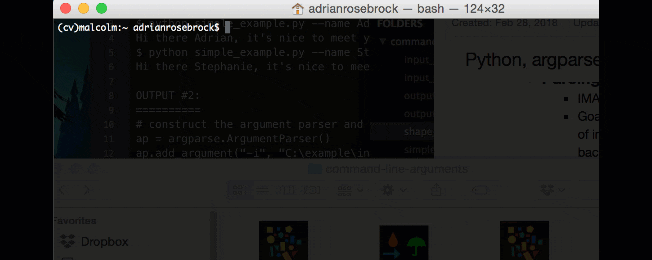
Figure 1: My terminal screen is used to run a Python script with command line arguments.
First, let’s make a new script, naming it
simple_example.py:
# import the necessary packages
import argparse

# construct the argument parse and parse the arguments
ap = argparse.ArgumentParser()
ap.add_argument("-n", "--name", required=True,
        help="name of the user")
args = vars(ap.parse_args())

# display a friendly message to the user
print("Hi there {}, it's nice to meet you!".format(args["name"]))
First, we need the
argparsepackage, so we go ahead and import it on Line 2.
On Line 5 we instantiate the
ArgumentParserobject as
ap.
Then on Lines 6 and 7 we add our only argument,
--name. We must specify both shorthand (
-n) and longhand versions (
--name) where either flag could be used in the command line. This is a required argument as is noted by
required=True.
The
helpstring from Line 7 will give additional information in the terminal if you need it. To view the command usage help you may enter the following in the terminal (output directly below):
$ python simple_example.py --help
usage: simple_example.py [-h] -n NAME

optional arguments:
  -h, --help            show this help message and exit
  -n NAME, --name NAME  name of the user
Notice how I specified all three of:
- The executable (
python
) - Our Python script file (
simple_example.py
) - And an argument (
--help
) in order to print the usage.
Line 8 of the script instructs Python and the
argparselibrary to parse the command line arguments. I also call
varson the object to turn the parsed command line arguments into a Python dictionary where the key to the dictionary is the name of the command line argument and the value is value of the dictionary supplied for the command line argument. To see this in action I would suggest inserting a
print(args)statement into the code.
While optional, I prefer converting the arguments object to a dictionary so I can execute the script via my command line or in a Jupyter Notebook. When using a Jupyter Notebook I can simply delete the command line arguments parsing code and insert a dictionary named
argswith any hardcoded values.
Now you’re probably wondering: How can I access the value from the command line argument argument?
That’s simple, and there’s an example on Line 11 of the script.
In the format string, we specify
args["name"]. As you’ll see shortly, we’ll print our name to the screen dynamically with this command line argument.
Here are the steps we need to take in order to execute our
simple_example.pyscript:
- Step 1: Download the zip accompanying this blog post from the “Downloads” section into a location on your machine of your choosing (I would suggest the Desktop for sake of simplicity).
- Step 2: Open a terminal and change directory to where the zip lives.
- Step 3: Unzip.
- Step 4: Change directory again, this time into the new directory that was just extracted.
- Step 5: Execute the program (with command line arguments) and view the output.
On this blog, I show commands and their arguments in a “shell” codeblock. The
$at the beginning of the prompt is your queue that this is a terminal command and you should enter the command after the
$character along with your preferred arguments similar to or exactly as written.
I’ve taken care of Step 1 by downloading the code to this lesson to my Desktop in my PyImageSearch directory for easy access.
From there, I entered the following commands and generated the accompanying output:
$ cd ~/Desktop/PyImageSearch
$
$ unzip command-line-arguments.zip
...
$
$ cd command-line-arguments
$ pwd
/Users/adrianrosebrock/Desktop
$
$ python simple_example.py --name Adrian
Hi there Adrian, it's nice to meet you!
$
$ python simple_example.py --name Stephanie
Hi there Stephanie, it's nice to meet you!
$
$ python simple_example.py --name YourNameHere
Hi there YourNameHere, it's nice to meet you!
Let’s walk through what I’ve demonstrated in the terminal above while referring to Steps 2-5.
Step 2:
I changed directory to where I downloaded the zip for this lesson (Line 1).
I pressed the enter/return button on Line 2 to make the output easier to read. This is optional.
Step 3:
I unzipped the .zip file associated with this lesson (Line 3).
The
...on Line 4 signifies that there was output from the unzipping process but I am not showing it here. Note that output doesn’t have a preceding
$.
Step 4:
Next I need to change directory into the folder that I just unzipped (Line 6).
Just to be sure I’m where I need to be, I print my working directory on Line 7 with the output being shown on Line 8.
Step 5:
I execute the command with argument on Line 10. I’m specifying my name after the
--nameflag. As long as my name doesn’t have any spaces, it will be displayed properly in the output.
The output is displayed on Line 11. Notice how the script dynamically shows my name exactly as I entered it in the command. Command line arguments are powerful and allow you to test your program with different input without changing a line of code.
Lines 13-17 demonstrate two additional examples that my script with no code changes will print a given name. Try it yourself with your own name…or maybe that of your nemesis.
Note: If I execute Step 5 without command line arguments (or with incorrect ones), I’ll see usage/error information printed as is shown.
$ python simple_example.py
usage: simple_example.py [-h] -n NAME
simple_example.py: error: argument -n/--name is required
This simple example helped us to grasp the concept of command line arguments; however it is not very useful to print a sentence containing our name.
In the next section I’ll provide a more practical example of using command line arguments
Parsing command line arguments with Python
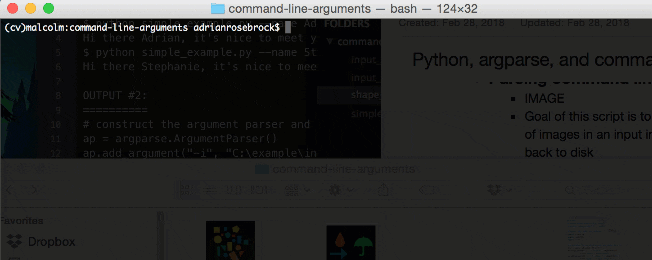
Figure 2: Using the argparse Python package you can easily parse command line arguments in the terminal/command line.
In this next example we’ll be counting shapes in any given input image while annotating an output image that gets written to disk.
We’ll be making use of command line arguments again to specify the input image path and the output image path.
The image processing technicals will be light for this explanation — after all we’re just making this example for the purposes of command line arguments.
So let’s create a new file called
shape_counter.pyand start coding:
Codeblock #1: Lines 1-20# import the necessary packages
import argparse
import imutils
import cv2

# construct the argument parser and parse the arguments
ap = argparse.ArgumentParser()
ap.add_argument("-i", "--input", required=True,
        help="path to input image")
ap.add_argument("-o", "--output", required=True,
        help="path to output image")
args = vars(ap.parse_args())

# load the input image from disk
image = cv2.imread(args["input"])

# convert the image to grayscale, blur it, and threshold it
gray = cv2.cvtColor(image, cv2.COLOR_BGR2GRAY)
blurred = cv2.GaussianBlur(gray, (5,5), 0)
thresh = cv2.threshold(blurred, 60, 255, cv2.THRESH_BINARY)[1]
We import
argparseon Line 2 — this is the package that will help us parse and access our command line arguments.
Then, on Lines 7-12 we parse two command line arguments. The code is very readable on these lines and you can see how to format an argument.
Let’s take the
--inputargument as an example.
On Line 7 we instantiate the
ArgumentParserobject as
ap.
Then on Lines 8 and 9 we add our
--inputargument. We must specify shorthand and longhand versions (
-iand
--input) where either flag could be used in the command line. This is a required argument as is noted by
required=True. The
helpstring will give additional information in the terminal as I demonstrated above.
Similarly, on Lines 10 and 11, we specify our
--outputargument which is also required.
From there we load the image using the path. Remember, the input image path is contained in
args["input"], so that is the parameter to
cv2.imread.
Simple, right?
The rest of the lines are image processing specific, so if you’ve landed on this blog without any OpenCV or image processing skills, you might want to poke around in the archives for further explanations on these concepts.
On Lines 18-20 we complete three operations:
- Convert the
image
to grayscale. - Blur the grayscale image.
- Threshold the
blurred
image.
We’re ready to find and draw shape contours:
# extract contours from the image
cnts = cv2.findContours(thresh.copy(), cv2.RETR_EXTERNAL,
        cv2.CHAIN_APPROX_SIMPLE)
cnts = cnts[0] if imutils.is_cv2() else cnts[1]

# loop over the contours and draw them on the input image
for c in cnts:
        cv2.drawContours(image, [c], -1, (0, 0, 255), 2)

# display the total number of shapes on the image
text = "I found {} total shapes".format(len(cnts))
cv2.putText(image, text, (10, 20), cv2.FONT_HERSHEY_SIMPLEX, 0.5,
                (0, 0, 255), 2)

# write the output image to disk
cv2.imwrite(args["output"], image)
On Lines 23-25 we’re finding shape contours in the
threshimage.
From there, we draw the contours on the input image (Lines 28 and 29).
To learn more about contours, please see Finding Shapes in Images using Python and OpenCV and the contours tag archives. I also discuss contours and other image processing fundamentals in my book, Practical Python and OpenCV + Case Studies.
Then we assemble and put text on the image (Lines 32-34). The text contains the total number of shapes.
Lastly, we make use of our
--outputimage path argument to write the image to disk with
cv2.imwrite(Line 37).
Let’s execute the command with our two arguments:
$ python shape_counter.py --input input_01.png --output output_01.png
If you inspect your working directory, you’ll notice the
output_01.pngimage is now present:

Figure 3: Shapes have been counted with our Python + OpenCV script which takes in command line arguments.
Let’s execute the command again with different arguments:
$ python shape_counter.py --input input_02.png --output output_02.png
Again, you’ll notice a new output file in your directory:
output_02.png.

Figure 4: Three shapes have been detected with OpenCV and Python by simply changing the command line arguments.
Now, take a step back. and consider what we have done from a command line arguments perspective.
What we did here is use one script with no changes and provided it different arguments. The
--inputargument contained the path/filename of the input image and likewise with
--output.
The concept is extremely simple and I hope this has cleared up how to use command line arguments. Before we wrap up this post, let’s take a look at what not to do.
How to not parse command line arguments
Every now and then I see readers who attempt to modify the code itself to accept command line arguments.
A great example of how not to parse command line arguments can be seen by starting with our command line arguments on Lines 6-12 from the previous section:
# construct the argument parser and parse the arguments
ap = argparse.ArgumentParser()
ap.add_argument("-i", "--input", required=True,
        help="path to input image")
ap.add_argument("-o", "--output", required=True,
        help="path to output image")
args = vars(ap.parse_args())
I’ve seen readers mistakenly try to update the argument parsing code to include the actual path to the input image:
# construct the argument parser and parse the arguments
ap = argparse.ArgumentParser()
ap.add_argument("-i", "C:\example\input_image.png", required=True,
        help="path to input image")
ap.add_argument("-o", "C:\example\output_image.png", required=True,
        help="path to output image")
args = vars(ap.parse_args())
Or in a list ditch effort, try to use the
helpparameter to include the file path:
# construct the argument parser and parse the arguments
ap = argparse.ArgumentParser()
ap.add_argument("-i", "--input", required=True,
        help="/home/pi/my_input.png")
ap.add_argument("-o", "--output", required=True,
        help="/home/pi/output_image.png")
args = vars(ap.parse_args())
Keep in mind that the code itself does not need to be updated.
Take a second to open up your terminal, navigate to where your code lives, and then execute the script, making sure to provide the command line arguments.
I want to share another “gotcha” with you. Sometimes on this blog, my command line argument flags have a ‘-‘ (dash) in them such as
--features-db. It’s a little bit confusing and a bit of a nuissance that when grabbing the value contained by the argument, you need to use a ‘_’ (underscore).
This is demonstrated in this excerpt from the PyImageSearch Gurus course Content Based Image Retrieval Module:
# construct the argument parser and parse the arguments
ap = argparse.ArgumentParser()
ap.add_argument("-d", "--dataset", required=True, help="Path to the directory of indexed images")
ap.add_argument("-f", "--features-db", required=True, help="Path to the features database")
ap.add_argument("-c", "--codebook", required=True, help="Path to the codebook")
ap.add_argument("-o", "--output", required=True, help="Path to output directory")
args = vars(ap.parse_args())

# load the codebook and open the features database
vocab = pickle.loads(open(args["codebook"], "rb").read())
featuresDB = h5py.File(args["features_db"], mode="r")
print("[INFO] starting distance computations...")
Notice on the highlighted lines that I’ve defined the argument as
--features-db(with a dash), but I reference it by
args["features_db"](with an underscore). This is because the
argparsePython library replaces dashes with underscores during the parsing.
You can do it!
Command line arguments may take some practice or getting used to if you are new to working in a terminal — but I have faith in you!
Don’t get discouraged.
Take your time.
And keep practicing.
Before you know it, you’ll have mastered command line arguments — take the time now to invest in your education and this valuable skill!
Setting your command line arguments via an IDE
From time to time I receive emails and blog comments asking how to run Python scripts from within their IDE.
About 90% of the time the question is similar to:
Hi Adrian,
Help! I can’t get the code to run.
How can I run the code from your blog post with PyCharm?
PyCharm and other IDEs are great tools that are packed with features. I love PyCharm and I use it daily.
While it’s possible to run a script with command line arguments in an IDE, I do not advise it.
You really need to get comfortable with the command line when you’re doing development. It actually saves time to use the terminal rather than to click around the GUI of your IDE and set up the arguments.
In an effort to serve the community, I’m providing two screencasts that were captured by David Hoffman — you’ll hear my familiar voice as I recorded the voiceover to explain the steps.
Step 1 is to grab the code to this tutorial (or another one on this blog if you are so inclined) via the “Downloads” section.
As you’ll see in the video, David downloaded the code into a folder residing on his desktop. Once you’ve put the download somewhere convenient for you, press play and follow along:
David and I took it a step further to demonstrate that you can select a virtual environment for your PyCharm run configuration.
The second example in this blog post requires that you have OpenCV installed.
Since David was a student of the PyImageSearch Gurus course, he used his
gurusvirtual environment. You can select an environment on your own system that you’ve set up with OpenCV. If you don’t have such an environment, you should follow my OpenCV installation instructions.
To watch the more advanced PyCharm + Run Configuration which uses command line arguments, click play below.
As you can see, both examples are relatively easy. PyCharm provides a convenient way to test code without using your terminal. I’m still partial to using the terminal as I’ve always got it open anyway for the many tasks that PyCharm can’t handle.
Did your virtual environment not show up in PyCharm?
Don’t worry!
You might just need to browse to the
~/.virtualenvsfolder and select your interpreter (all from within the PyCharm Run Configuration screen).
So, what’s next?
I hope this tutorial helped you get up to speed with command line arguments and how to use them. Chances are, if you’re reading this tutorial you may be a bit new to the Python programming language and the OpenCV library.
If so, that’s totally okay!
I was in the same boat as you when I first started working with Python years and years ago. I would spend hours trying new examples, running code, re-coding the entire script, re-running it, and trying to reproduce the results.
As you might imagine, I’m a big fan of learning by example, so a good next step would be to have some fun and read this blog post on detecting cats in images/videos. This tutorial is meant to be very hands-on and demonstrate how you can (quickly) build a Python + OpenCV application to detect the presence of cats in images. It also includes command line arguments so you can practice your skills from this post.
And if you’re really interested in leveling-up your computer vision skills, you should definitely check out my book, Practical Python and OpenCV + Case Studies. My book not only covers the basics of computer vision and image processing, but also teaches you how to solve real-world computer vision problems including face detection in images and video streams, object tracking in video, and handwriting recognition.

Thousands of PyImageSearch readers have used Practical Python and OpenCV to learn both the fundamentals of the Python programming language and the OpenCV library at the same time. Each and every line of code in the book is thoroughly documented, ensuring you understand exactly what each piece of code is doing.
To learn more about my book, and how it can help you on your path to Python + OpenCV mastery, just click here.
Summary
In today’s blog post you learned how to utilize command line arguments using the Python programming language.
You also learned how to utilize the
argparselibrary for parsing command line arguments.
At this point you should now understand the fundamentals of command line arguments and the role they play in software, programs, and scripts.
As you saw, when used correctly, you do not have to modify any code to work with command line arguments — just open up a terminal, navigate to your Python script, and execute it!
Additionally, if you are new to the Python programming language and want to level up your Python coding skills, I have put together a list of my favorite resources to learn Python as a guest post on the SimpleProgrammer blog — be sure to give it a look.
If you enjoyed today’s blog post be sure enter your email address in the form below to be notified when future blog posts are published!
Downloads:
The post Python, argparse, and command line arguments appeared first on PyImageSearch.
from PyImageSearch http://ift.tt/2Hty6Xw
via IFTTT
No comments:
Post a Comment